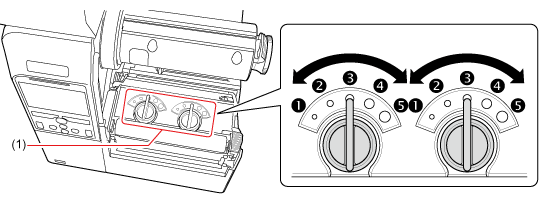
TOP > Adjusting the Product > Adjusting the Head Pressure Balance > Head Pressure Setting Head Pressure Setting Set the head pressure according to the media thickness, including the liner. 1. Open the top cover of the product. 2. Find the adjustment dials (1) on the top of the print head assembly. 3. Turn the adjustment dials (1) according to the media thickness and set the head pressure. Media Thickness (mm (inch))0.060 - 0.200 (0.0024" - 0.0079")0.200 - 0.268 (0.0079" - 0.011")Adjustment Dials (Left and Right, CL4NX only) to (Left and Right, CL6NX only) to (Left and Right)ReferenceThin paper/normal label, etc.Thick paper/tag, etc. • The factory default settings of both Left and Right dials are .• For CL6NX dispenser model, the factory default settings of both Left and Right dials are .• The thickness of the media includes the liner.After adjusting the head pressure, perform actual printing and if media feeding starts to shift to the right side when facing the product, adjust the pressure balance referring to the Pressure Balance Setting.Related TopicsPressure Balance Setting Back to top
(Left and Right, CL4NX only)
(Left and Right, CL6NX only)