CT4-LX Operator Manual
SATO

MENU

MENU

  • TOP (Table of Contents)
  • Getting Started
  • Searching from Category
  • Searching by Function Names
  • Searching According to What You Want to Do
  • Troubleshooting
  • Support and Warranty
Close
TOP > Basic Information > Memory of the Product > Connecting the USB Memory Inside the Product
Connecting the USB Memory Inside the Product
You can do automatically back up the product's setting information by connecting a USB memory for the auto-clone function into the USB connector (Type A) inside the product.
Also, user data, such as fonts, external characters, and graphics on the USB, can be registered to the product. (You need to specify this connector by using the card slot for use <CC> command.)
 
•
The size of the USB memory that can be connected inside the product is as follows:
◦
Length: under 68 mm (2.68") (excludes the metal part of the connector)
◦
Width: under 27.6 mm (1.09")
◦
Thickness: under 8.6 mm (0.34")
1.
Press the cover open latch (1) to open the top cover (2).
2.
Pull out the parts (3), on which are engraved.
The parts (3) are indicated by the 
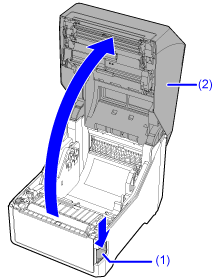
(ribbon cover open) marks on the combined direct thermal/thermal transfer model.
3.
Remove the screw (4) from the underside of the top cover, and then open the USB memory cover (5).
4.
Insert the USB memory into the USB connector (6).
5.
Close the USB memory cover, and secure it with the screw.
6.
Close the cover (7).
7.
Close the top cover.
Push both ends of the top cover, and close it firmly until it clicks.
 
•
When closing the top cover, be careful not to pinch your fingers.
 
•
The icon is shown in the status bar.

Related Topics
Automatically Backing Up the Product's Settings and Data

Back to top

© 2019 SATO Corporation