Setting SOS (SATO Online Services)
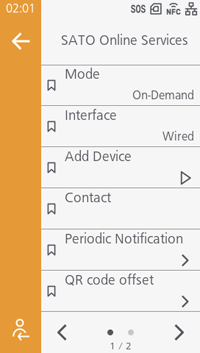
Set the functions for SOS (SATO Online Services).
SOS (SATO Online Services) is a service that monitors printer operational status via the cloud and supports parts replacement and troubleshooting. It is necessary to register an account and register the product to be used. For details, refer to the SOS portal site.

- A specialized application is required to scan QR codes and to read data via NFC.
[Mode]
Select the SOS connection method or disable SOS function.
- [Disabled]
- [On-Demand]
Use one of the following methods to obtain the product information and send it to the SOS Cloud.- Scan the QR code displayed on the product's screen
- NFC connection
- [Real-Time]
Sends the product information to the SOS cloud in real time using the wired LAN or wireless LAN connection. - [Light]
Sends the product information to the SOS cloud in real time using the wired LAN or wireless LAN connection.
- When connecting to SOS via [On-Demand] or [Light], you will be able to check the product's operating information via SOS Web. (Settings cannot be changed from SOS Web.)
- When connecting to SOS via [Real-Time], you will be able to check the product's operating information, as well as to check and change the settings, via SOS Web.
- The following settings appear if you select an option other than [Disabled].
Initial value:
-
 [On-Demand]
 -
 [Disabled]
[Interface]
Set the communication method for connecting to the SOS cloud.
- [Wired]
- [Wi-Fi]
- [Cellular]
Initial value:
-
[Cellular]
-
[Wired]
- The initial value differs depending on the interface settings.
[Allow Remote Control]
[MQTT Protocol]
Set the communication protocol of MQTT.
Appears if you select [Real-Time] for [Mode].
-
When using a SIM connection (cellular) for SOS communication, we recommend setting it to [MQTT].
Initial value: [MQTT over WebSocket]
[Add Device]
Shows the serial number and association code that are necessary when adding the product to SOS.
- Regarding the procedure to add a product to SOS, refer to the printer setup manual.
https://www.sato-sos.com/support/#print_preparation_manual
https://www.sato-sos.com/en/support/#print_preparation_manual
[Contact]
SOS contact information that appears when an error occurs is displayed.
Initial value:
0120-951301
[Periodic Notification]
[Periodic Notification] > [Type]
[Periodic Notification] > [Notification Count]
[Periodic Notification] > [Time 1] to [Time 3]
[Periodic Notification] > [Weekday]
[Periodic Notification] > [Day]
[Periodic Notification] > [Time]
[Periodic Notification] > [Counter]
Select the consumable parts to be the basis for notifications.
Appears if you select [Counter] for [Type].
- [Printhead]
- [Cutter]
- [Printhead+Cutter]
- [Cutter] and [Printhead+Cutter] are displayed when using a cutter, rotary cutter, or linerless cutter.
Initial value: [Printhead]
[Periodic Notification] > [Printhead]
[Periodic Notification] > [Cutter]
[QR code offset]
[QR code offset] > [Vertical]
Adjust the vertical position of the QR Code by setting '+' to move the print position in the direction opposite to the feed direction and '-' to move it in the feed direction.
-792 to 792 dots (initial value: 0)
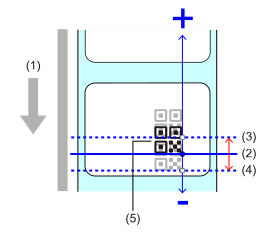
- Media feed direction
- Position before adjustment
- Position after adjustment in the plus direction
- Position after adjustment in the minus direction
- QR Code
[QR code offset] > [Horizontal]
Adjust the horizontal position of the QR Code by using "+" to adjust to the left side and "-" to adjust to the right side while facing the front of the product.
-792 to 792 dots (initial value: 0)
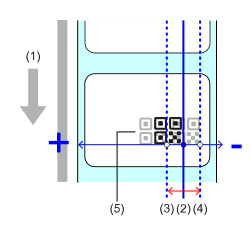
- Media feed direction
- Position before adjustment
- Position after adjustment in the plus direction
- Position after adjustment in the minus direction
- QR Code
[Daily Checkup]
The current product information is displayed by the QR code. Scan the QR code and send it to the SOS cloud.
Appears if you select [On-Demand] for [Mode].
- Instead of scanning a QR code, product information can be retrieved using an NFC connection and sent to the SOS cloud.
- To print a QR code, tap
 .
.
To print a QR code, use media of the following sizes.
- CL4-SXRMore than 41 mm (1.61") in length and more than 33 mm (1.30") in width (not including the liner)
- CL6-SXRMore than 41 mm (1.61") in length and more than 55 mm (2.17") in width (not including the liner)
[Restore SOS Agent]
Restore the SOS agent to the factory default state.
- After a firmware update, the SOS Agent is automatically updated to a version that is compatible with the installed firmware.
[Supply Order] > [Supply Order]
[Supply Order] > [Registered Count]
[Supply Order] > [Current Profile]
[Supply Order] > [Supply Profile] > [Last Updated]
[Supply Order] > [Supply Profile] > [Label Data]
[Supply Order] > [Supply Profile] > [Ribbon Data]
[Supply Order] > [Supply Profile] > [Optimal Print Settings]
[Version]