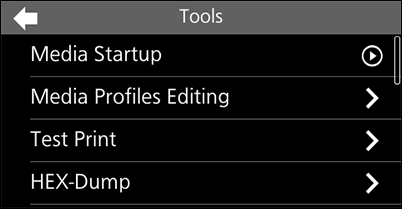
Tap [Media Startup] and do the settings according to the on-screen instructions. In the final screen, tap [Apply] to apply the settings to the product.
•
•
•
•
•
•
•
•
• To cancel the settings, press the (Power/Home) button while you are doing the settings, or tap [Cancel] in the final screen.
•
•
•
•
•
•
•
•To register a new profile, tap the items shown as [Non-registered]. To edit a registered media profile, tap the items that show that profile's name. Do the settings according to the on-screen instructions. Tap [Register] in the final confirmation screen to register the media profile.
• To cancel the settings, press the (Power/Home) button while you are doing the settings, or tap [Cancel] in the final screen.Tap the media profile to delete, and then tap in the confirmation message.
1.
2. Tap to start the test print. Tap to pause the print.
•
•
• The settings in [Pitch], [Offset], and [Darkness Adjust] are linked and are changed with the settings in the [Printing] > [Advanced] > [Adjustments] menu.
1.
2. Tap to start the test print. Tap to pause printing.
◦
◦
◦
◦
◦
◦
•
•
• The settings in [Pitch], [Offset], and [Darkness Adjust] are linked and are changed with the settings in the [Printing] > [Advanced] > [Adjustments] menu.
1.
2. Tap to start the test print. Tap to pause printing.
◦
◦
◦
◦
◦
◦
•
•
• The settings in [Pitch], [Offset], and [Darkness Adjust] are linked and are changed with the settings in the [Printing] > [Advanced] > [Adjustments] menu.
1.
2. Tap to start the test print. Tap to pause printing.
•
•
• The settings in [Pitch], [Offset], and [Darkness Adjust] are linked and are changed with the settings in the [Printing] > [Advanced] > [Adjustments] menu.
1.
2. Tap to start the test print. Tap to pause printing.
•
•
• The settings in [Pitch], [Offset], and [Darkness Adjust] are linked and are changed with the settings in the [Printing] > [Advanced] > [Adjustments] menu.
1.
2. Tap to start the test print. Tap to pause printing.
•
•
• The settings in [Pitch], [Offset], and [Darkness Adjust] are linked and are changed with the settings in the [Printing] > [Advanced] > [Adjustments] menu.If you enable [Hex Dump Mode], the product prints the received data and at the same time creates a file of the received data inside "hexdump/".
•
•
•
◦
◦
3.
•Tap to execute the initialization. When the initialization is complete, the product restarts.
Tap to execute the initialization.Tap to execute the initialization.
2. Tap on the message.
2. Tap on the message.Tap on the on-screen keyboard to confirm.
2. Tap on the message.
3.
1.
3. Tap on the message.
This can only be set when a USB memory, which has been formatted by using the [Format USB drive] menu is installed to the USB connector (Type A) inside the product.
Available only when the optional wireless LAN/Bluetooth kit is installed and the [Wi-Fi] > [Enabled] menu is enabled.
Tap to delete the log data.