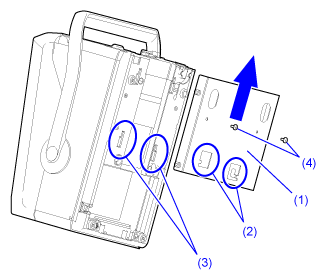
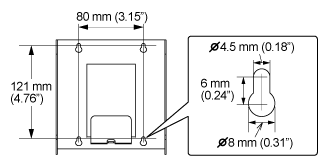
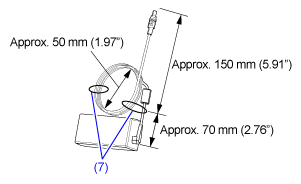
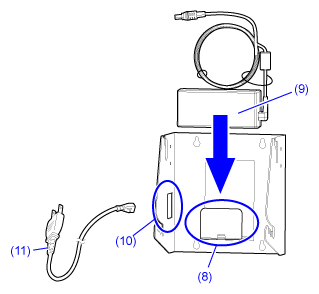
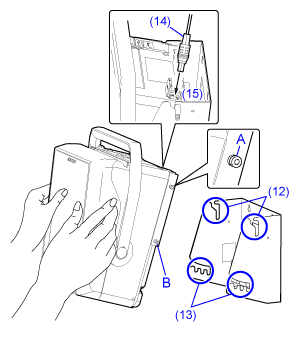
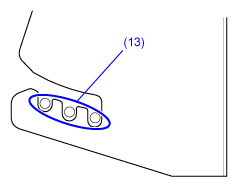
TOP > Getting Started > Installation > Installing the Options > Installing the Optional Wall Mount Kit > Installing the Wall Mount Kit Installing the Wall Mount Kit • Do not connect or disconnect the power cord while your hands are wet. Doing so could cause an electric shock. • Carefully handle the wall mount kit so that you may be not injured by its sharp edges. • When mounting the product on the wall mount kit, be cautious so that your fingers are not caught in between. • When mounting the product on the mount kit, hold the product with both hands. Otherwise, you may be injured by the product fallen. 1. Attach the joint plate to the product. a. Turn over the product on a clean level surface. b. Insert the hooks (2) on the joint plate (1) into the hook slots (3) on the product. c. Slide the joint plate in the direction of the arrow shown in the illustration. d. Secure the joint plate with the supplied screws (4). 2. Attach the mount bracket to the wall. a. Secure the four bracket mounting holes (6) of the mount bracket (5) to the wall by using the screws you prepared. b. Make sure that the mount bracket is completely fixed and fastened to the wall. • Dimensions of the bracket mounting holes are as follows: 3. Attach the AC adapter to the mount bracket. a. Wind the AC adapter cable in a circle with a diameter of about 50 mm (1.97"). b. Adjust the remaining length of the AC adapter cable to about 150 mm (5.91"). c. Bind the cable at two points (7) with cable straps. d. Place the AC adapter (9) on the adapter holder (8). e. Insert the AC cable (11) from the opening (10) and connect the AC cable to the AC adapter. • Use the wire saddle for the AC adapter cable as necessary. 4. Load the media in the product. 5. Install the product to the mount bracket. a. Put protrusions A on both sides of the joint plate into the guides (12) on the mount bracket. b. Put protrusions B on both sides of the joint plate into the angle adjustment points (13) on the mount bracket. c. Insert the AC adapter cable (14) into the DC input connector (15) of the product. 6. Adjust the angle of the product. a. Set protrusions B on both sides of the joint plate into the angle adjustment points (13) on the mount bracket. b. Power on the product. c. Move protrusions B and adjust the angle to the position for the easiest view. Related Topics Loading Media Powering On the Product Back to top