Setting and Adjusting the Media Sensor
Change the Media Sensor Being Used
[Printing] > [Sensor Type]
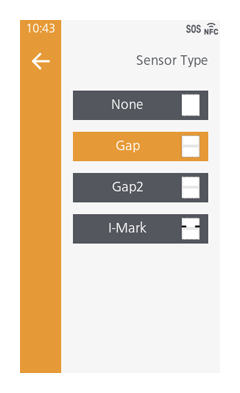
Set the sensor to be used to detect media.
The media sensors that can be used vary depending on the model in use, the print mode, and the Micro Label Print function settings.
- [None]
Media sensor is not used. - [Gap]
Select this to use media with gaps between labels. - [Gap2]
Select this to use media with gaps between labels. This can improve the precision of the print position when using smaller media sizes. - [I-Mark]
Select this when using media with a black mark (I-mark) on the reverse side.
Initial value:
- When the print mode is [Continuous], [Tear-Off], [Dispenser], [Cutter], [Cut & Print]: [Gap]
- When the print mode is [Linerless Cutter]: [None]

- When using the GAP2 sensors, sensor adjustment is required for each label or ribbon used. For more information on sensor adjustments, see Calibration of Media Sensor. (We recommend performing sensor adjustment again after replacing the ribbon to ensure optimal adjustment values.) Also, if you are using multiple types of media, we recommend registering settings as media profiles for each media. For more information on media profiles, see Setting Media Profiles.
- Using the GAP2 sensors with a ribbon having low transparency may result in incorrect detection of gaps between labels.
- If error No. 1028 ([Gap Not Found]) appears, adjust the sensor again.
Calibration of Media Sensor
If problems with media detection occur, adjust the media sensor level to improve detection accuracy.
Adjusting the Media Sensor Automatically

- Auto calibration of the media sensor is not possible when using a linerless cutter.
- Load the media.
Peel off the label from the media and pass the liner under the media sensor guide.

- Position the liner so that the I-mark (1) does not touch the media sensor position (2).
- Position the liner so that the I-mark (1) does not touch the label top sensor (3).
- Push the head assembly downward until it "clicks" into place.

- When pushing the head assembly downward, be careful not to pinch your fingers.
- From the settings screen, tap [Printing] > [Advanced] > [Sensor Adjustments] > [Auto Calibration].
- Select a sensor to be adjusted.
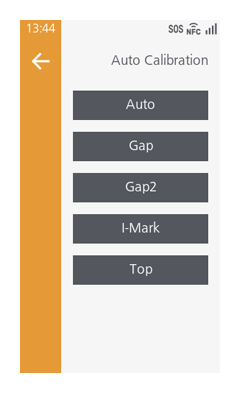
- Selecting [Top] adjusts the label top sensor.
- If [Auto] is selected, sensors other than [Top] are adjusted. Adjusting the label top sensor is not included.
- The selections displayed vary depending on the options being used.
- When the confirmation screen appears, tap
 .
.
Sensor adjustments start.
- When sensor adjustments are complete, tap .

- If message indicating adjustment failed, load the media correctly and try again.
- Press the
 button to go to the Offline screen.
 - Press the
 button to confirm that the media is fed correctly.
When adjusting [Top], press the button to switch to Online mode, then confirm that the media is correctly adjusted to the print start position by the Label Waste Prevention function.
- For more information on the Label Waste Prevention function, see Setting the Label Waste Prevention Function.
- If the media is not fed correctly after executing [Auto Calibration], contact your SATO reseller or technical support.
Adjusting the Media Sensor Manually
The media sensor sensitivity and slice level can be manually adjusted in [Printing] > [Advanced] > [Sensor Adjustments] under the following items.
- [GAP Levels]
- [GAP Slice Level]
- [GAP2 Levels]
- [GAP2 Slice Level]
- [I-Mark Levels]
- [I-Mark Slice Level]
- Normally, no adjustment is necessary.
- The selections displayed vary depending on the sensors being used.
Adjusting the Sensitivity
First, calculate the "Low" level values of the media sensors to be adjusted.
- Pass the media under the media sensor guide and load it.
To adjust [GAP Levels] or [GAP2 Levels], peel off the label from the media and pass just the liner under the media sensor guide.
When adjusting [I-Mark Levels], load the media without peeling off the labels.
- Load the media so that the I-mark (1) does not touch the media sensor position (2).
- Push the head assembly downward until it "clicks" into place.
- When pushing the head assembly downward, be careful not to pinch your fingers.
- From the settings screen, tap [Printing] > [Advanced] > [Sensor Adjustments].
- Tap the sensor to adjust ([GAP Levels]/[GAP2 Levels]/[I-Mark Levels]).
- Change the value of [Emit] until the value of "Sensor" is less than 0.5 (V).
Set the value for [Emit] as low as possible.
Initial value:- [GAP Levels]: 124
- [GAP2 Levels]: 83
- [I-Mark Levels]: 50
- If changing the [Emit] value does not reduce the "Sensor" value below 0.5, change the [Receive] value.
Initial value:- [GAP Levels]: 116
- [GAP2 Levels]: 101
- [I-Mark Levels]: 60
- Make a note of the values of the "Sensor".
These are the "Low" level values.
Next, calculate the "High" level values of the media sensors to be adjusted.
- Press the head lock lever backward, open the head assembly, and then load the media again.
Leave the labels on.
- For [GAP Levels]/[GAP2 Levels], load the media so that the I-mark (1) does not touch the media sensor position (2).
- For [I-Mark Levels], load the media so that the I-mark (1) overlaps the media sensor position (2), allowing the media sensor to detect it.
- Push the head assembly downward until it "clicks" into place.
- When pushing the head assembly downward, be careful not to pinch your fingers.
- Confirm the values of the "Sensor".
If the value is 1.0 (V) or more higher than the "Low" level value that was noted in step 7, this is the "High" level value.
If the difference between the "High" level and "Low" level is less than 1.0, repeat the procedure from step 1 to adjust the [Emit] and [Receive] values until the difference exceeds 1.0. - If the "Sensor" value is within the reference range, tap
 to confirm the value.
- The reference values for the "High" level and "Low" level are as follows.
- Low < 0.5 (V)
- High - Low ≥ 1.0 (V)
- The reference values for the "High" level and "Low" level are as follows.
Adjusting the Slice Level
- From the settings screen, tap [Printing] > [Advanced] > [Sensor Adjustments].
- Tap the slice level to adjust ([GAP Slice Level]/[GAP2 Slice Level]/[I-Mark Slice Level]).
- Calculate the slice level value using the following formula and set it to [Slice Level].
GAP Slice Level, GAP2 Slice Level = (High level - Low level) x 0.3 + Low level
I-Mark Slice Level = (High level - Low level) x 0.7 + Low level
Initial value: 0.0 - Tap to confirm the value.
- When [Slice Level] is set to 0.0 (V), the slice level is automatically set by the product.
Setting the Sensor that Detects the End of the Media
[Printing] > [Advanced] > [Paper End] > [Sensor Type]
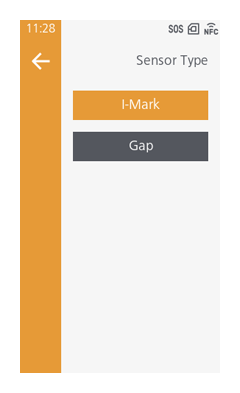
- [I-Mark]
Use the I-mark sensor to detect the paper end. - [Gap]
Use the gap sensor to detect the paper end.
Initial value: [I-Mark]