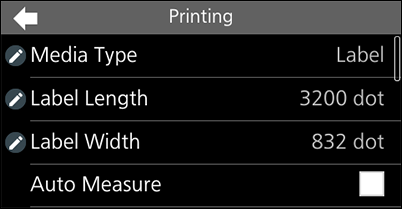
•
•
•
• The changes to this setting are linked and are changed with the settings in the [Tools] > [Media Startup] menu.
•
•
2.
3. Press the (Power/Home) button to show the Home screen.
4. Press the (Power/Home) button to show the Online screen.
•
◦
• If [Protocol] in the [Applications] menu is changed to [SZPL], then [Auto Measure] is enabled and executes automatically.
• When [Advanced] > [Label Waste Prevention] menu is enabled, disable [Auto Measure]. If you enable [Auto Measure], operation of the Label Waste Prevention function is not guaranteed.
• The changes to this setting are linked and are changed with the settings in the [Tools] > [Media Startup] menu.When [Ribbon Near End] is enabled, the warning icon appears when the ribbon is about to run out. Printing does not stop even if the warning icon shows up.Appears only if you have selected [Use Ribbon] in the [Printing Mode] menu on the combined direct thermal/thermal transfer model.
• The changes to this setting are linked and are changed with the settings in the [Tools] > [Media Startup] menu.
• If you have selected [Dispenser] in the [Print Mode] menu, only [Gap] and [I-Mark] will be available.
• If you have selected [Linerless cutter] or [Linerless tearoff] in the [Print Mode] menu, only [None] and [I-Mark] will be available.
• Select something other than [None] to use RFID tags on an RFID model. If you set [None], you cannot use RFID tags.
• The changes to this setting are linked and are changed with the settings in the [Tools] > [Media Startup] menu.When [Auto-mode] is enabled, the print mode changes automatically according to the status of the installed option.
Allows you to print the next data while the previous data is cut at the end position of the printed media. If no print data is received within the period specified for [Eject Cut], the product feeds the media to the cut position and cuts at the end position of the printed media.
• Changing the print mode may link to and change [Sensor Type] and [Backfeed]. After changing the settings, confirm that the settings have become compatible with the media you are using.
Appears only if you have selected [Cut & Print] in the [Print Mode] menu or if you have selected [Partial cutter] and then [Before] in [Backfeed].
• The changes to this setting are linked and are changed with the settings in the [Tools] > [Media Startup] menu.
• To further fine tune the print darkness, set [Printing] > [Advanced] > [Adjustments] > [Darkness Adjust].
•
•
•
◦
◦
6. Tap .
◦
◦
• If the media is not fed correctly after executing [Auto-calibration], contact your SATO reseller or technical support.
4.
5. Change the [Emit] value until the [Sensor] value is below 0.5 (V). Set the [Emit] value as low as possible.
6. If the [Sensor] value does not decrease below 0.5 after you changed the [Emit] value, change the [Receive] value.
7. Take a note of the [Sensor] value from the above procedure. This is the "Low" level value for the Gap sensor.
3.If the difference between the "High" and the "Low" levels is less than 1.0, adjust the [Emit] and [Receive] values so that the difference is more than 1.0, or adjust the "Low" level (voltage) of the Gap sensor again.
4. If both "High" and "Low" levels comply with the standard value, tap to confirm the value.
• The changes to this setting are linked and are changed with the settings in the [Tools] > [Media Startup] menu.
2.
4. Tap to confirm the value.
• The changes to this setting are linked and are changed with the settings in the [Tools] > [Media Startup] menu.
3.
4. Change the [Emit] value until the [Sensor] value is below 0.5 (V). Set the [Emit] value as low as possible.
5. If the [Sensor] value does not decrease below 0.5 after you changed the [Emit] value, change the [Receive] value.
6. Take a note of the [Sensor] value from the above procedure. This is the "Low" level value for the I-mark sensor.
1.
3.If the difference between the "High" and the "Low" levels is less than 1.0, adjust the [Emit] and [Receive] values so that the difference is more than 1.0, or adjust the "Low" level (voltage) of the I-mark sensor again.
4. If both "High" and "Low" levels comply with the standard value, tap to confirm the value.
• The changes to this setting are linked and are changed with the settings in the [Tools] > [Media Startup] menu.
2.
4. Tap to confirm the value.
• The changes to this setting are linked and are changed with the settings in the [Tools] > [Media Startup] menu.
Offset adjusts the backfeed amount and the media stop position for tear-off/cut/dispense operations.
•
• The changes to this setting are linked and are changed with each of the test print settings in the [Tools] > [Test Print] menu.
•
• The changes to this setting are linked and are changed with each of the test print settings in the [Tools] > [Test Print] menu.
•
• This setting is linked to [Initial Display at Start-Up] in the [Standalone] menu. By enabling [Start Online], [Application] is enabled in [Initial Display at Start-Up]. By disabling [Start Online], [Home Screen] is enabled in [Initial Display at Start-Up].However, if [Feed At Power On] is enabled, the product feeds the media when it is powered on and changes to Online mode.Also, if [Auto Measure] is enabled, the product feeds the media when it changes to Online mode for the first time after being powered on.However, if [Auto Measure] is enabled, the product feeds the media when it changes to Online mode for the first time after being powered on.
• To enable this, on the [SETTINGS] menu, use [Tools] > [Media Startup] or [Media Profiles Registration] to batch set the settings related to the Label Waste Prevention function.
• The changes to this setting are linked and are changed with the settings in the [Tools] > [Media Startup] menu.
• Disable [Auto Measure]. If you enable [Auto Measure], operation of the Label Waste Prevention function is not guaranteed.
•
•
•
•
• If you change to labels with a different length, set the label length again in [Registered Label Length] or set it to 0 (Auto). If [Registered Label Length] is different from the actual media length, printing may become misaligned.
• The changes to this setting are linked and are changed with the settings in the [Tools] > [Media Startup] menu.
•If [Reprint] is enabled, you can tap [REPRINT] in the online screen to print the previous data again.
Adjust the media stop position or cut position when the [Sensor Type] is set to [None]. This adjustment also sets the blank amount from the media stop position.
•