TOP > Various Settings of the Product > The [Settings] Menu > [Interface] Menu > [Network] > [Settings]
• After completing the settings, press thebutton (
). While the button to decide whether to save the settings is displayed on the [Wi-Fi] screen, press the
button (
) to apply the values that were input in each setting screen.
• Press thebutton (
) to discard the changes. While the button to decide whether to save the settings is displayed on the [Wi-Fi] screen, press the
button (
) and then press the
button (
) on the message to confirm whether you want to discard the changes.
If you have selected [DHCP] in the [Mode] menu or [Wi-Fi Direct] is set, the gateway address you received from the DHCP server is displayed on the screen.If you have selected [DHCP] in the [Mode] menu or [Wi-Fi Direct] is set, the gateway address you received from the DHCP server is displayed on the screen.If you have selected [DHCP] in the [Mode] menu or [Wi-Fi Direct] is set, the gateway address you received from the DHCP server is displayed on the screen.If you have selected [DHCP] in the [Mode] menu, the screen shows the DNS server address you received from the DHCP server.
If you have selected [Auto] or [DHCP] in the [Mode] menu, the screen shows the IP address you acquired.If you have selected [Auto] or [DHCP] in the [Mode] menu, the screen shows the gateway address you acquired.If you have selected [Auto] or [DHCP] in the [Mode] menu, the screen shows the DNS server address that was acquired.
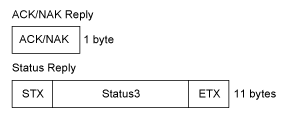
• You can change the return status format of port3 to Compatible mode by enabling [Legacy Status for Port 9100].
• When you have selected [Enabled], be sure to use one port connection for Status3 and Status4. Operation using two port connections for Status4 is not guaranteed.
•
•
•
•
[DHCP Options] can be set only if you have selected [DHCP] in the [IPv4] > [Mode] menu or [IPv6] > [Mode] menu.
•
1.
2. When [Scanning...] appears on the screen, press the WPS button on the access point of the wireless LAN device.
3. When the connection to the access point is established, [Successfully configured.] appears on the screen.
• When the connection to the access point is failed, [Failed to find an Access Point.] appears on the screen.
1.
2. When [Scanning...] appears on the screen, set the PIN code shown on the screen to the access point of the wireless LAN or computer.
3. When the connection to the access point is established, [Successfully configured.] appears on the screen.
• If the connection to the access point is failed, [Failed to find an Access Point.] appears on the screen.The Wi-Fi Direct function is enabled if you have selected [Infrastructure] in the [Mode] menu. If you have changed the setting from [Ad-hoc] to [Infrastructure] in the [Mode] menu, reboot the product before setting the Wi-Fi Direct function.
1. Set the device name for the product using [Device Name]. You can enter 1 to 32 characters. Alphabets (capital and small letters), numbers and symbols can be used.
2. Select [Connect] to search and show the connectable device names or to accept connection requests when the product is the GO (Group Owner).
3.
4.
6.
•
• [Start Group] and [Remove Group] are shown only if Wi-Fi is active and the product is not connected to a Wi-Fi Direct network.
•
•
•Select the name of the Wi-Fi network you want to connect using the/
buttons and press the
button (
) to confirm.
•
•
•
•
•
•
•
•
•Appears only if you have selected items other than [Personal (PSK)] in the [WPA Authentication] menu or if you have selected [Dynamic WEP] in the [Security] menu.
•
•
•
•
•
•
•
• If you have selected [TTLS] in the [EAP Mode] menu, the options are [MSCHAPv2], [MSCHAP], [CHAP], and [PAP].Appears only if you have selected [FAST] in the [EAP Mode] menu and if you have selected [Disabled] in [PAC Auto Provisioning].