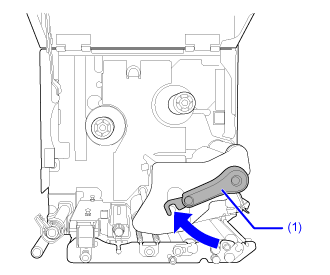
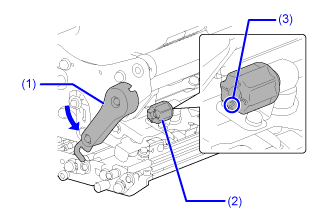
TOP > Adjusting the Product > Adjusting the Head Pressure Balance > Pressure Balance Setting Pressure Balance Setting Required tool• Slotted screwdriverThe adjustment procedure for the pressure balance is as follows: 1. Open the top cover of the product. 2. Turn the head lock lever (1) clockwise to unlock the print head. 3. To expose the adjustment dial (2) beside the head lock lever as shown, turn the head lock lever (1) back until before it locks. The numeral (3) at the bottom (looking parallel with print head) of the adjustment dial indicates the current value set for pressure balance.4. Use the slotted screw driver to turn the adjustment dial (2), and then set the pressure balance according to the media width and media thickness. Media Thickness(mm (inch))0.05 to 0.20 (0.002" to 0.0079")Thin paper/normal label, etc.0.20 to 0.31 (0.0079" to 0.30122")Thick paper/tag, etc.Media Width(mm (inch))S84NX30 to 128(1.18" to 5.04")10 to 30(0.39" to 1.18")30 to 128(1.18" to 5.04")10 to 30(0.39" to 1.18")S86NX80 to 177(3.15" to 6.97")51 to 80(2.01" to 3.15")80 to 177(3.15" to 6.97")51 to 80(2.01" to 3.15")Pressure BalanceAdjustment Dial • The factory default setting is .• The thickness of the media includes the liner.• The dial setting values in the table are only for reference, and the values may vary depending on the media type. Be sure to check if the print quality is stable by actually printing. Back to top