Introductions
SATO Online Services (hereafter referred to as SOS) monitors all printers using the IoT technology, and performs preventive maintenance, “Proactive action” for consumable parts by tracking the operating statuses. Furthermore, in case of a malfunction, SOS identifies the cause immediately to contribute to quick troubleshooting, and drastically reduces the downtime due to printer errors.
About SATO Online Services
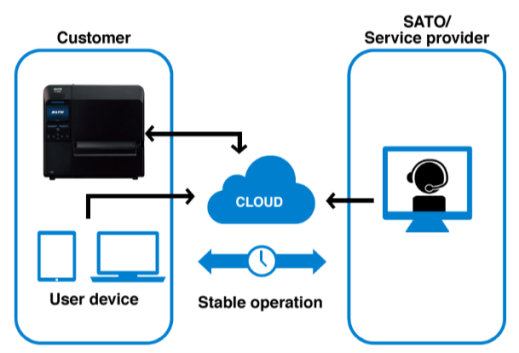
System configurations
Monitors your SATO printers with the system 24 hours a day, 365 days a year.
-
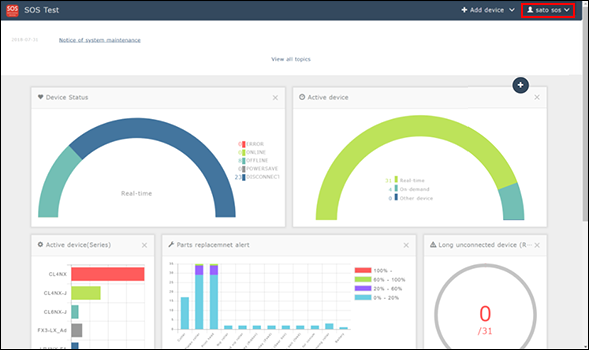
You can check the operating statuses of the printers at all times on the SOS Web screen on your PC or mobile device.
-
The SATO assists stable operation without stopping printers by tracking the operating statuses.
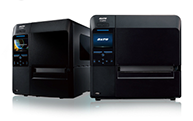
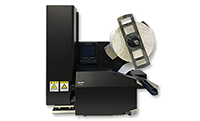
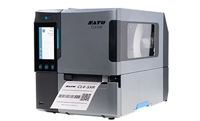
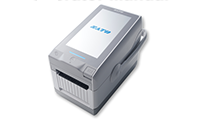
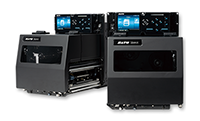
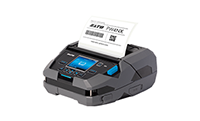
Supported models
CL4NX/CL6NX, CL4-SXR/CL6-SXR, LR4NX-FA, FX3-LX, CT4-LX, S84NX/86NX, and PW4NX
Stable operations with preventive maintenance
The Sato provides timely proactive maintenance guidance—“Proactive Action”—based on the operating status of the printers.
* SOS system monitors the real time connected printer 24 hours a day, 365 days a year (expect for maintenance period)
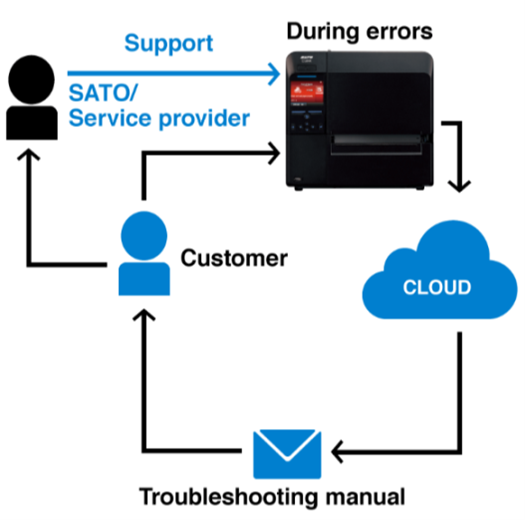
On-site troubleshooting
If a critical error is detected, the Sato will contact the customer directly depending on the printer’s operating status and arrange for repairs.
Critical error: Thermal head, cutter and control board-related errors.
Quickly sends a specific solution suitable for the error status via email on the spot.
-
Notification settings for error statuses can be made. (Optional)
Label end error, various sensor errors, etc. -
Sends error-specific troubleshooting support instructions via email.
-
Promptly grasps the printer status from the cloud for speedy solution.
* If problems cannot be solved on the spot, contact local SATO office.
Long term non-connection alert
If a printer has not connected to the system for a certain period since its last connection, the nearest service center will provide support to help restore the connection and ensure the printer continues to operate in a stable environment.
-
Real time connection: For a printer that has not been connected for 90 days or longer counting from the last connection day.
-
QR/NFC connection: For a printer that has not been connected for 90 days or longer counting from the last connection day.
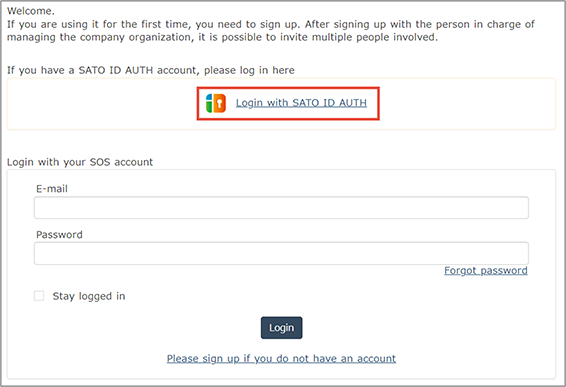
SOS Login
Create an account
SATO ID AUTH
Single sign-on can be realized by associating SATO ID AUTH (Hereafter called ID AUTH) with SOS account. By associating the account, the number of registered Company, User, Device can be centrally managed. Customers can just log in with their ID of SATO ID AUTH and their Google/Microsoft account will also be supported.
|
Notes for account association
|
About SATO ID AUTH account
For initial login, SATO Invitation Email or business partner is required. Please log in from the URL written in the invitation email.
Please see SATO Invitation Email.
Create SATO ID AUTH Account
SATO Invitation Email
-
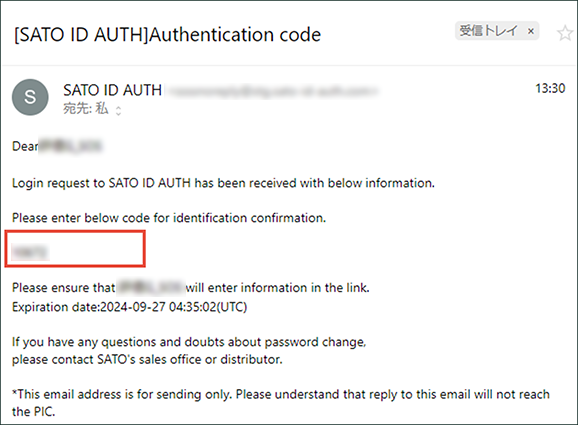
Invitation email will arrive from SATO.
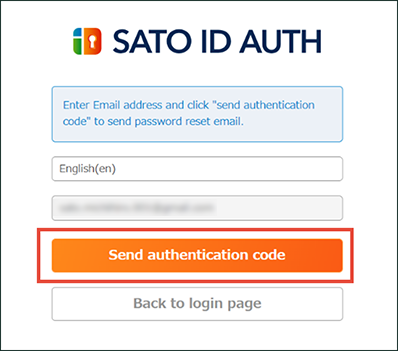
When you click the invitation e-mail, the authentication code transmission screen will appear.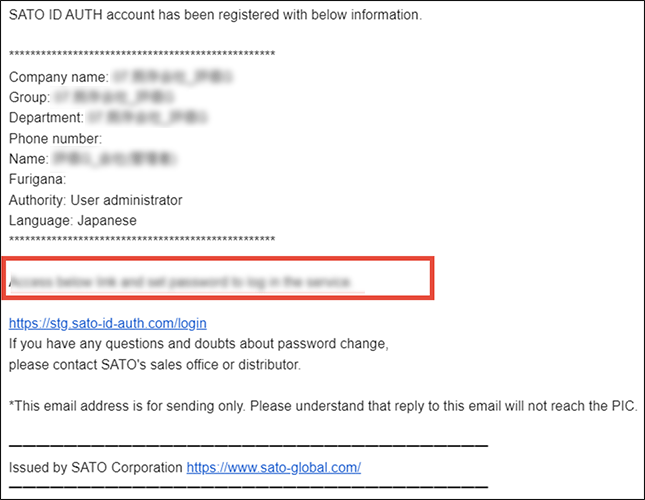
-
Enter email address and click [Send authentication code] button.
-
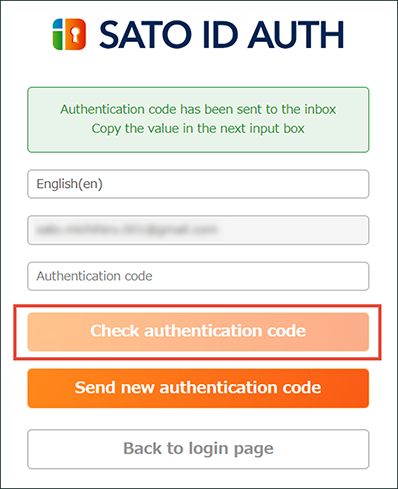
Authentication code received email. Check the code.
-
Enter authentication code and log in with [Check authentication code].
-
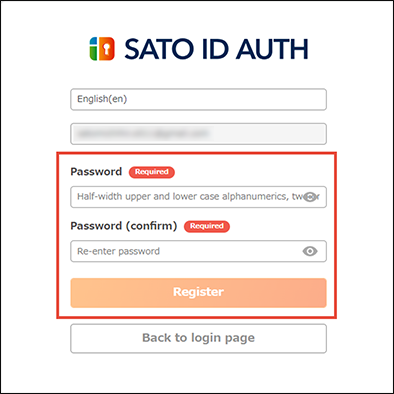
The password setting screen will appear.
-
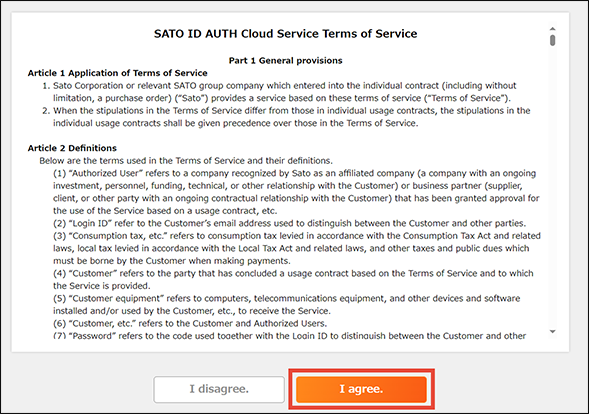
Please check our Terms of Use.
-
Screen shifts to HOME screen.
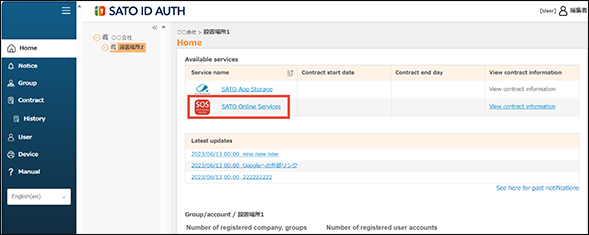
Click [SATO Online Services].
SOS account
Before using SOS, create a representative account to log in to SOS by SATO local office or our contracted business partners.
After an administrative account that represents an individual company or organization is created, the representative account can invite multiple accounts for each printer location or each division.
First, SATO local office or our contracted business partners create the representative account.
Open an account
Invitation email
Once SATO local office or our contracted business partners invite a main administrate to login to the SOS.
Invitation email is sent as follow.
-
Access the URL written on the email and temporary password.
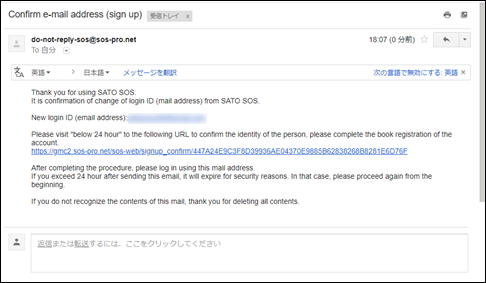
The URL will be invalid in 24 hours for security reasons after the email is received. Access the URL within the time to complete the registration.
Use a combination of alphanumeric with upper and lower case within 8 characters to register a password. However, a symbol cannot be used in the first character of the password. -
Enter the email address and the temporary password.
-
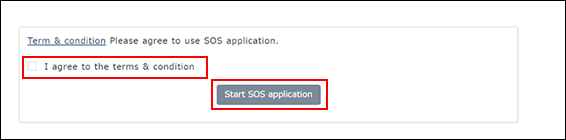
Confirm the terms & condition of the SOS application, and click the checkbox of [I agree to the terms & condition].
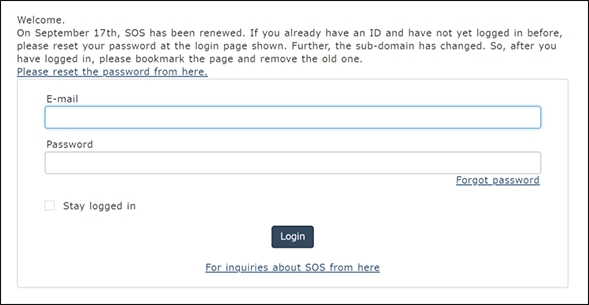
Now, you can log in to SOS using the registered email address and password.
SOS Web App Login
SOS Web App
-
When SOS screen shows, click [Login with SATO ID AUTH]
-
Read Terms of Service and check [Agree with Terms of Service]. Click [Start using SOS application].
-
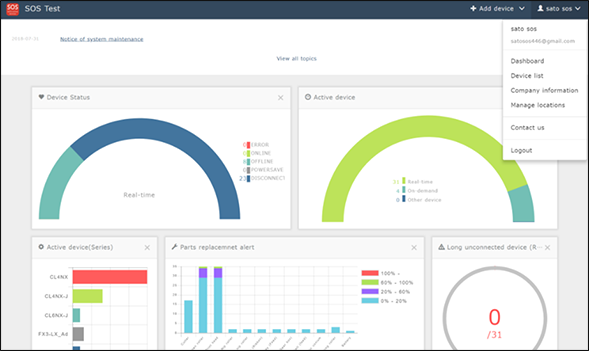
When dashboard opens, the login is complete.
SOS Web App
-
Click [SOS Log in] displayed in the sign-up completion screen.
-
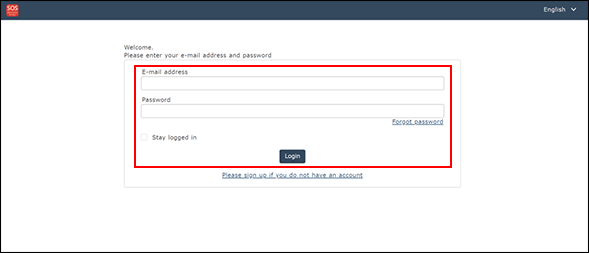
The login screen is displayed. Enter the email address and password.
-
When dashboard opens, the login is complete.
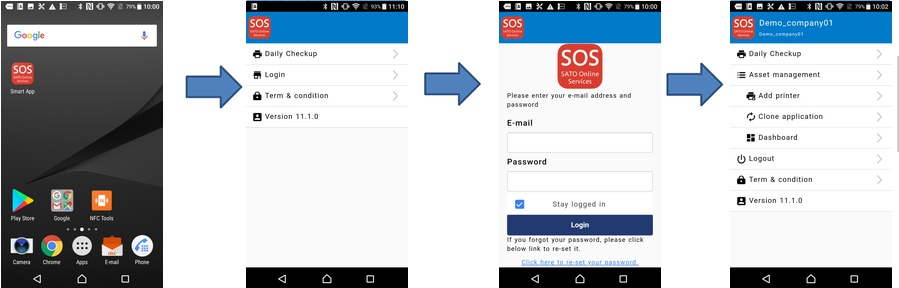
SOS Smart App
-
Start SOS.
-
Select [Login].
-
Enter your account.
-
Logged in.
Logout
Click [Logout] on the common menu on the upper right.
Connect Printers
To use SATO Online Services, you will need to register your printer. To register your printer, change the following settings:
* Settings of the printer's network information
* Settings of the printer's SOS mode
The settings vary depending on the connection method. Please confirm the appropriate setting for your device.
Please refer to the printer setup manual for each printer model.
(https://www.sato-sos.com/en/support/#print_preparation_manual)
For adding printers to SATO Online Services
To connect printers to SATO Online Services, Set the following printer setting it is necessary to change the network settings of your printers
* DNS: required
* Proxy server: required if it connect via proxy server.
* NTP: optional
Precautions for Label Printer Settings
This system can be used when the label printer’s RTC or NTP is enabled.
If the date and time of the label printer are incorrect, a connection error with this system may occur.
And it is also necessary to prepare following information.
* Account (ID, PW)
* Definition of unique printer name and it's location name.
If Multiple locations are existing, we recommend registering location settings beforehand.
* It describes only for SOS setting. Other network settings (IP, Subnet, Gateway and WLAN setting) is referred to printer manual.
Port Diagnostics
Port diagnostic service
To connect to SOS from your intra-network, a port diagnostic tool that easily diagnoses the network environment is provided. Use the tool from the following SOS portal site.
https://www.sato-sos.com/en
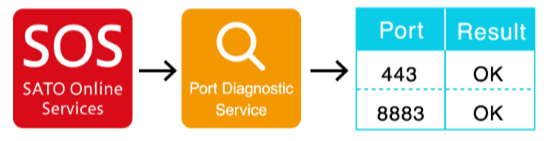
SOS diagnostic tool
A tool to quickly diagnose customer’s network environment. The diagnosis is performed by referring to the network settings selected in the printer. The tool can be used in the printer with the firmware version 1.13.4-r1 and later.
Ensure to check the following before using the tool:
・The printer is connected to the network
・All the network settings to connect SOS are completed.
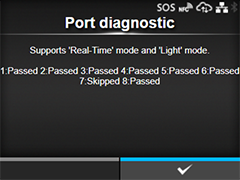
How to use
Select [Port diagnosis] under [Settings] > [Network settings] > [Network] > [Services] > [Online services].
When the confirmation screen appears, press ENTER key.
Diagnosis starts and please hold.
Diagnosis results will be shown when the diagnosis is done. Check the results and press ENTER key.
Diagnosis results
Diagnosis results will be shown as follows:
[Results] (Real-time mode)
|
Passed |
Connection is OK |
|
Failed |
Connection is NG |
|
Connecting |
Connection ongoing |
|
Timeout |
Network timeout |
|
Aborted |
The process is aborted |
|
Skipped |
The process is skipped |
* Even when all results are okay, the ports need to be checked as they may not support TLS1.2.
Diagnostic results description
The diagnosis consists of eight test items and following test items are performed in order.
|
Test number |
Test item |
Connection host |
Connection port |
NG or timeout message |
|
1 |
Communication with gateway |
Default gateway |
- |
No ping response from gateway. Due to physical disconnection such as cable is pulled out, or wrong network settings. |
|
2 |
Host name check |
api.sato-sos.com |
- |
Host name cannot be converted to IP address. Wrong DNS settings. |
|
3 |
Currently unused |
- |
The SOS connection is not affected regardless of whether the port diagnostic result is OK or NG. |
|
|
4 |
Currently unused |
- |
The SOS connection is not affected regardless of whether the port diagnostic result is OK or NG. |
|
|
5 |
Connection with SOS cloud service |
api.sato-sos.com |
443 |
Failed to acquire a file from api.sato-sos.com. The access may be blocked by firewall. Contact IT Dept. and provide host name and port number to enable the use of this function. |
|
6 |
s3-ap-northeast-1.amazonaws.com |
443 |
Failed to acquire a file from s3-ap-northeast-1.amazonaws.com. The access may be blocked by firewall. Contact IT Dept. and provide host name and port number to enable the use of this function. |
|
|
7 |
Socket connection with SOS network |
aih-stsos-pro-001.azure-devices.net |
443 |
The port is not open. The access may be blocked by firewall. Contact IT Dept. and provide host name and port number to enable the use of this function. |
|
8 |
aih-stsos-pro-001.azure-devices.net |
443 + 8883 |
Real-time connection (Network connection)
The Real-time connection (Network connection) enables the printers connected within your intra-network to be safely connected to the SOS cloud. The printers are monitored for safety use by sharing the operating statuses, setting information, error information, etc. of the printers with the SOS cloud.
Operation log is sent every 60min at normal operation mode but error will be shown at real time by instantly sending error log when an error happens.
To connect your printers from the company's intra-network to SOS, establish communication with the following port numbers.
Port number: 443/TCP and Port number: 8883/TCP *Both are for outbound only.
Connection method 1
Use both port numbers 443 and 8883 via firewall.
Connection method 2
Use port number 443 via proxy server and 8883 via firewall.
Please check the table below to see which model you are using. Click the text link in the right column for the model you are using.
|
|
|
|
|
|

|
|
|
|
|
If you cannot find the model you are looking for, please check our website.
https://www.sato.co.jp/products/printer/
Real-time connection (Network connection): CL4NX/CL6NX/LR4NX-FA
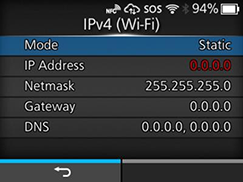
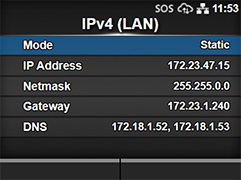
DNS settings
Show setting menu of printer.
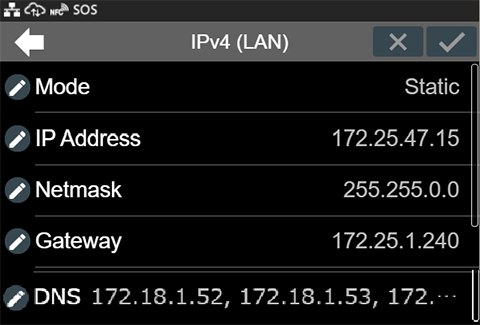
[Settings] > [Interface] > [Network] > [Settings] > [LAN] > [IPv4]
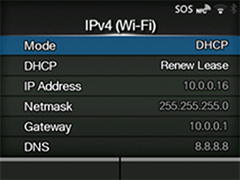
<Example>
|
Mode |
Static |
|
IP Address |
172.25.47.19 |
|
Netmask |
255.255.0.0 |
|
Gateway |
172.25.1.240 |
|
DNS |
172.18.1.52,172.18.1.53,172.30.5.23 * Three DNS address can be set * DNS is not required if DHCP is set. |
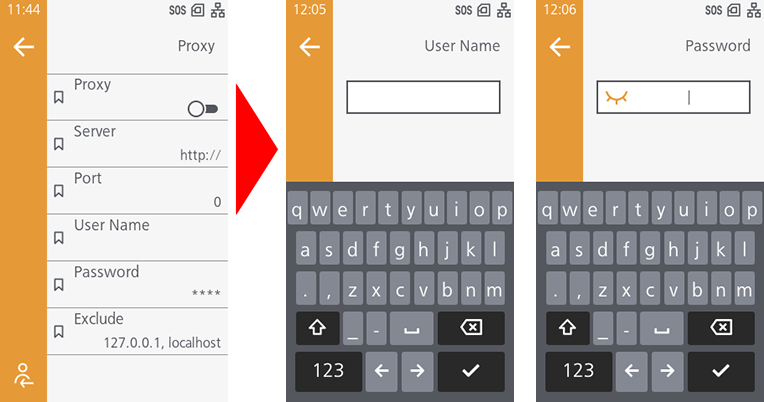
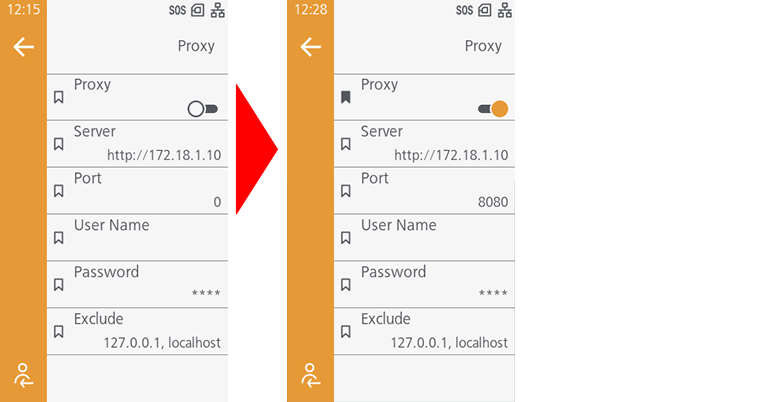
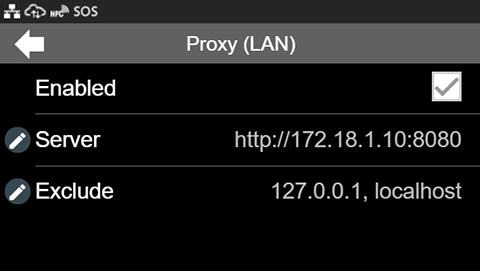
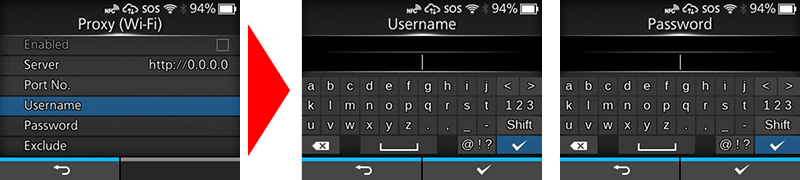
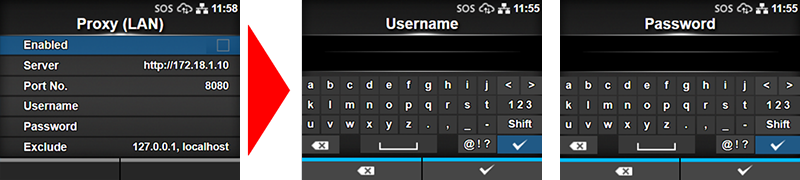
Set Proxy settings (Mandatory if proxy server is used)
-
Show proxy setting screen of product's menu.
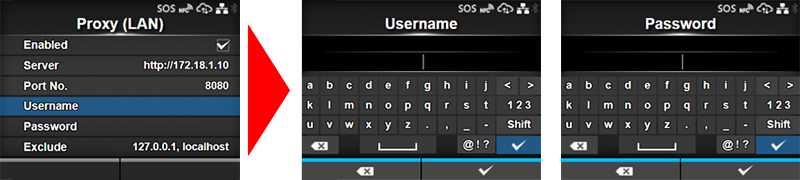
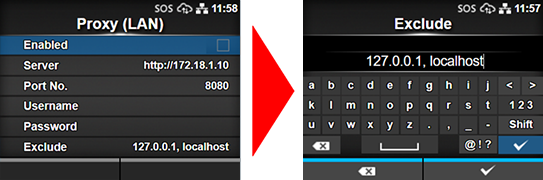
[Settings] > [Interface] > [Network] > [Settings] > [LAN] > [Proxy] -
Set proxy server value (IP address and port number) in the Server.
ex.) http://172.18.1.10:8080 (http://{IP Address}:{Port number})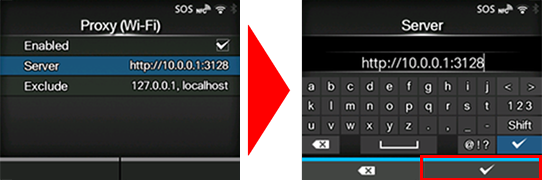
-
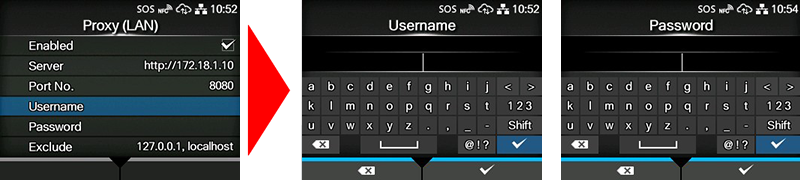
Set the Username and Password respectively. If the username and password are not available in the proxy server, this setting is not required.
-
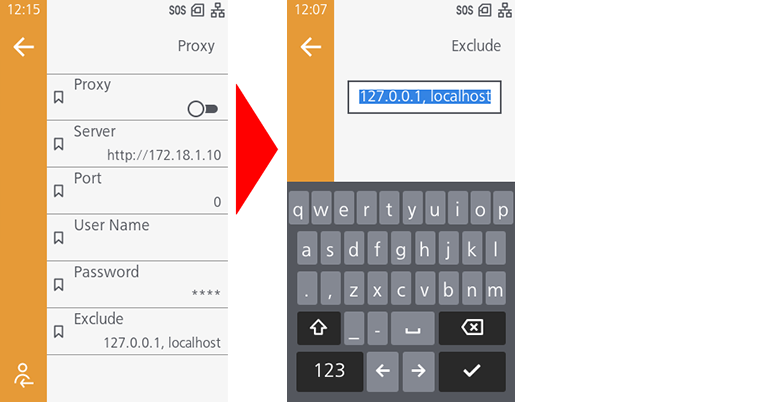
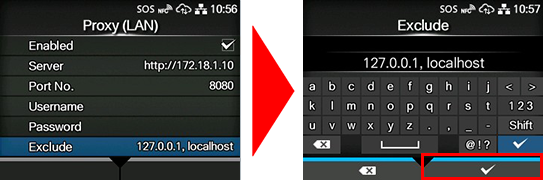
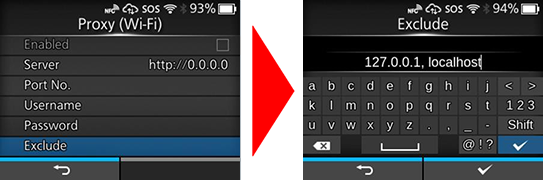
Check exclude setting contains [127.0.0.1, localhost].
[127.0.0.1, localhost] are static value. Leave this setting and no change.* And if there is no value set on this menu, please enter [127.0.0.1, localhost] manually.
-
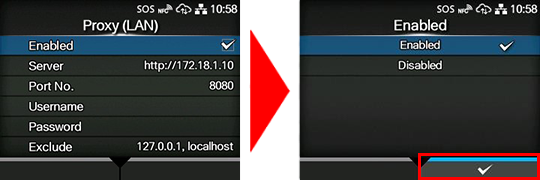
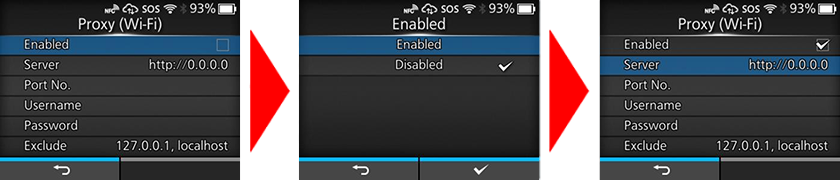
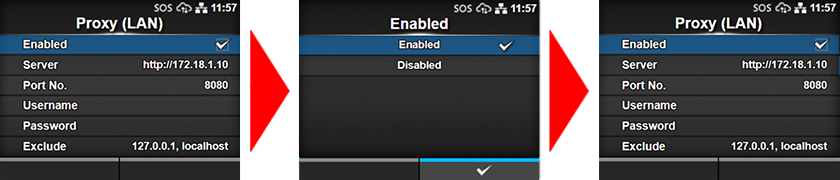
Check the checkbox to enable the valid item.

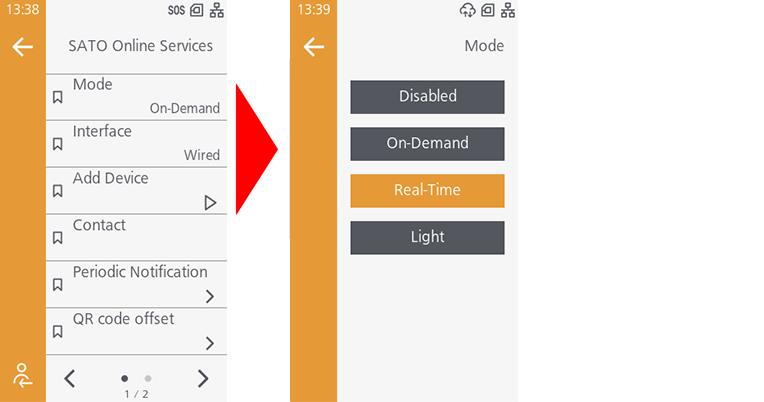
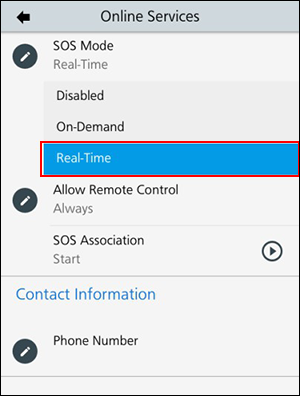
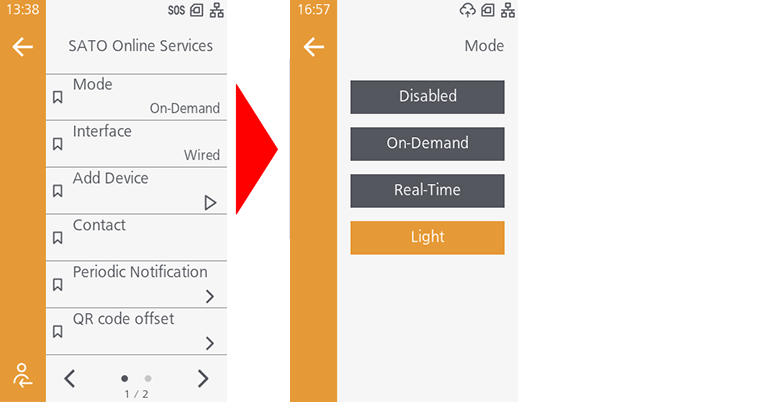
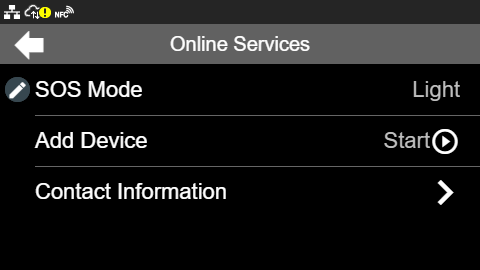
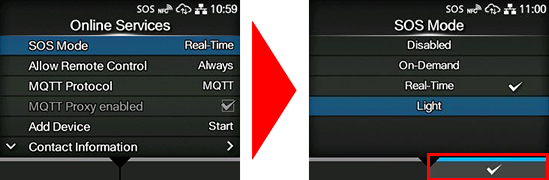
SOS mode settings
-
Show SOS mode settings screen.
[Settings] > [Interface] > [Network] > [Services] > [Online Services] > [SOS Mode] -
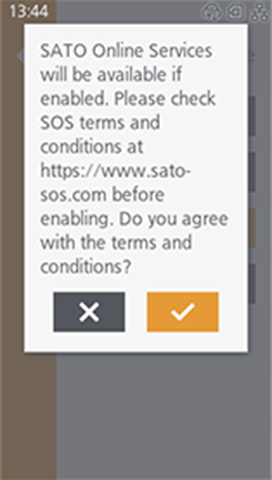
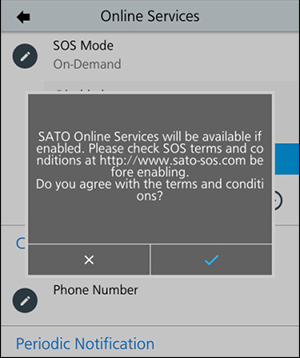
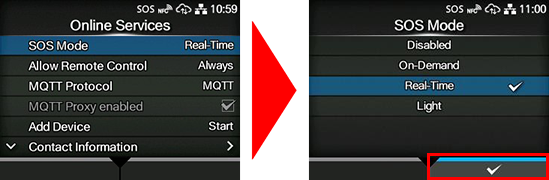
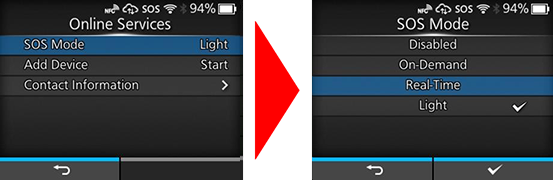
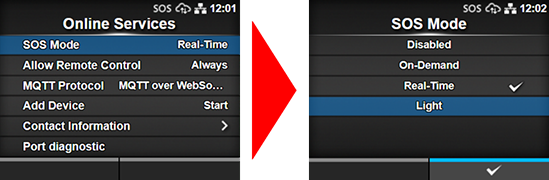
Set SOS Mode to [Real-Time] from [Disabled].
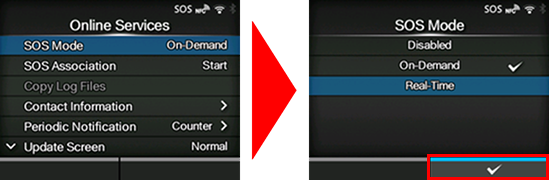
-
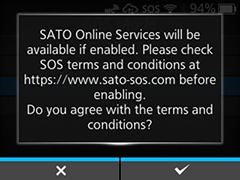
Check the terms of SOS and agree them.
-
Reboot printer.
Reboot printer and make sure that SOS icon and cloud icon are appeared on printer LCD.
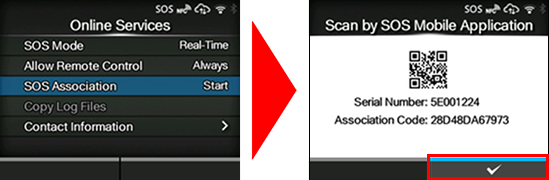
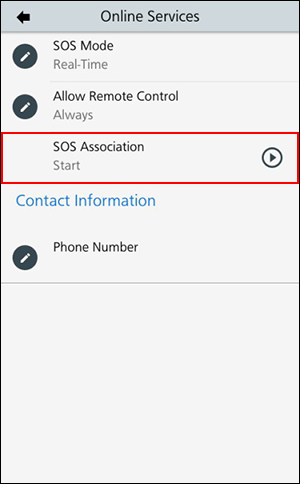
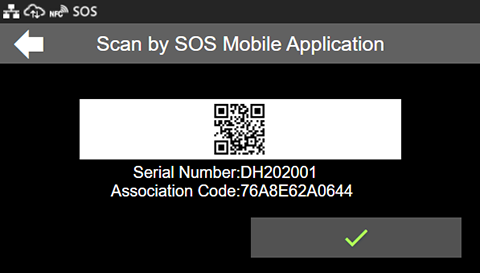
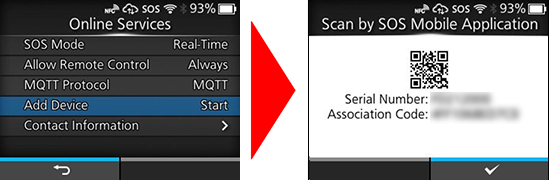
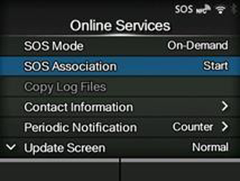
Check Association code
-
Show SOS Association menu.
[Settings] > [Interface] > [Network] > [Services] > [Online Services] -
Press [SOS Association] to [Start].
-
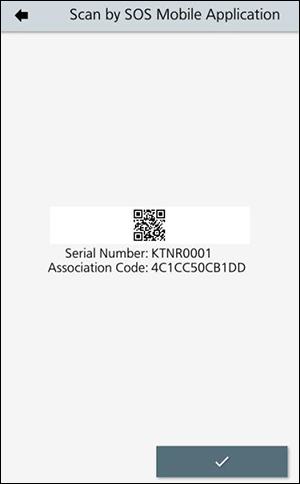
Serial number (8 Chars) and association code (12 Chars) are shown on screen. (Recommend to note it)
* Association code will expire 10 minutes after showing.
Printer Registration
Following two steps can be used. Choose the applicable one depending on registration method.
Register via PC: Register your printer via PC
Register via smartphone: Register your printer via SOS Smart App
Register your printer via PC
To register your printer via PC, you need to register the installation location.
Installation location (Group edit)
-
Select [Device] from Menu, choose Installation location, and click [New entry].

-
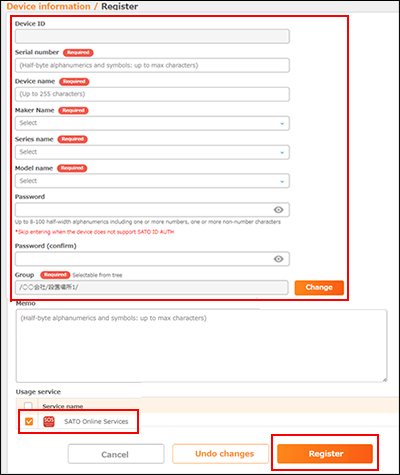
Enter [Required] fields in Device information, and press [Register] button.
-
Device information (serial number, device name, password) shall be entered by User.
Enter information.
-
Enter "SATO" for [Supplier name].
-
Select [Device model name] based on the serial number.
-
Please check if contracted service has been selected for [Service in use].
-
-
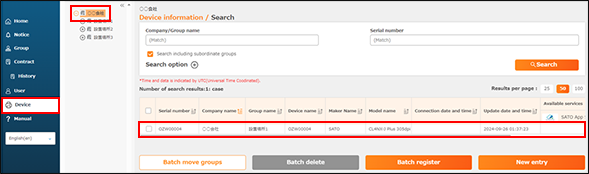
Select [Device] from Menu, choose Group to view registered device.
-
Login to SATO Online Services.

Enter email address and password.
-
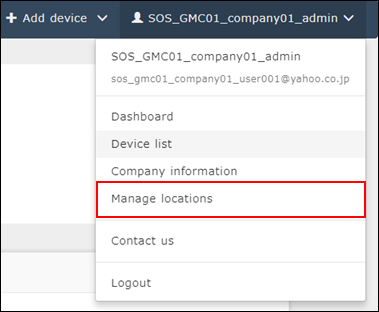
Go to [Manage locations] and click [+] button.
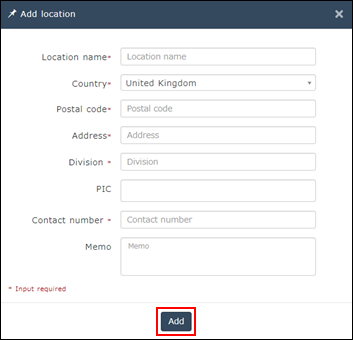
-
Enter necessary information and click [Add] to complete.
-
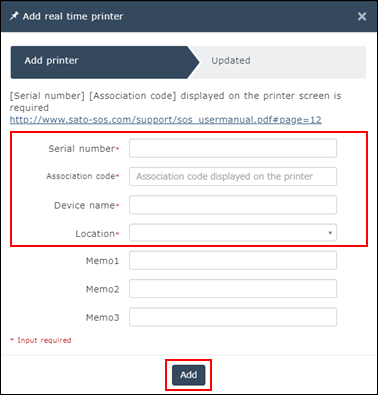
Move to "Real-time" screen.
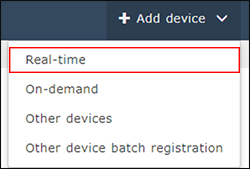
-
Input following information and press [Add].
-
Serial number
-
Association code
-
Device name: Identification name of printer
-
Location: Where printer is installed at
*Other item is optional.
-
Register your printer via SOS Smart App
-
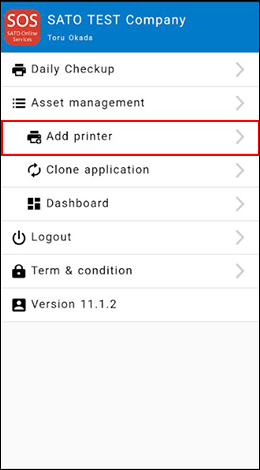
Startup SOS Smart App and log-in. Select [Add printer].
-
Select [Real-time].
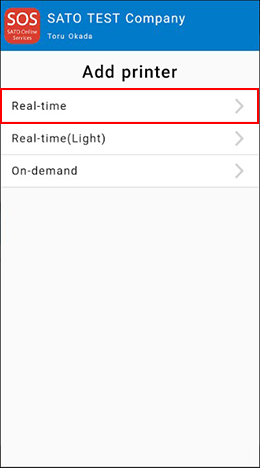
-
Scan QR code which is displayed on the printer.
-
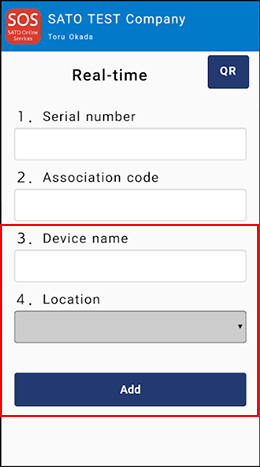
Serial number and Association code will be entered Automatically, enter Device name and choose Location, tap [Add] to complete the registration.
Confirmation on SOS Web App
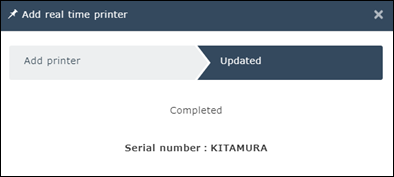
Check the [Device list] of SATO Online Services show operated serial number.

Real-time connection (Network connection): CL4-SXR/CL6-SXR
DNS settings
Show setting menu of printer.
[Settings] > [Interface] > [Network] > [Wired] > [IPv4]
<Example>
|
Mode |
Static |
|
IP Address |
192.168.17.75 |
|
Netmask |
255.255.252.0 |
|
Gateway |
192.168.16.1 |
|
Primary DNS |
192.168.16.1 |
|
Secondary DNS |
192.168.1.1 |
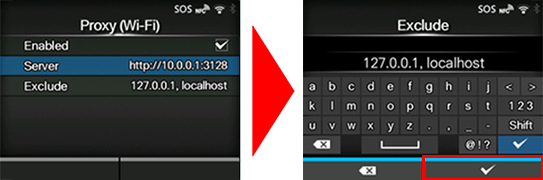
Set Proxy settings (Mandatory if proxy server is used)
-
Show proxy setting screen of product's menu.
[Settings] > [Interface] > [Network] > [Advanced] > [Proxy] -
Set proxy server value (IP address and port number) in the Server.
ex.) http://172.18.1.10:8080 (http://{IP Address}:{Port number})
-
Set the Username and Password respectively. If the username and password are not available in the proxy server, this setting is not required.
-
Check exclude setting contains [127.0.0.1, localhost].
[127.0.0.1, localhost] are static value. Leave this setting and no change.* And if there is no value set on this menu, please enter [127.0.0.1, localhost] manually.
-
Check the checkbox to enable the valid item.
SOS mode settings
-
Show SOS mode settings screen.
[Settings] > [Cloud Services] > [SATO Online Services] > [Mode] -
Set Mode to [Real-Time] from [Disabled].
-
Check the terms of SOS and agree them.
-
Reboot printer.
Reboot printer and make sure that SOS icon and cloud icon are appeared on printer LCD.
Check Association code
-
Show SOS Association menu.
[Settings] > [Cloud Services] > [SATO Online Services] > [Add Device]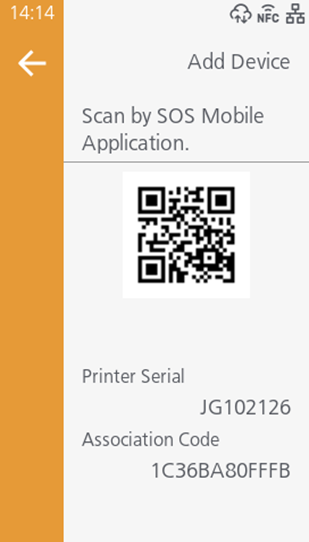
-
Serial number (8 Chars) and association code (12 Chars) are shown on screen. (Recommend to note it)
* Association code will expire 10 minutes after showing.
Printer Registration
Following two steps can be used. Choose the applicable one depending on registration method.
Register via PC: Register your printer via PC
Register via smartphone: Register your printer via SOS Smart App
Register your printer via PC
To register your printer via PC, you need to register the installation location.
Installation location (Group edit)
-
Select [Device] from Menu, choose Installation location, and click [New entry].
-
Enter [Required] fields in Device information, and press [Register] button.
-
Device information (serial number, device name, password) shall be entered by User.
Enter information.
-
Enter "SATO" for [Supplier name].
-
Select [Device model name] based on the serial number.
-
Please check if contracted service has been selected for [Service in use].
-
-
Select [Device] from Menu, choose Group to view registered device.
-
Login to SATO Online Services.
Enter email address and password.
-
Go to [Manage locations] and click [+] button.
-
Enter necessary information and click [Add] to complete.
-
Move to "Real-time" screen.
-
Input following information and press [Add].
-
Serial number
-
Association code
-
Device name: Identification name of printer
-
Location: Where printer is installed at
*Other item is optional.
-
Register your printer via SOS Smart App
-
Startup SOS Smart App and log-in. Select [Add printer].
-
Select [Real-time].
-
Scan QR code which is displayed on the printer.
-
Serial number and Association code will be entered Automatically, enter Device name and choose Location, tap [Add] to complete the registration.
Confirmation on SOS Web App
Check the [Device list] of SATO Online Services show operated serial number.
Real-time connection (Network connection): FX3-LX
DNS settings
[Settings] > [Interface] > [Network] > [Settings] > [LAN] > [IPv4]
<Example>
|
Mode |
Static |
|
IP Address |
172.25.47.19 |
|
Netmask |
255.255.0.0 |
|
Gateway |
172.25.1.240 |
|
DNS |
172.18.1.52,172.18.1.53,172.30.5.23 * Three DNS address can be set * DNS is not required if DHCP is set. |
Set Proxy settings (Mandatory if proxy server is used)
-
Show proxy setting screen of product's menu.
[Settings] > [Interface] > [Network] > [Settings] > [LAN Proxy (LAN)] -
Set proxy server information.
Enable

Server
172.18.1.10:8080
Exclude
127.0.0.1,localhost
* "127.0.0.1,localhost" are static value. You cannot change or delete.
SOS mode settings
-
Show SOS mode settings screen.
[Settings] > [Interface] > [Network] > [Services] > [Online Services] -
Set SOS Mode to [Real-Time] from [Disabled].
And check a terms of SOS and agree it
-
Reboot printer.
Check Association code
-
Show SOS Association menu.
[Settings] > [Interface] > [Network] > [Services] > [Online Services] -
Turn SOS Association to [Start].
-
Serial number (8 Chars) and association code (12 Chars) are shown on screen. (Recommend to note it)
* Association code will expire 10 minutes after showing.
Printer Registration
Following two steps can be used. Choose the applicable one depending on registration method.
Register via PC: Register your printer via PC
Register via smartphone: Register your printer via SOS Smart App
Register your printer via PC
To register your printer via PC, you need to register the installation location.
Installation location (Group edit)
-
Select [Device] from Menu, choose Installation location, and click [New entry].
-
Enter [Required] fields in Device information, and press [Register] button.
-
Device information (serial number, device name, password) shall be entered by User.
Enter information.
-
Enter "SATO" for [Supplier name].
-
Select [Device model name] based on the serial number.
-
Please check if contracted service has been selected for [Service in use].
-
-
Select [Device] from Menu, choose Group to view registered device.
-
Login to SATO Online Services.
Enter email address and password.
-
Go to [Manage locations] and click [+] button.
-
Enter necessary information and click [Add] to complete.
-
Move to "Real-time" screen.
-
Input following information and press [Add].
-
Serial number
-
Association code
-
Device name: Identification name of printer
-
Location: Where printer is installed at
*Other item is optional.
-
Register your printer via SOS Smart App
-
Startup SOS Smart App and log-in. Select [Add printer].
-
Select [Real-time].
-
Scan QR code which is displayed on the printer.
-
Serial number and Association code will be entered Automatically, enter Device name and choose Location, tap [Add] to complete the registration.
Confirmation on SOS Web App
Check the [Device list] of SATO Online Services show operated serial number.
Real-time connection (Network connection): CT4-LX
DNS settings
Show setting menu of printer.
[SETTINGS] > [Interface] > [Network] > [Settings] > [LAN] > [IPv4] (or [IPv6])
<Example>
|
Mode |
Static |
|
IP Address |
172.24.47.15 |
|
Netmask |
255.255.0.0 |
|
Gateway |
172.24.1.240 |
|
DNS |
172.18.1.52,172.18.1.53 |
Set Proxy settings (Mandatory if proxy server is used)
-
Show proxy setting screen of product’s menu.
[SETTINGS] > [Interface] > [Network] > [Settings] > [LAN] > [Proxy] -
Set proxy server value (IP address and port number) in the Server.
<Example> IP address: port No.
Enabled
Tick the box(*1)
Server
http://172.18.1.10:8080
Exclude
127.0.0.1,localhost(*2)
*1 Enable to tick after entered "Server" and "Exclude".
*2 It is mandatory to enter "127.0.0.1,localhost."
SOS mode settings
-
Display SOS menu.
[SETTINGS] > [Interface] > [Network] > [Services] > [Online Services] -
Set SOS Mode as [Real-Time].

Check Association code
-
Select [Add Device].
-
It would be better to take a note "Serial Number" (8 digits) and "Association Code" (12 digits)
* Association code is valid in 10 minutes after display on the printer.
Printer Registration
Following two steps can be used. Choose the applicable one depending on registration method.
Register via PC: Register your printer via PC
Register via smartphone: Register your printer via SOS Smart App
Register your printer via PC
To register your printer via PC, you need to register the installation location.
Installation location (Group edit)
-
Select [Device] from Menu, choose Installation location, and click [New entry].
-
Enter [Required] fields in Device information, and press [Register] button.
-
Device information (serial number, device name, password) shall be entered by User.
Enter information.
-
Enter "SATO" for [Supplier name].
-
Select [Device model name] based on the serial number.
-
Please check if contracted service has been selected for [Service in use].
-
-
Select [Device] from Menu, choose Group to view registered device.
-
Login to SATO Online Services.
Enter email address and password.
-
Go to [Manage locations] and click [+] button.
-
Enter necessary information and click [Add] to complete.
-
Move to "Real-time" screen.
-
Input following information and press [Add].
-
Serial number
-
Association code
-
Device name: Identification name of printer
-
Location: Where printer is installed at
*Other item is optional.
-
Register your printer via SOS Smart App
-
Startup SOS Smart App and log-in. Select [Add printer].
-
Select [Real-time].
-
Scan QR code which is displayed on the printer.
-
Serial number and Association code will be entered Automatically, enter Device name and choose Location, tap [Add] to complete the registration.
Confirmation on SOS Web App
Check the [Device list] of SATO Online Services show operated serial number.
Real-time connection (Network connection): S84NX/S86NX
DNS settings
Show setting menu of printer.
[Settings] > [Interface] > [Network] > [Settings] > [LAN] > [IPv4]

<Example>
|
Mode |
Static |
|
IP Address |
172.25.47.19 |
|
Netmask |
255.255.0.0 |
|
Gateway |
172.25.1.240 |
|
DNS |
172.18.1.52,172.18.1.53,172.30.5.23 * Three DNS address can be set * DNS is not required if DHCP is set. |
Set Proxy settings (Mandatory if proxy server is used)
-
Show proxy setting screen of product's menu.
[Settings] > [Interface] > [Network] > [Settings] > [LAN] (or [Wi-Fi] )> [Proxy] -
Set proxy server value (IP address and port number) in the Server.
ex.) http://172.18.1.10:8080 (http://{IP Address}:{Port number})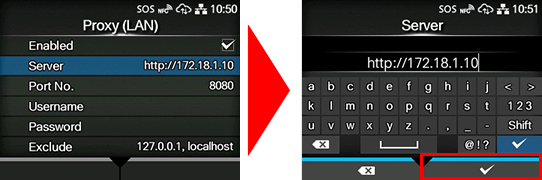
-
Set the Username and Password respectively. If the username and password are not available in the proxy server, this setting is not required.
-
Check exclude setting contains [127.0.0.1, localhost].
[127.0.0.1, localhost] are static value. Leave this setting and no change.* And if there is no value set on this menu, please enter [127.0.0.1, localhost] manually.
-
Check the checkbox to enable the valid item.
SOS mode settings
-
Show SOS mode settings screen.
[Settings] > [Interface] > [Network] > [Services] > [Online Services] > [SOS Mode] -
Set SOS Mode to [Real-Time] from [Disabled].
-
Check the terms of SOS and agree them.
-
Reboot printer.
Reboot printer and make sure that SOS icon and cloud icon are appeared on printer LCD.
Check Association code
-
Show SOS Association menu.
[Settings] > [Interface] > [Network] > [Services] > [Online Services] -
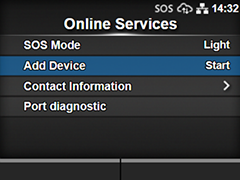
Press [Add Device] to [Start].
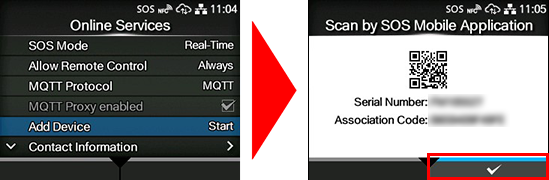
-
Serial number (8 Chars) and association code (12 Chars) are shown on screen. (Recommend to note it)
* Association code will expire 10 minutes after showing.
Printer Registration
Following two steps can be used. Choose the applicable one depending on registration method.
Register via PC: Register your printer via PC
Register via smartphone: Register your printer via SOS Smart App
Register your printer via PC
To register your printer via PC, you need to register the installation location.
Installation location (Group edit)
-
Select [Device] from Menu, choose Installation location, and click [New entry].
-
Enter [Required] fields in Device information, and press [Register] button.
-
Device information (serial number, device name, password) shall be entered by User.
Enter information.
-
Enter "SATO" for [Supplier name].
-
Select [Device model name] based on the serial number.
-
Please check if contracted service has been selected for [Service in use].
-
-
Select [Device] from Menu, choose Group to view registered device.
-
Login to SATO Online Services.
Enter email address and password.
-
Go to [Manage locations] and click [+] button.
-
Enter necessary information and click [Add] to complete.
-
Move to "Real-time" screen.
-
Input following information and press [Add].
-
Serial number
-
Association code
-
Device name: Identification name of printer
-
Location: Where printer is installed at
*Other item is optional.
-
Register your printer via SOS Smart App
-
Startup SOS Smart App and log-in. Select [Add printer].
-
Select [Real-time].
-
Scan QR code which is displayed on the printer.
-
Serial number and Association code will be entered Automatically, enter Device name and choose Location, tap [Add] to complete the registration.
Confirmation on SOS Web App
Check the [Device list] of SATO Online Services show operated serial number.
Real-time connection (Network connection): PW4NX
DNS settings
Show setting menu of printer.
[Settings] > [Interface] > [Network] > [Settings] > [Wi-Fi] > [IPv4]
<Example>
|
Mode |
Static |
|
IP Address |
172.25.47.19 |
|
Netmask |
255.255.0.0 |
|
Gateway |
172.25.1.240 |
|
DNS |
172.18.1.52,172.18.1.53,172.30.5.23 * Three DNS address can be set * DNS is not required if DHCP is set. |
Set Proxy settings (Mandatory if proxy server is used)
-
Show proxy setting screen of product's menu.
[Settings] > [Interface] > [Network] > [Settings] > [Wi-Fi] > [Proxy] -
Set proxy server value (IP address and port number) in the Server.
ex.) http://172.18.1.10:8080 (http://{IP Address}:{Port number})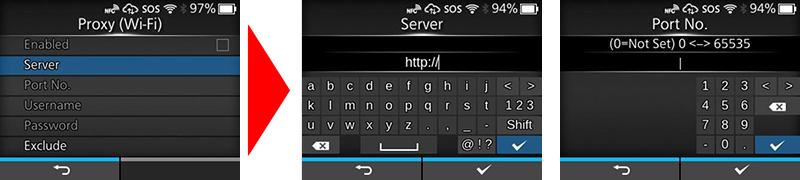
-
Set the Username and Password respectively. If the username and password are not available in the proxy server, this setting is not required.
-
Check exclude setting contains [127.0.0.1, localhost].
[127.0.0.1, localhost] are static value. Leave this setting and no change.* And if there is no value set on this menu, please enter [127.0.0.1, localhost] manually.
-
Check the checkbox to enable the valid item.
SOS mode settings
-
Show SOS mode settings screen.
[Settings] > [Interface] > [Network] > [Services] > [Online Services] > [SOS Mode] -
Set SOS Mode to [Real-Time] from [Disabled].
-
Check the terms of SOS and agree them.
-
Reboot printer.
Reboot printer and make sure that SOS icon and cloud icon are appeared on printer LCD.
Check Association code
-
Show SOS mode settings screen.
[Settings] > [Interface] > [Network] > [Services] > [Online Services] -
Press [Add Device] to [Start].
-
Serial number (8 Chars) and association code (12 Chars) are shown on screen. (Recommend to note it)
* Association code will expire 10 minutes after showing.
Printer Registration
Following two steps can be used. Choose the applicable one depending on registration method.
Register via PC: Register your printer via PC
Register via smartphone: Register your printer via SOS Smart App
Register your printer via PC
To register your printer via PC, you need to register the installation location.
Installation location (Group edit)
-
Select [Device] from Menu, choose Installation location, and click [New entry].
-
Enter [Required] fields in Device information, and press [Register] button.
-
Device information (serial number, device name, password) shall be entered by User.
Enter information.
-
Enter "SATO" for [Supplier name].
-
Select [Device model name] based on the serial number.
-
Please check if contracted service has been selected for [Service in use].
-
-
Select [Device] from Menu, choose Group to view registered device.
-
Login to SATO Online Services.
Enter email address and password.
-
Go to [Manage locations] and click [+] button.
-
Enter necessary information and click [Add] to complete.
-
Move to "Real-time" screen.
-
Input following information and press [Add].
-
Serial number
-
Association code
-
Device name: Identification name of printer
-
Location: Where printer is installed at
*Other item is optional.
-
Register your printer via SOS Smart App
-
Startup SOS Smart App and log-in. Select [Add printer].
-
Select [Real-time].
-
Scan QR code which is displayed on the printer.
-
Serial number and Association code will be entered Automatically, enter Device name and choose Location, tap [Add] to complete the registration.
Confirmation on SOS Web App
Check the [Device list] of SATO Online Services show operated serial number.
Real-time Light connection (Network connection)
The Real-time Light connection (Network connection) enables the printers connected within your intra-network to be safely connected to the SOS cloud. The printers securely transmit operating status, configuration data, error notifications, and other relevant information to the SOS cloud for continuous monitoring.
Operation log is sent every 60min at normal operation mode but error will be shown at real time by instantly sending error log when an error happens.
To connect your printers from the company's intra-network to SOS, establish communication with the following port numbers.
Port number: 443/TCP and Port number: 8883/TCP *Both are for outbound only.
Connection method 1
Use both port numbers 443 and 8883 via firewall.
Connection method 2
Use port number 443 via proxy server and 8883 via firewall.
Please check the table below to see which model you are using. Click the text link in the right column for the model you are using.
|
|
|
|
|
|
|
|
|
|
|
|
|
|
|
|
If you cannot find the model you are looking for, please check our website.
https://www.sato.co.jp/products/printer/
Real-time Light connection (Network connection): CL4NX/CL6NX/LR4NX-FA/PW4NX
DNS settings
Show setting menu of printer.
[Settings] > [Interface] > [Network] > [Settings] > [LAN] (or [Wi-Fi] ) > [IPv4]
* If you are using PW4NX, please select [Wi-Fi].
<Example>
|
Mode |
Static |
|
IP Address |
172.25.47.19 |
|
Netmask |
255.255.0.0 |
|
Gateway |
172.25.1.240 |
|
DNS |
172.18.1.52,172.18.1.53,172.30.5.23 * Three DNS address can be set * DNS is not required if DHCP is set. |
Set Proxy settings (Mandatory if proxy server is used)
-
Show proxy setting screen of product's menu.
[Settings] > [Interface] > [Network] > [Settings] > [LAN] (or [Wi-Fi] ) > [Proxy]* If you are using PW4NX, please select [Wi-Fi].
-
Set proxy server value (IP address and port number) in the Server.
ex.) http://172.18.1.10:8080 (http://{IP Address}:{Port number})
-
Set the Username and Password respectively. If the username and password are not available in the proxy server, this setting is not required.
-
Check exclude setting contains [127.0.0.1, localhost].
[127.0.0.1, localhost] are static value. Leave this setting and no change.* And if there is no value set on this menu, please enter [127.0.0.1, localhost] manually.
-
Check the checkbox to enable the valid item.
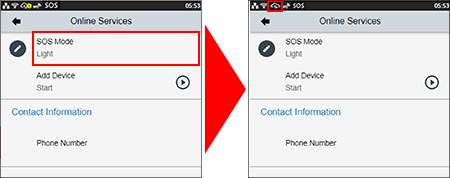
SOS mode settings
-
Show SOS mode settings screen.
[Settings] > [Interface] > [Network] > [Services] > [Online Services] > [SOS Mode] -
Set SOS Mode to [Light] from Disabled.
-
Check the terms of SOS and agree them.
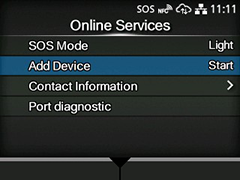
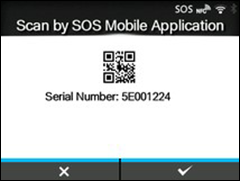
Display the QR code/PIN code on the printer
-
Select SOS connection.
-
Printer serial number is shown.
Printer serial number is needed to login to SATO Online Services and register your printer.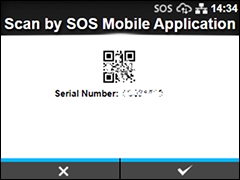
-
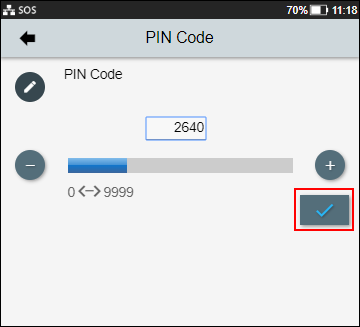
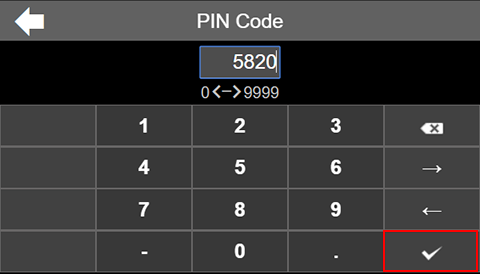
PIN code input screen is shown
When this screen is shown, acquire a PIN code, following the below step.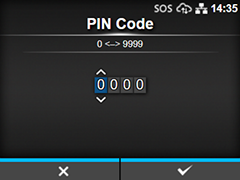
Printer Registration
Following two steps can be used. Choose the applicable one depending on registration method.
Register via PC: Register your printer via PC
Register via smartphone: Register your printer via SOS Smart App
Register your printer via PC
To register your printer via PC, you need to register the installation location.
Installation location (Group edit)
-
Select [Device] from Menu, choose Installation location, and click [New entry].
-
Enter [Required] fields in Device information, and press [Register] button.
-
Device information (serial number, device name, password) shall be entered by User.
Enter information.
-
Enter "SATO" for [Supplier name].
-
Select [Device model name] based on the serial number.
-
Please check if contracted service has been selected for [Service in use].
-
-
Select [Device] from Menu, choose Group to view registered device.
-
Click [SATO Online Services].
-
Login to SATO Online Services with your account and click On-demand/Light mode in the printer registration shown at the top right of the screen.
* You need to register for a SOS account beforehand.
-
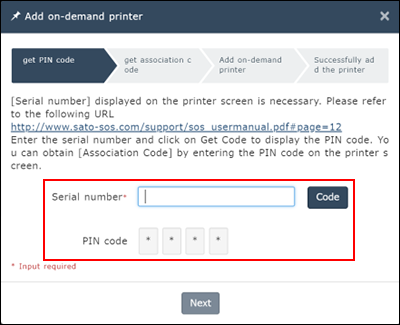
Enter the serial number.
Input screen of the printer serial number is shown. Enter the serial number of the added printer and click [Code] button. Enter the printer serial number you made a note before steps.
PIN code is shown.
* This PIN code is necessary to identify the added printer.
* It is recommended to make a note of the PIN code.
-
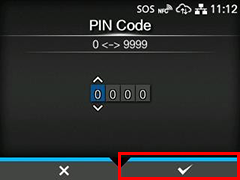
Return to "Printer screen" and enter the PIN code.
Press the right softkey [✓] of the printer to confirm the entered PIN code. Enter the PIN code you made a note before steps.
-
Printer serial number and association code are shown in the printer screen. It is recommended to make a note of the association code.
-
Click [Next] in the Add QR connection printer screen.
-
Enter the following items and click the [Add].
-
Association code
-
Device name: Identification name of printer
-
Location: Where printer is installed at
*Other item is optional.
-
-
Login to SATO Online Services.
Enter email address and password.
-
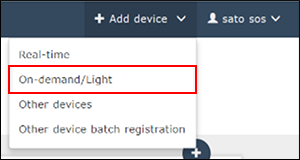
Click [+ Add device] on the upper right of the Dashboard screen as shown on the left, and select [On-demand/Light].
-
Enter the serial number.
Serial Number input screen is shown. Then input the printer serial number and press [Code] button.
PIN code is shown. Recommend to note it.
-
Return to "Printer screen" and enter the PIN code.
Press the right softkey [✓] of the printer to confirm the entered PIN code.
-
Printer serial number and association code are shown in the printer screen. It is recommended to make a note of the association code.
-
Click [Next] in the Add QR connection printer screen.
-
Enter the following items and click the [Add].
-
Association code
-
Device name: Identification name of printer
-
Location: Where printer is installed at
*Other item is optional.
-
Register your printer via SOS Smart App
-
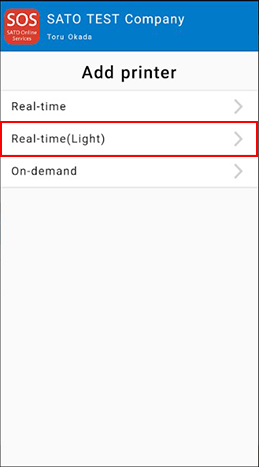
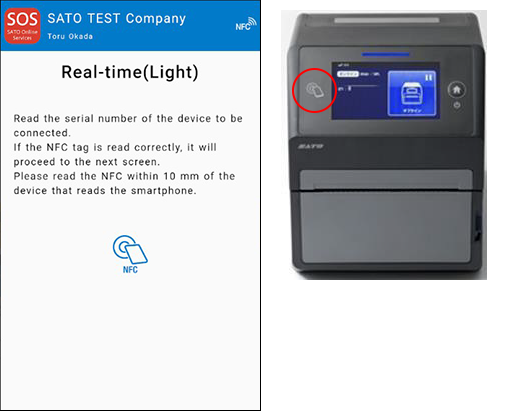
Startup SOS Smart App and log-in. Select [Add printer].
-
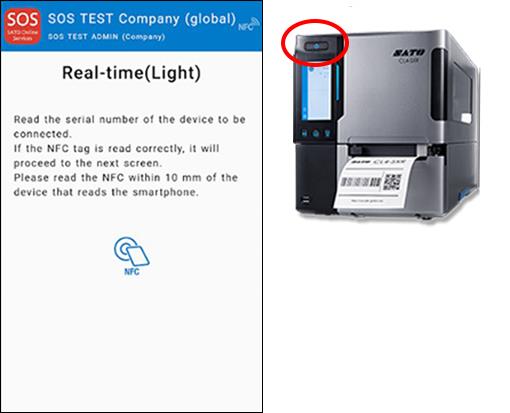
Tap [Real-time (Light)] in the printer registration screen.
-
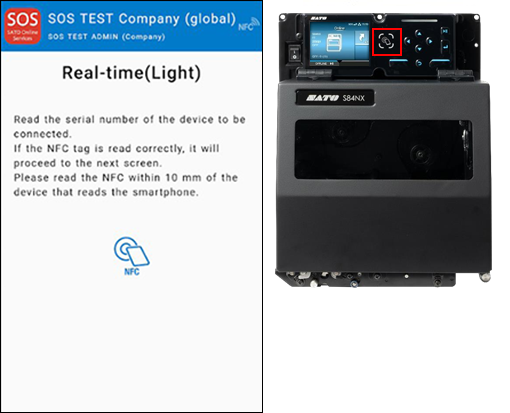
While the light mode connection screen is shown, place the smartphone close to the printer NFC area. NFC is mounted in a red circle portion of the below picture.
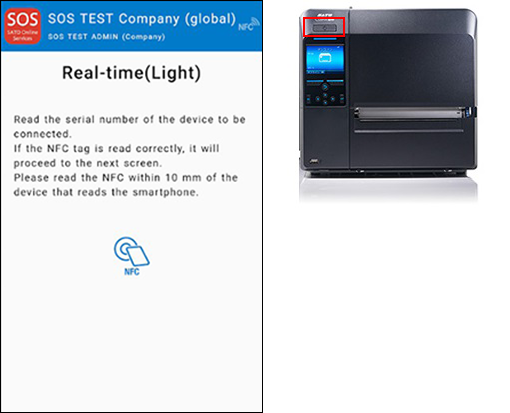
-
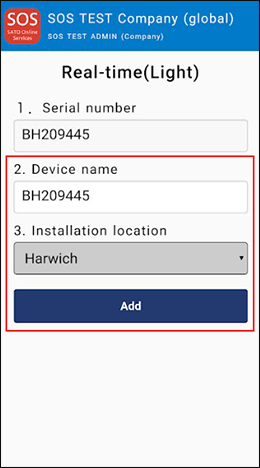
When the screen is read via NFC, below screen is shown. Enter the model name, location using SOS Smart App and tap [Add] button.
-
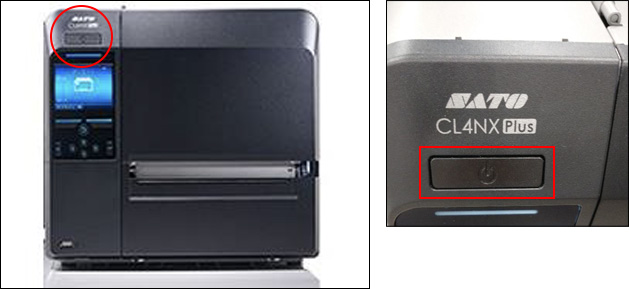
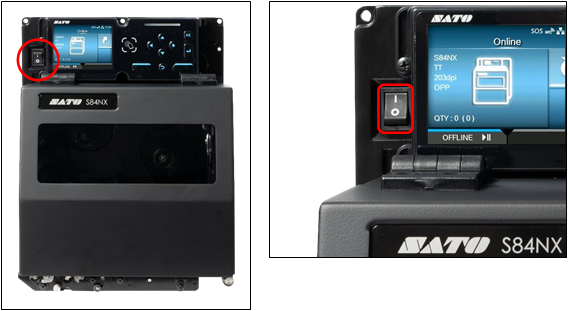
After the printer information is added, long-press the power button of the printer to turn off the power once, then restart the printer.
Confirmation on SOS Web App
Check the [Device list] of SATO Online Services show operated serial number.
Real-time Light connection (Network connection):
DNS settings
Show setting menu of printer.
[Settings] > [Interface] > [Network] > [Settings] > [LAN] (or [Wi-Fi] ) > [IPv4]
* If you are using PW4NX, please select [Wi-Fi].
<Example>
|
Mode |
Static |
|
IP Address |
172.25.47.19 |
|
Netmask |
255.255.0.0 |
|
Gateway |
172.25.1.240 |
|
DNS |
172.18.1.52,172.18.1.53,172.30.5.23 * Three DNS address can be set * DNS is not required if DHCP is set. |
Set Proxy settings (Mandatory if proxy server is used)
-
Show proxy setting screen of product's menu.
[Settings] > [Interface] > [Network] > [Settings] > [LAN] (or [Wi-Fi] ) > [Proxy]* If you are using PW4NX, please select [Wi-Fi].
-
Set proxy server value (IP address and port number) in the Server.
ex.) http://172.18.1.10:8080 (http://{IP Address}:{Port number})
-
Set the Username and Password respectively. If the username and password are not available in the proxy server, this setting is not required.
-
Check exclude setting contains [127.0.0.1, localhost].
[127.0.0.1, localhost] are static value. Leave this setting and no change.* And if there is no value set on this menu, please enter [127.0.0.1, localhost] manually.
-
Check the checkbox to enable the valid item.
SOS mode settings
-
Show SOS mode settings screen.
[Settings] > [Interface] > [Network] > [Services] > [Online Services] > [SOS Mode] -
Set SOS Mode to [Light] from Disabled.
-
Check the terms of SOS and agree them.
Display the QR code/PIN code on the printer
-
Select SOS connection.
-
Printer serial number is shown.
Printer serial number is needed to login to SATO Online Services and register your printer.
-
PIN code input screen is shown
When this screen is shown, acquire a PIN code, following the below step.
Printer Registration
Following two steps can be used. Choose the applicable one depending on registration method.
Register via PC: Register your printer via PC
Register via smartphone: Register your printer via SOS Smart App
Register your printer via PC
To register your printer via PC, you need to register the installation location.
Installation location (Group edit)
-
Select [Device] from Menu, choose Installation location, and click [New entry].
-
Enter [Required] fields in Device information, and press [Register] button.
-
Device information (serial number, device name, password) shall be entered by User.
Enter information.
-
Enter "SATO" for [Supplier name].
-
Select [Device model name] based on the serial number.
-
Please check if contracted service has been selected for [Service in use].
-
-
Select [Device] from Menu, choose Group to view registered device.
-
Click [SATO Online Services].
-
Login to SATO Online Services with your account and click On-demand/Light mode in the printer registration shown at the top right of the screen.
* You need to register for a SOS account beforehand.
-
Enter the serial number.
Input screen of the printer serial number is shown. Enter the serial number of the added printer and click [Code] button. Enter the printer serial number you made a note before steps.
PIN code is shown.
* This PIN code is necessary to identify the added printer.
* It is recommended to make a note of the PIN code.
-
Return to "Printer screen" and enter the PIN code.
Press the right softkey [✓] of the printer to confirm the entered PIN code. Enter the PIN code you made a note before steps.
-
Printer serial number and association code are shown in the printer screen. It is recommended to make a note of the association code.
-
Click [Next] in the Add QR connection printer screen.
-
Enter the following items and click the [Add].
-
Association code
-
Device name: Identification name of printer
-
Location: Where printer is installed at
*Other item is optional.
-
-
Login to SATO Online Services.
Enter email address and password.
-
Click [+ Add device] on the upper right of the Dashboard screen as shown on the left, and select [On-demand/Light].
-
Enter the serial number.
Serial Number input screen is shown. Then input the printer serial number and press [Code] button.
PIN code is shown. Recommend to note it.
-
Return to "Printer screen" and enter the PIN code.
Press the right softkey [✓] of the printer to confirm the entered PIN code.
-
Printer serial number and association code are shown in the printer screen. It is recommended to make a note of the association code.
-
Click [Next] in the Add QR connection printer screen.
-
Enter the following items and click the [Add].
-
Association code
-
Device name: Identification name of printer
-
Location: Where printer is installed at
*Other item is optional.
-
Register your printer via SOS Smart App
-
Startup SOS Smart App and log-in. Select [Add printer].
-
Tap [Real-time (Light)] in the printer registration screen.
-
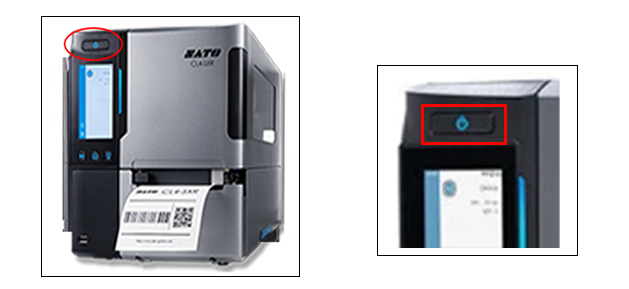
While the light mode connection screen is shown, place the smartphone close to the printer NFC area. NFC is mounted in a red circle portion of the below picture.
-
When the screen is read via NFC, below screen is shown. Enter the model name, location using SOS Smart App and tap [Add] button.
-
After the printer information is added, long-press the power button of the printer to turn off the power once, then restart the printer.
Confirmation on SOS Web App
Check the [Device list] of SATO Online Services show operated serial number.
Real-time Light connection (Network connection): CL4-SXR/CL6-SXR
DNS settings
Show setting menu of printer.
[Settings] > [Interface] > [Network] > [Wired] > [IPv4]
<Example>
|
Mode |
Static |
|
IP Address |
192.168.17.52 |
|
Netmask |
255.255.252.0 |
|
Gateway |
192.168.16.1 |
|
Primary DNS |
192.168.16.1 |
|
Secondary DNS |
192.168.1.1 |
Set Proxy settings (Mandatory if proxy server is used)
-
Show proxy setting screen of product's menu.
[Settings] > [Interface] > [Network] > [Advanced] > [Proxy] -
Set proxy server value (IP address and port number) in the Server.
ex.) http://172.18.1.10:8080 (http://{IP Address}:{Port number})
-
Set the Username and Password respectively. If the username and password are not available in the proxy server, this setting is not required.
-
Check exclude setting contains [127.0.0.1, localhost].
[127.0.0.1, localhost] are static value. Leave this setting and no change.* And if there is no value set on this menu, please enter [127.0.0.1, localhost] manually.
-
Check the checkbox to enable the valid item.
SOS mode settings
-
Show SOS mode settings screen.
[Settings] > [Cloud Services] > [SATO Online Services] > [Mode] -
Set SOS Mode to [Light] from [Disabled].
Display the QR code/PIN code on the printer
-
Select [Add Device]
-
Printer serial number is shown.
Printer serial number is needed to login to SATO Online Services and register your printer.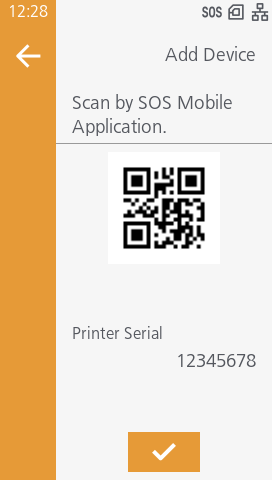
-
PIN code input screen is shown
When this screen is shown, acquire a PIN code, following the below step.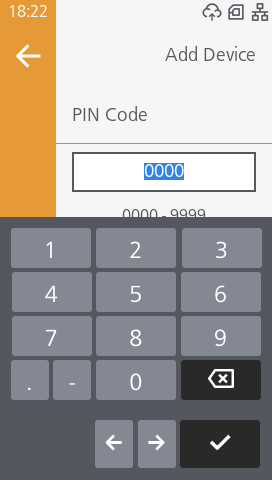
Printer Registration
Following two steps can be used. Choose the applicable one depending on registration method.
Register via PC: Register your printer via PC
Register via smartphone: Register your printer via SOS Smart App
Register your printer via PC
To register your printer via PC, you need to register the installation location.
Installation location (Group edit)
-
Select [Device] from Menu, choose Installation location, and click [New entry].
-
Enter [Required] fields in Device information, and press [Register] button.
-
Device information (serial number, device name, password) shall be entered by User.
Enter information.
-
Enter "SATO" for [Supplier name].
-
Select [Device model name] based on the serial number.
-
Please check if contracted service has been selected for [Service in use].
-
-
Select [Device] from Menu, choose Group to view registered device.
-
Click [SATO Online Services].
-
Login to SATO Online Services with your account and click On-demand/Light mode in the printer registration shown at the top right of the screen.
* You need to register for a SOS account beforehand.
-
Enter the serial number.
Input screen of the printer serial number is shown. Enter the serial number of the added printer and click [Code] button. Enter the printer serial number you made a note before steps.
PIN code is shown.
* This PIN code is necessary to identify the added printer.
* It is recommended to make a note of the PIN code.
-
Return to "Printer screen" and enter the PIN code.
Press the right softkey [✓] of the printer to confirm the entered PIN code. Enter the PIN code you made a note before steps.
-
Printer serial number and association code are shown in the printer screen. It is recommended to make a note of the association code.
-
Click [Next] in the Add QR connection printer screen.
-
Enter the following items and click the [Add].
-
Association code
-
Device name: Identification name of printer
-
Location: Where printer is installed at
*Other item is optional.
-
-
Login to SATO Online Services.
Enter email address and password.
-
Click [+ Add device] on the upper right of the Dashboard screen as shown on the left, and select [On-demand/Light].
-
Enter the serial number.
Serial Number input screen is shown. Then input the printer serial number and press [Code] button.
PIN code is shown. Recommend to note it.
-
Return to "Printer screen" and enter the PIN code.
Press the right softkey [✓] of the printer to confirm the entered PIN code.
-
Printer serial number and association code are shown in the printer screen. It is recommended to make a note of the association code.
-
Click [Next] in the Add QR connection printer screen.
-
Enter the following items and click the [Add].
-
Association code
-
Device name: Identification name of printer
-
Location: Where printer is installed at
*Other item is optional.
-
Register your printer via SOS Smart App
-
Startup SOS Smart App and log-in. Select [Add printer].
-
Tap [Real-time (Light)] in the printer registration screen.
-
While the light mode connection screen is shown, place the smartphone close to the printer NFC area. NFC is mounted in a red circle portion of the below picture.
-
When the screen is read via NFC, below screen is shown. Enter the model name, location using SOS Smart App and tap [Add] button.
-
After the printer information is added, long-press the power button of the printer to turn off the power once, then restart the printer.
Confirmation on SOS Web App
Check the [Device list] of SATO Online Services show operated serial number.
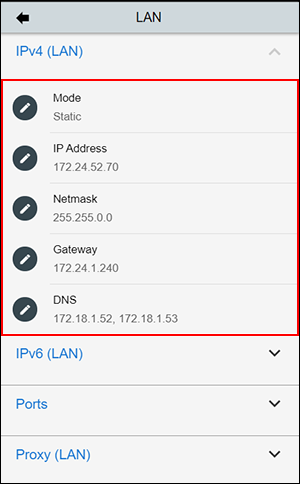
Real-time Light connection (Network connection): FX3-LX
DNS settings
[Settings] > [Interface] > [Network] > [Settings] > [LAN] (or [Wi-Fi] ) > [IPv4] (or [IPv4 (Wi-Fi)] )
<Example>
|
Mode |
Static |
|
IP Address |
172.24.52.70 |
|
Netmask |
255.255.0.0 |
|
Gateway |
172.25.1.240 |
|
DNS |
172.18.1.52,172.18.1.53 * Three DNS address can be set * DNS is not required if DHCP is set. |
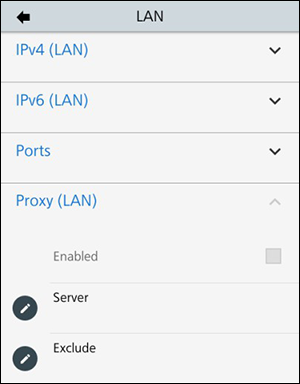
Set Proxy settings (Mandatory if proxy server is used)
-
Show proxy setting screen of product's menu.
[Settings] > [Interface] > [Network] > [Settings] > [LAN] (or [Wi-Fi] ) > [Proxy] -
Set proxy server value (IP address and port number) in the Server.
ex.) http://172.18.1.10:8080 (http://{IP Address}:{Port number})Check "Exclude" setting contains "127.0.0.1, localhost". [127.0.0.1, localhost] is static value, so please leave it as it is. (no need to change)
And if there is no value on this menu, please enter 127.0.0.1, localhost manually.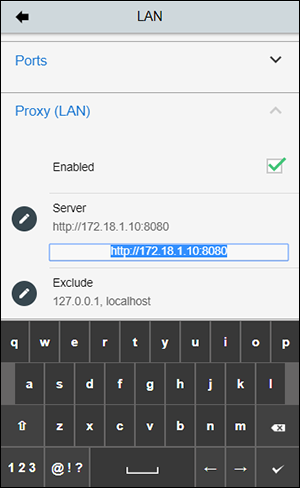
Once completed the network configuration, make sure to reboot the printer.
SOS mode settings
-
After Power ON, make sure that the network or Wi-fi icon is shown on the display.
(network configuration: IP address, DNS etc. should be completed)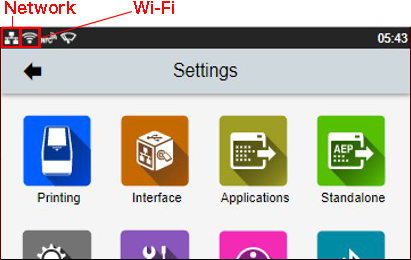
-
Show SOS mode settings screen.
[Settings] > [Interface] > [Network] > [Services] > [Online Services]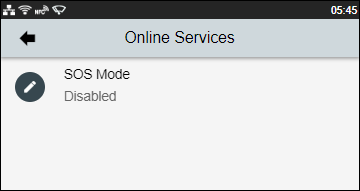
-
Change SOS Mode to [Light]. Please make sure that "!" icon is disappeared.
If the cloud icon is shown as
 , it might not be able to communicate via HTTPS.
So please check the network setting.
Printer Registration
Following two steps can be used. Choose the applicable one depending on registration method.
Register via PC: Register your printer via PC
Register via smartphone: Register your printer via SOS Smart App
Register your printer via PC
To register your printer via PC, you need to register the installation location.
Installation location (Group edit)
-
Select [Device] from Menu, choose Installation location, and click [New entry].
-
Enter [Required] fields in Device information, and press [Register] button.
-
Device information (serial number, device name, password) shall be entered by User.
Enter information.
-
Enter "SATO" for [Supplier name].
-
Select [Device model name] based on the serial number.
-
Please check if contracted service has been selected for [Service in use].
-
-
Select [Device] from Menu, choose Group to view registered device.
-
Click [SATO Online Services].
-
Click [+ Add device] on the upper right of the Dashboard screen as shown on the left, and select [On-demand/Light].
-
Enter the serial number.
Enter the serial number and click
 button, then shows the PIN code.
-
Return to "Printer screen" and enter the PIN code.
-
Enter a printer information. After fill in the required information, click
 button.
-
Association code
-
Device name: Identification name of printer
-
Location: Where printer is installed at
*Other item is optional.
-
-
Login to SATO Online Services.
Enter email address and password.
-
Click [+ Add device] on the upper right of the Dashboard screen as shown on the left, and select [On-demand/Light].
-
Enter the serial number.
Serial Number input screen is shown. Then input the printer serial number and press [Code] button.
PIN code is shown. Recommend to note it.
-
Return to "Printer screen" and enter the PIN code.
-
Enter a printer information. After fill in the required information, click
button.
-
Association code
-
Device name: Identification name of printer
-
Location: Where printer is installed at
*Other item is optional.
-
Register your printer via SOS Smart App
-
Startup SOS Smart App and log-in. Select [Add printer].
-
Tap [Real-time (Light)] in the printer registration screen.
-
Please make sure that NFC icon is blinking. If not, please check your mobile if NFC function on is enabled or not.
Overlap the NFC logo on the mobile and FX3-LX logo.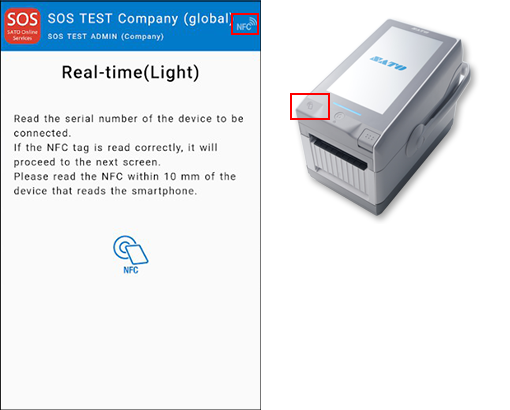
-
When NFC is read properly, Mobile App displays the registration page. Make sure the printer's serial number and select the location. (And enter a device name if necessary)
If it is OK, tap the [Add] button.
-
Reboot the printer and wait until "!" icon is disappeared.
Confirmation on SOS Web App
Check the [Device list] of SATO Online Services show operated serial number.
Real-time Light connection (Network connection): CT4-LX
DNS settings
Show setting menu of printer.
[SETTINGS] > [Interface] > [Network] > [Settings] > [LAN] > [IPv4] (or [IPv6])
<Example>
|
Mode |
Static |
|
IP Address |
172.24.47.15 |
|
Netmask |
255.255.0.0 |
|
Gateway |
172.24.1.240 |
|
DNS |
172.18.1.52,172.18.1.53, 172.30.5.23 |
Set Proxy settings (Mandatory if proxy server is used)
-
Show proxy setting screen of product’s menu.
[SETTINGS] > [Interface] > [Network] > [Settings] > [LAN] > [Proxy] -
Set proxy server value (IP address and port number) in the Server.
<Example> IP address: port No.
Enabled
Tick the box(*1)
Server
http://172.18.1.10:8080
Exclude
127.0.0.1,localhost(*2)
*1 Enable to tick after entered "Server" and "Exclude".
*2 It is mandatory to enter "127.0.0.1,localhost."
SOS mode settings
-
Display SOS menu.
[SETTINGS] > [Interface] > [Network] > [Services] > [Online Services] -
Set SOS Mode as [Light].
Display the QR code/PIN code on the printer
-
Select [Add Device] and keep showing QR code (Serial Number on the display).
If the cloud icon is shown as
, it might not be able to communicate via HTTPS.
So please check the network setting.
Printer Registration
Following two steps can be used. Choose the applicable one depending on registration method.
Register via PC: Register your printer via PC
Register via smartphone: Register your printer via SOS Smart App
Register your printer via PC
To register your printer via PC, you need to register the installation location.
Installation location (Group edit)
-
Select [Device] from Menu, choose Installation location, and click [New entry].
-
Enter [Required] fields in Device information, and press [Register] button.
-
Device information (serial number, device name, password) shall be entered by User.
Enter information.
-
Enter "SATO" for [Supplier name].
-
Select [Device model name] based on the serial number.
-
Please check if contracted service has been selected for [Service in use].
-
-
Select [Device] from Menu, choose Group to view registered device.
-
Click [SATO Online Services].
-
Go to [+ Add device] and select [On-demand/Light] as following.
-
Enter the serial number.
Enter the serial number and click
button, then shows the PIN code.
-
Return to "Printer screen" and enter the PIN code.
-
Enter a printer information. After fill in the required information, click
button.
-
Association code
-
Device name: Identification name of printer
-
Location: Where printer is installed at
*Other item is optional.
-
-
Login to SATO Online Services.
Enter email address and password.
-
Click [+ Add device] on the upper right of the Dashboard screen as shown on the left, and select [On-demand/Light].
-
Enter the serial number.
Enter the serial number and click
button, then shows the PIN code.
-
Return to "Printer screen" and enter the PIN code.
-
Enter a printer information. After fill in the required information, click
button.
-
Association code
-
Device name: Identification name of printer
-
Location: Where printer is installed at
*Other item is optional.
-
Register your printer via SOS Smart App
-
Startup SOS Smart App and log-in. Select [Add printer].
-
Tap [Real-time (Light)] in the printer registration screen.
-
Please make sure that NFC icon is blinking. If not, please check your mobile that NFC function is enabled.
-
When NFC is read properly, Mobile App displays the registration page. Make sure the printer's serial number and select the location. (And modify a device name if necessary).
If it is OK, tap [Add] button.
Confirmation on SOS Web App
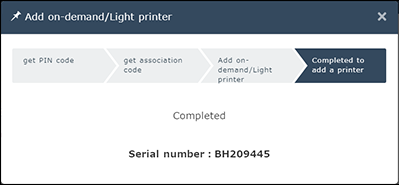
Check the [Device list] of SATO Online Services show operated serial number.
Real-time Light connection (Network connection): S84NX/S86NX
DNS settings
Show setting menu of printer.
[Settings] > [Interface] > [Network] > [Settings] > [LAN] > [IPv4]
<Example>
|
Mode |
Static |
|
IP Address |
172.25.47.19 |
|
Netmask |
255.255.0.0 |
|
Gateway |
172.25.1.240 |
|
DNS |
172.18.1.52,172.18.1.53,172.30.5.23 * Three DNS address can be set * DNS is not required if DHCP is set. |
Set Proxy settings (Mandatory if proxy server is used)
-
Show proxy setting screen of product's menu.
[Settings] > [Interface] > [Network] > [Settings] > [LAN] (or [Wi-Fi] ) > [Proxy] -
Set proxy server value (IP address and port number) in the Server.
ex.) http://172.18.1.10:8080 (http://{IP Address}:{Port number})
-
Set the Username and Password respectively. If the username and password are not available in the proxy server, this setting is not required.
-
Check exclude setting contains [127.0.0.1, localhost].
[127.0.0.1, localhost] are static value. Leave this setting and no change.* And if there is no value set on this menu, please enter [127.0.0.1, localhost] manually.
-
Check the checkbox to enable the valid item.
SOS mode settings
-
Show SOS mode settings screen.
[Settings] > [Interface] > [Network] > [Services] > [Online Services] > [SOS Mode] -
Set SOS Mode to [Light] from Disabled.
-
Check the terms of SOS and agree them.
Display the QR code/PIN code on the printer
-
Select SOS connection.
-
Printer serial number is shown.
Printer serial number is needed to login to SATO Online Services and register your printer.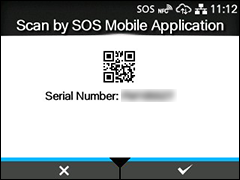
-
PIN code input screen is shown
When this screen is shown, acquire a PIN code, following the below step.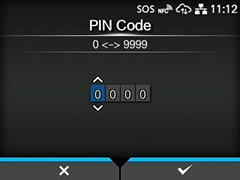
Printer Registration
Following two steps can be used. Choose the applicable one depending on registration method.
Register via PC: Register your printer via PC
Register via smartphone: Register your printer via SOS Smart App
Register your printer via PC
To register your printer via PC, you need to register the installation location.
Installation location (Group edit)
-
Select [Device] from Menu, choose Installation location, and click [New entry].
-
Enter [Required] fields in Device information, and press [Register] button.
-
Device information (serial number, device name, password) shall be entered by User.
Enter information.
-
Enter "SATO" for [Supplier name].
-
Select [Device model name] based on the serial number.
-
Please check if contracted service has been selected for [Service in use].
-
-
Select [Device] from Menu, choose Group to view registered device.
-
Click [SATO Online Services].
-
Login to SATO Online Services with your account and click On-demand/Light mode in the printer registration shown at the top right of the screen.
* You need to register for a SOS account beforehand.
-
Enter the serial number.
Input screen of the printer serial number is shown. Enter the serial number of the added printer and click [Code] button. Enter the printer serial number you made a note before steps.
PIN code is shown.
* This PIN code is necessary to identify the added printer.
* It is recommended to make a note of the PIN code.
-
Return to "Printer screen" and enter the PIN code.
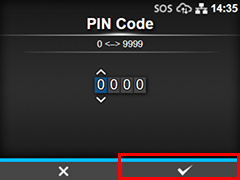
Press the right softkey [✓] of the printer to confirm the entered PIN code. Enter the PIN code you made a note before steps.
-
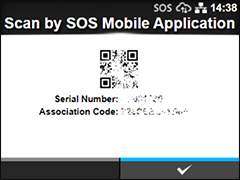
Printer serial number and association code are shown in the printer screen. It is recommended to make a note of the association code.

-
Click [Next] in the Add QR connection printer screen.
-
Enter the following items and click the [Add].
-
Association code
-
Device name: Identification name of printer
-
Location: Where printer is installed at
*Other item is optional.
-
-
Login to SATO Online Services.
Enter email address and password.
-
Click [+ Add device] on the upper right of the Dashboard screen as shown on the left, and select [On-demand/Light].
-
Enter the serial number.
Serial Number input screen is shown. Then input the printer serial number and press [Code] button.
PIN code is shown. Recommend to note it.
-
Return to "Printer screen" and enter the PIN code.
Press the right softkey [✓] of the printer to confirm the entered PIN code.
-
Printer serial number and association code are shown in the printer screen. It is recommended to make a note of the association code.
-
Click [Next] in the Add QR connection printer screen.
-
Enter the following items and click the [Add].
-
Association code
-
Device name: Identification name of printer
-
Location: Where printer is installed at
*Other item is optional.
-
Register your printer via SOS Smart App
-
Startup SOS Smart App and log-in. Select [Add printer].
-
Tap [Real-time (Light)] in the printer registration screen.
-
While the light mode connection screen is shown, place the smartphone close to the printer NFC area. NFC is mounted in a red circle portion of the below picture.
-
When the screen is read via NFC, below screen is shown. Enter the model name, location using SOS Smart App and tap [Add] button.
-
After the printer information is added, long-press the power button of the printer to turn off the power once, then restart the printer.
Confirmation on SOS Web App
Check the [Device list] of SATO Online Services show operated serial number.
Real-time Light connection (Network connection): PW208NX
Before using SOS, SOS account is necessary.
Please contact nearest SATO local office or our contracted business partners.
Push the power button on the control panel until the LED lights up in blue and turn on the printer.
An initial icon ![]() is displayed at the top of the printer screen, but it is not yet connected with SATO.
is displayed at the top of the printer screen, but it is not yet connected with SATO.
Please make the following settings to link the printer and use account.
|
Network setting
Network requirement for SOS
In order to connect the printer to SOS using the network, it is necessary to enable communication on the Internet with the following port numbers.
Port number:443/TCP *Outbound only
Connection method 1
Through a firewall (DNS setting required for printers)
Connection method 2
Through a proxy server (Proxy server setting described below is necessary)
Limitation about Real-time Light
Wireless LAN connection is required to connect the printer to SOS using the network as Real-time Light. Since it is necessary to configure communication conditions according to your network environment, please consult your network administrator for details.
How to set the wireless LAN interface
In order to connect the printer to the wireless LAN, Network setting is configured by using SATO All-In-One Tool Application.
Please check your country page in the sato-global site.
Wireless LAN configuration by All-In-One Tool Application.
http://www.manual.sato-global.com/printer/cl4nx_cl6nx/main/main_GUID-F0688981-C154-440A-BBC0-CDBEF7FCEA0A.html
Manual is not for PW208NX. However, configuration steps are the same.
Proxy server (if customer use proxy)
In order to set up proxy saver setting for printer, please access the printer through Web config page to set. Please display the web config page and set up the proxy server as follows.
-
Open the browser and enter the URL of this product.
If the IP address of the device is "192.168.143.123", please enter "https://192.168.143.123"
Web config screen.
-
If you are asked for a security certificate, you need to authenticate and click [Continue]. The model name, print head resolution and MAC address are displayed in the upper right of each page.
-
Click [Login] to log in.
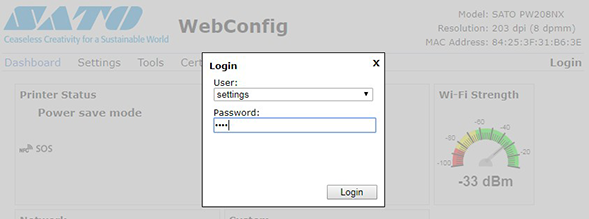
Select [setting] and enter 0310 as password.
-
After login, select [Settings] > [Network] in the menu to display the setting menu.
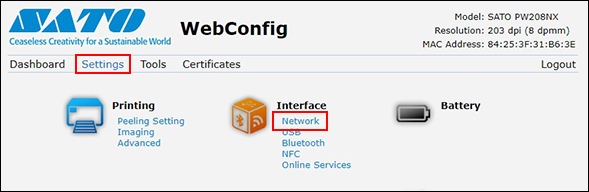
-
Set proxy saver.
In the setting menu, select [Network] > [Settings] > [Wi-Fi] > [Proxy] and set the proxy server information.
Printer settings for SOS
-
Turn on the printer and go to "Online Service" to change SOS mode to Light.
-
When you press and hold the
 button and
  button simultaneously for 2 seconds or more in the offline (stop) screen.
Select [Interface] > [Online Services] > [SOS mode] from the printer menu and set the SOS mode to [Light].
-
Log in to SOS Smart app select [Add printer] > [Real-time Light].
Only for NFC-enabled devices/smartphones running the Android OS or NFC must be enabled on the device/smartphone.
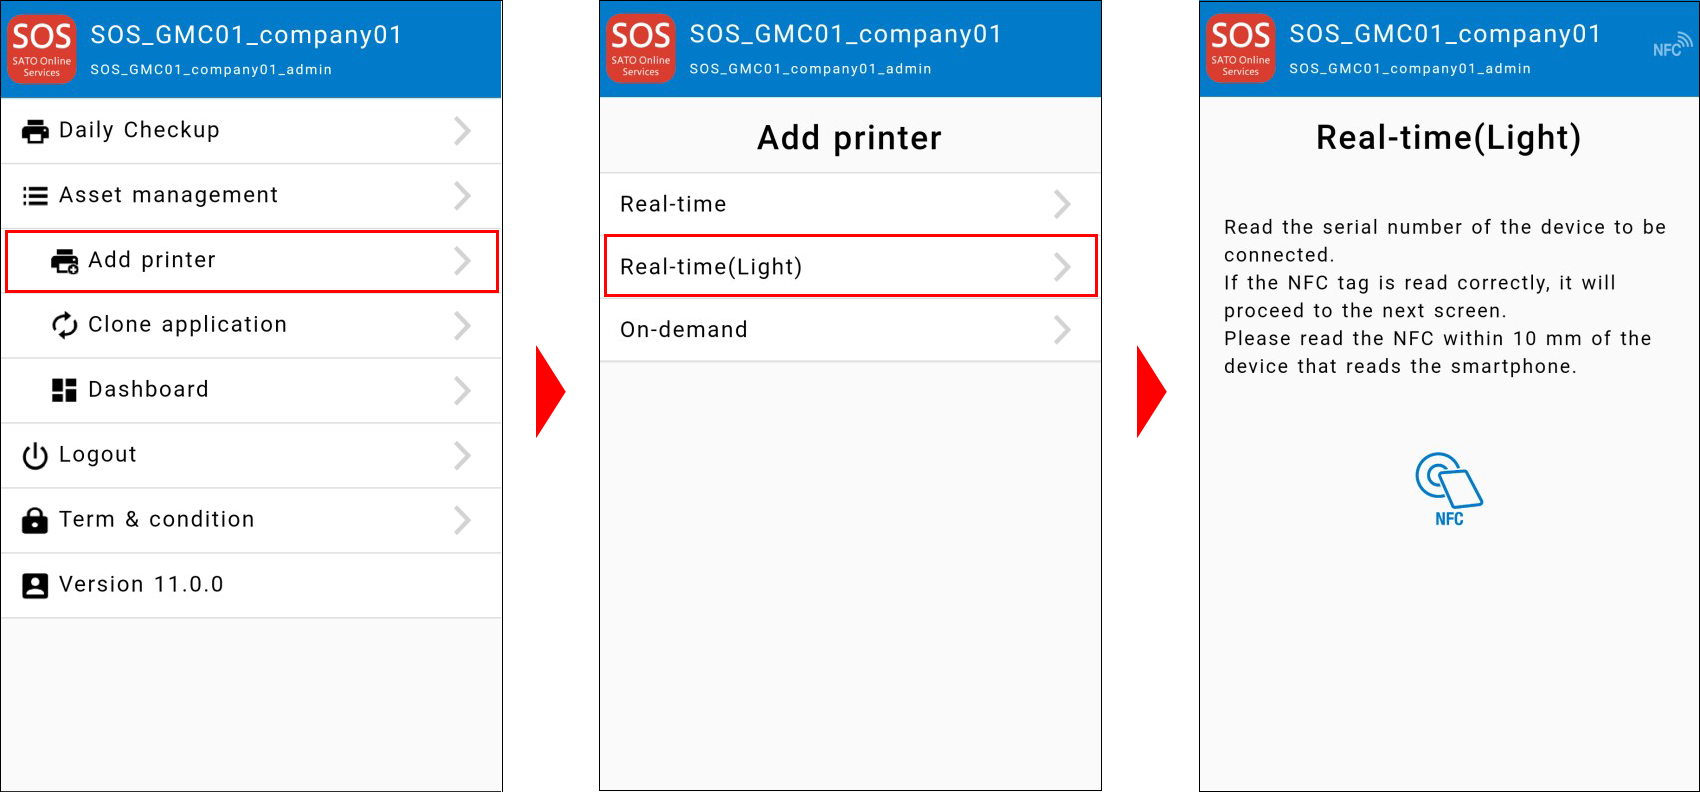
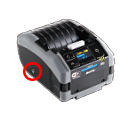
Touch the NFC of the printer with the "Real-time Light" displayed. NFC is installed in the red circle part of the figure below.
-
When NFC reading is completed, the screen changes so enter the device name and installation location with SOS Smart App and tap the [Add] button.
After completing the addition, long press the power button of the printer, turn off the power to restart the printer.

Confirmation on SOS Web App
Check the [Device list] of SATO Online Services show operated serial number.
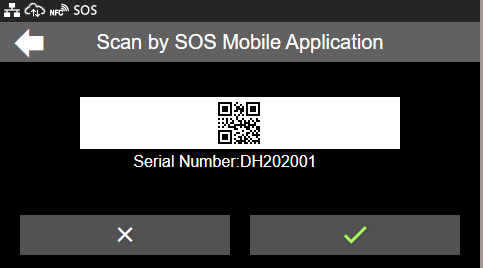
On-demand connection (QR code connection)
The on-demand connection using QR codes requires scanning QR codes of the printers with a mobile device (smartphone, tablet, etc.) where the SOS mobile application is installed beforehand. The printers are monitored for safety use by sharing the operating statuses, setting information, error information, etc. of the printers between the mobile device and the SOS cloud.
Please check the table below to see which model you are using. Click the text link in the right column for the model you are using.
|
|
|
|
|
|
|
|
|
|
|
|
|
|
If you cannot find the model you are looking for, please check our website.
https://www.sato.co.jp/products/printer/
On-demand connection (QR code connection): CL4NX/CL6NX/LR4NX-FA/PW4NX
SOS mode settings
-
Push the power button on the control panel until the LED lights up in blue and turn on the printer. Then press
 left key or
  key and set a printer to "OFFLINE".
 -
Press
 Enter Key.
 -
Select [Interface] by using

 key. Then Press Enter key.
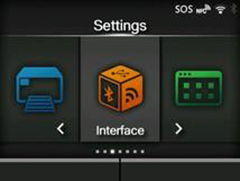
-
Select [Network] by using

 key. Then Press Enter key.
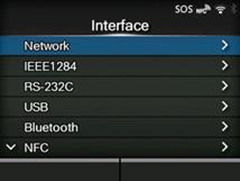
-
Select [Services] by using
key. Then press Enter key.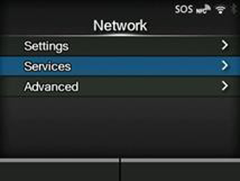
-
Select [Online Services] by using
key. Then press Enter key.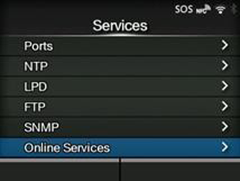
* If Online Services] menu is not displayed.
Please contact nearest SATO office and install a latest firmware. -
Change SOS mode and choose SOS Association.
* Change [SOS Mode] to [On-Demand] from [Disabled], and press [Add Device].
Display the QR code/PIN code on the printer
-
Serial Number is shown.
Press right key to move next screen. To register your printer, Serial Number is necessary.* Recommend to note this Serial No.
-
Input PIN code.
Login to SATO Online Services and get PIN code with following process.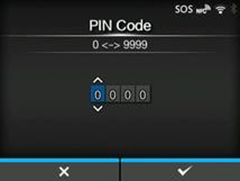
Printer Registration
Following two steps can be used. Choose the applicable one depending on registration method.
Register via PC: Register your printer via PC
Register via smartphone: Register your printer via SOS Smart App
Register your printer via PC
To register your printer via PC, you need to register the installation location.
Installation location (Group edit)
-
Select [Device] from Menu, choose Installation location, and click [New entry].
-
Enter [Required] fields in Device information, and press [Register] button.
-
Device information (serial number, device name, password) shall be entered by User.
Enter information.
-
Enter "SATO" for [Supplier name].
-
Select [Device model name] based on the serial number.
-
Please check if contracted service has been selected for [Service in use].
-
-
Select [Device] from Menu, choose Group to view registered device.
-
Click [SATO Online Services].
-
Click [+ Add device] on the upper right of the Dashboard screen as shown on the left, and select [On-demand/Light].
-
Enter the serial number.
Input screen of the printer serial number is shown. Enter the serial number of the added printer and click [Code] button. Enter the printer serial number you made a note before steps.
-
Return to "Printer screen" and enter the PIN code.
Press the right softkey [✓] of the printer to confirm the entered PIN code.
-
Printer serial number and association code are shown in the printer screen. It is recommended to make a note of the association code.
-
Click [Next] in the Add QR connection printer screen.
-
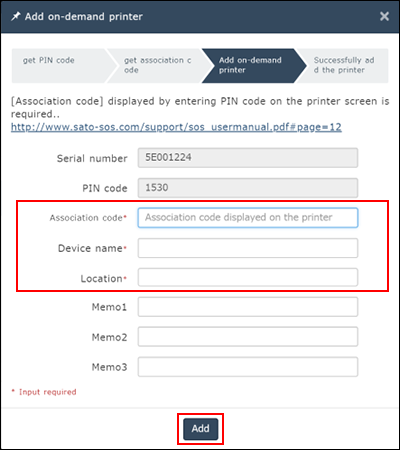
Enter the following items and click the [Add].
-
Association code
-
Device name: Identification name of printer
-
Location: Where printer is installed at
*Other item is optional.
-
-
Login to SATO Online Services.
Enter email address and password.
-
Click [+ Add device] on the upper right of the Dashboard screen as shown on the left, and select [On-demand/Light].
-
Enter the serial number.
Serial Number input screen is shown. Then input the printer serial number and press [Code] button.
PIN code is shown. Recommend to note it.
-
Return to "Printer screen" and enter the PIN code.
Press the right softkey [✓] of the printer to confirm the entered PIN code.
-
Printer serial number and association code are shown in the printer screen. It is recommended to make a note of the association code.
-
Click [Next] in the Add QR connection printer screen.
-
Enter the following items and click the [Add].
-
Association code
-
Device name: Identification name of printer
-
Location: Where printer is installed at
*Other item is optional.
-
Register your printer via SOS Smart App
-
Startup SOS Smart App and log-in. Select [Add printer].
-
Tap [On-demand] in the printer registration screen.

-
Tap the [QR] button on the On-Demand screen to load the [QR Code] displayed on the printer screen.
When the printer serial number is entered, tap the [Get a PIN] button to display the 4-digit PIN code.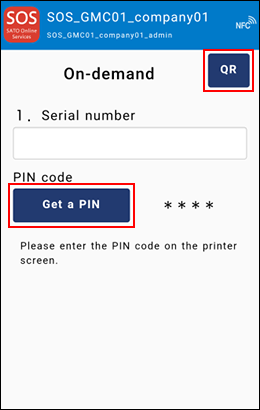
-
When the PIN code is set to the printer, the QR code is displayed on the printer screen.
-
Tap the [QR] button on the On-Demand screen to load the [QR Code] displayed on the printer screen.
The association code will be entered. After entering the device name and selecting the location, tap the [Add] button. Registration of printer authentication using QR connection is completed.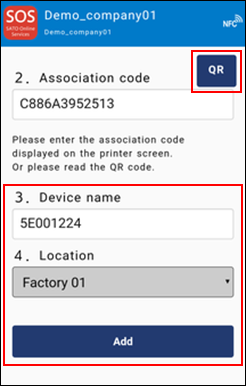
Daily Checkup must be performed after the printer registration is completed.
Confirmation on SOS Web App
Check the [Device list] of SATO Online Services show operated serial number.
On-demand connection (QR code connection): CL4-SXR/CL6-SXR
SOS mode settings
-
Show SOS mode settings screen.
[Settings] > [Cloud Services] > [SATO Online Services] > [Mode] -
Set SOS Mode to [On-Demand].
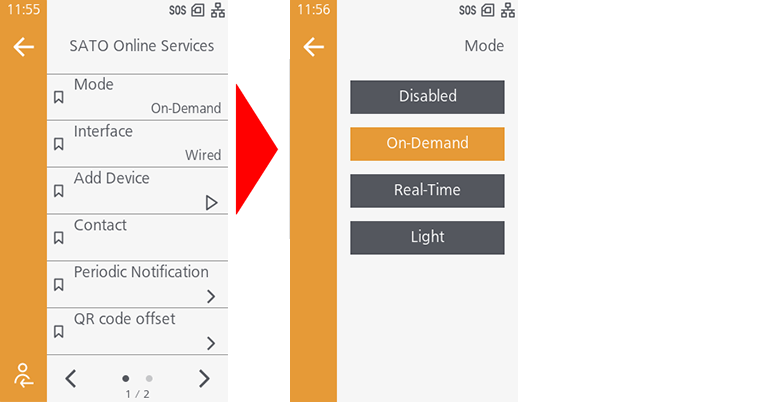
Display the QR code/PIN code on the printer
-
Select [Add Device]
-
Printer serial number and association code are shown in the printer screen. It is recommended to make a note of the association code.
-
PIN code input screen is shown
When this screen is shown, acquire a PIN code, following the below step.
Printer Registration
Following two steps can be used. Choose the applicable one depending on registration method.
Register via PC: Register your printer via PC
Register via smartphone: Register your printer via SOS Smart App
Register your printer via PC
To register your printer via PC, you need to register the installation location.
Installation location (Group edit)
-
Select [Device] from Menu, choose Installation location, and click [New entry].
-
Enter [Required] fields in Device information, and press [Register] button.
-
Device information (serial number, device name, password) shall be entered by User.
Enter information.
-
Enter "SATO" for [Supplier name].
-
Select [Device model name] based on the serial number.
-
Please check if contracted service has been selected for [Service in use].
-
-
Select [Device] from Menu, choose Group to view registered device.
-
Click [SATO Online Services].
-
Click [+ Add device] on the upper right of the Dashboard screen as shown on the left, and select [On-demand/Light].
-
Enter the serial number.
Input screen of the printer serial number is shown. Enter the serial number of the added printer and click [Code] button. Enter the printer serial number you made a note before steps.
-
Return to "Printer screen" and enter the PIN code.
Press the right softkey [✓] of the printer to confirm the entered PIN code.
-
Printer serial number and association code are shown in the printer screen. It is recommended to make a note of the association code.
-
Click [Next] in the Add QR connection printer screen.
-
Enter the following items and click the [Add].
-
Association code
-
Device name: Identification name of printer
-
Location: Where printer is installed at
*Other item is optional.
-
-
Login to SATO Online Services.
Enter email address and password.
-
Click [+ Add device] on the upper right of the Dashboard screen as shown on the left, and select [On-demand/Light].
-
Enter the serial number.
Serial Number input screen is shown. Then input the printer serial number and press [Code] button.
PIN code is shown. Recommend to note it.
-
Return to "Printer screen" and enter the PIN code.
Press the right softkey [✓] of the printer to confirm the entered PIN code.
-
Printer serial number and association code are shown in the printer screen. It is recommended to make a note of the association code.
-
Click [Next] in the Add QR connection printer screen.
-
Enter the following items and click the [Add].
-
Association code
-
Device name: Identification name of printer
-
Location: Where printer is installed at
*Other item is optional.
-
Register your printer via SOS Smart App
-
Startup SOS Smart App and log-in. Select [Add printer].
-
Tap [On-demand] in the printer registration screen.
-
Tap the [QR] button on the On-Demand screen to load the [QR Code] displayed on the printer screen.
When the printer serial number is entered, tap the [Get a PIN] button to display the 4-digit PIN code.
-
Return to "Printer screen" and enter the PIN code.
Press the right softkey [✓] of the printer to confirm the entered PIN code. Enter the PIN code you made a note before steps.
-
Printer serial number and association code are shown in the printer screen. It is recommended to make a note of the association code.
-
Tap the [QR] button on the On-Demand screen to load the [QR Code] displayed on the printer screen.
The association code will be entered. After entering the device name and selecting the location, tap the [Add] button. Registration of printer authentication using QR connection is completed.
Daily Checkup must be performed after the printer registration is completed.
Confirmation on SOS Web App
Check the [Device list] of SATO Online Services show operated serial number.
On-demand connection (QR code connection): FX3-LX
SOS mode settings
-
Push the power button on the control panel until the LED lights up in blue and turn on the printer.
-
Open SOS Menu.
[Settings] > [Interface] > [Network] > [Settings] > [Online Services] -
Change SOS mode and choose SOS Association.
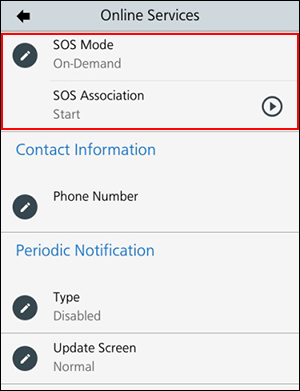
-
Change [SOS Mode] to [On-Demand] from [Disabled].
Display the QR code/PIN code on the printer
-
Press [SOS Association].
-
Serial Number is displayed.

*To register your printer, Serial Number is necessary. Recommend to note this Serial No.
-
Input PIN code.
Login to SATO Online Services and get PIN code.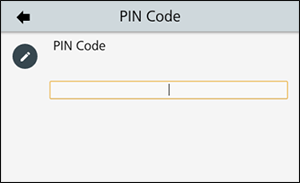
Printer Registration
Following two steps can be used. Choose the applicable one depending on registration method.
Register via PC: Register your printer via PC
Register via smartphone: Register your printer via SOS Smart App
Register your printer via PC
To register your printer via PC, you need to register the installation location.
Installation location (Group edit)
-
Select [Device] from Menu, choose Installation location, and click [New entry].
-
Enter [Required] fields in Device information, and press [Register] button.
-
Device information (serial number, device name, password) shall be entered by User.
Enter information.
-
Enter "SATO" for [Supplier name].
-
Select [Device model name] based on the serial number.
-
Please check if contracted service has been selected for [Service in use].
-
-
Select [Device] from Menu, choose Group to view registered device.
-
Click [SATO Online Services].
-
Click [+ Add device] on the upper right of the Dashboard screen as shown on the left, and select [On-demand/Light].
-
Enter the serial number.
Serial Number input screen is shown. Then input the printer serial number and press [Code] button.
PIN code is shown. Recommend to note it.
-
Go to printer LCD and Input PIN to printer.
Press "Right key" to go to next screen.
Press the right softkey [✓] of the printer to confirm the entered PIN code.
-
Association Code is displayed.
Serial Number and Association Code are shown at printer display.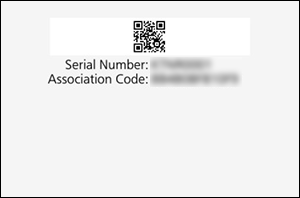
-
Enter the following items and click the [Add].
-
Association code
-
Device name: Identification name of printer
-
Location: Where printer is installed at
*Other item is optional.
-
-
Login to SATO Online Services.
Enter email address and password.
-
Click [+ Add device] on the upper right of the Dashboard screen as shown on the left, and select [On-demand/Light].
-
Enter the serial number.
Serial Number input screen is shown. Then input the printer serial number and press [Code] button.
PIN code is shown. Recommend to note it.
-
Return to "Printer screen" and enter the PIN code.
Press the right softkey [✓] of the printer to confirm the entered PIN code.
-
Printer serial number and association code are shown in the printer screen. It is recommended to make a note of the association code.
-
Click [Next] in the Add QR connection printer screen.
-
Enter the following items and click the [Add].
-
Association code
-
Device name: Identification name of printer
-
Location: Where printer is installed at
*Other item is optional.
-
Register your printer via SOS Smart App
-
Startup SOS Smart App and log-in. Select [Add printer].
-
Tap [On-demand] in the printer registration screen.
-
Tap the [QR] button on the On-Demand screen to load the [QR Code] displayed on the printer screen.
When the printer serial number is entered, tap the [Get a PIN] button to display the 4-digit PIN code.
-
Go to printer LCD and Input PIN to printer.
Press "Right key" to go to next screen.
Press the right softkey [✓] of the printer to confirm the entered PIN code.
-
Association Code is displayed.
Serial Number and Association Code are shown at printer display.
-
Tap the [QR] button on the On-Demand screen to load the [QR Code] displayed on the printer screen.
The association code will be entered. After entering the device name and selecting the location, tap the [Add] button. Registration of printer authentication using QR connection is completed.
Daily Checkup must be performed after the printer registration is completed.
Confirmation on SOS Web App
Check the [Device list] of SATO Online Services show operated serial number.
On-demand connection (QR code connection): CT4-LX
SOS mode settings
-
Display SOS menu.
[SETTINGS] > [Interface] > [Network] > [Settings] > [Online Services] -
Set SOS Mode as [On-Demand].

Display the QR code/PIN code on the printer
-
Select "Add Device" and keep showing QR code (Serial Number on the display).

Press the right softkey [✓] of the printer to close the window.
Printer Registration
Following two steps can be used. Choose the applicable one depending on registration method.
Register via PC: Register your printer via PC
Register via smartphone: Register your printer via SOS Smart App
Register your printer via PC
To register your printer via PC, you need to register the installation location.
Installation location (Group edit)
-
Select [Device] from Menu, choose Installation location, and click [New entry].
-
Enter [Required] fields in Device information, and press [Register] button.
-
Device information (serial number, device name, password) shall be entered by User.
Enter information.
-
Enter "SATO" for [Supplier name].
-
Select [Device model name] based on the serial number.
-
Please check if contracted service has been selected for [Service in use].
-
-
Select [Device] from Menu, choose Group to view registered device.
-
Click [SATO Online Services].
-
Click [+ Add device] on the upper right of the Dashboard screen as shown on the left, and select [On-demand/Light].
-
Enter the serial number.
Input screen of the printer serial number is shown. Enter the serial number of the added printer and click [Code] button. Enter the printer serial number you made a note before steps.
-
Return to "Printer screen" and enter the PIN code.
Press the right softkey [✓] of the printer to confirm the entered PIN code.
-
Enter the following items and click the [Add].
-
Association code
-
Device name: Identification name of printer
-
Location: Where printer is installed at
*Other item is optional.
-
-
Login to SATO Online Services.
Enter email address and password.
-
Click [+ Add device] on the upper right of the Dashboard screen as shown on the left, and select [On-demand/Light].
-
Enter the serial number.
Serial Number input screen is shown. Then input the printer serial number and press [Code] button.
PIN code is shown. Recommend to note it.
-
Return to "Printer screen" and enter the PIN code.
Press the right softkey [✓] of the printer to confirm the entered PIN code.
-
Printer serial number and association code are shown in the printer screen. It is recommended to make a note of the association code.
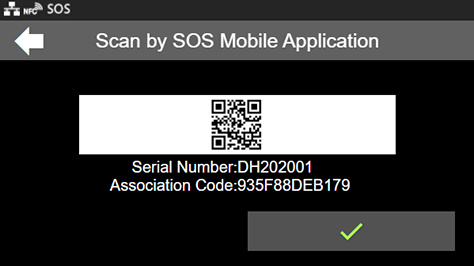
-
Click [Next] in the Add QR connection printer screen.
-
Enter the following items and click the [Add].
-
Association code
-
Device name: Identification name of printer
-
Location: Where printer is installed at
*Other item is optional.
-
Register your printer via SOS Smart App
-
Startup SOS Smart App and log-in. Select [Add printer].
-
Tap [On-demand] in the printer registration screen.
-
Tap the [QR] button on the On-Demand screen to load the [QR Code] displayed on the printer screen.
When the printer serial number is entered, tap the [Get a PIN] button to display the 4-digit PIN code.
-
Return to "Printer screen" and enter the PIN code.
-
Scan QR code with mobile.
-
Tap the [QR] button on the On-Demand screen to load the [QR Code] displayed on the printer screen.
The association code will be entered. After entering the device name and selecting the location, tap the [Add] button. Registration of printer authentication using QR connection is completed.
Daily Checkup must be performed after the printer registration is completed.
Confirmation on SOS Web App
Check the [Device list] of SATO Online Services show operated serial number.
On-demand connection (QR code connection): S84NX/S86NX
SOS mode settings
-
Push the power button on the control panel until the LED lights up in blue and turn on the printer. Then press
 left key or LINE key and set a printer to "OFFLINE".
 -
Press
Enter Key. -
Select [Interface] by using
key. Then Press Enter key.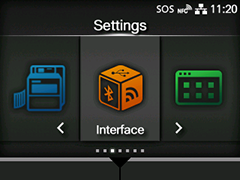
-
Select [Network] by using
key. Then Press Enter key.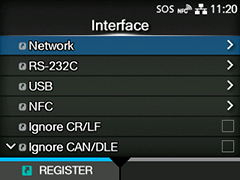
-
Select [Services] by using
key. Then press Enter key.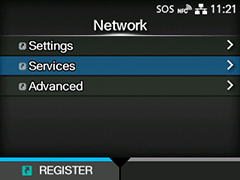
-
Select [Online Services] by using
key. Then press Enter key.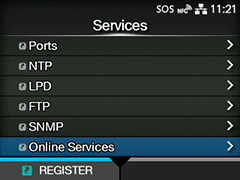
* If Online Services] menu is not displayed.
Please contact nearest SATO office and install a latest firmware. -
Change SOS mode and choose SOS Association.
* Change [SOS Mode] to [On-Demand] from [Disabled], and press [Add Device].
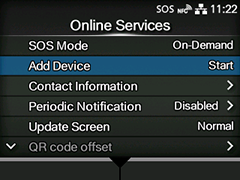
Display the QR code/PIN code on the printer
-
Serial Number is shown.
Press right key to move next screen. To register your printer, Serial Number is necessary.* Recommend to note this Serial No.
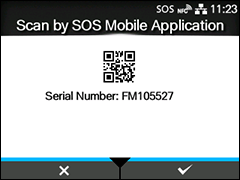
-
Input PIN code.
Login to SATO Online Services and get PIN code with following process.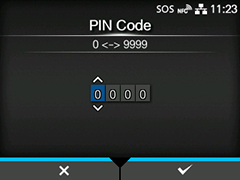
Printer Registration
Following two steps can be used. Choose the applicable one depending on registration method.
Register via PC: Register your printer via PC
Register via smartphone: Register your printer via SOS Smart App
Register your printer via PC
To register your printer via PC, you need to register the installation location.
Installation location (Group edit)
-
Select [Device] from Menu, choose Installation location, and click [New entry].
-
Enter [Required] fields in Device information, and press [Register] button.
-
Device information (serial number, device name, password) shall be entered by User.
Enter information.
-
Enter "SATO" for [Supplier name].
-
Select [Device model name] based on the serial number.
-
Please check if contracted service has been selected for [Service in use].
-
-
Select [Device] from Menu, choose Group to view registered device.
-
Click [SATO Online Services].
-
Click [+ Add device] on the upper right of the Dashboard screen as shown on the left, and select [On-demand/Light].
-
Enter the serial number.
Input screen of the printer serial number is shown. Enter the serial number of the added printer and click [Code] button. Enter the printer serial number you made a note before steps.
-
Go to printer LCD and Input PIN to printer.
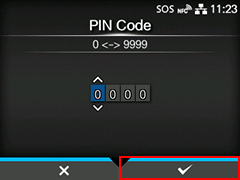
Input PIN code to printer. Press Right key to go to next screen.
-
Association Code is displayed.

Serial Number and Association Code are displayed. Press [Next] button at [Add on-demand printer] screen.
-
Click [Next] in the Add QR connection printer screen.
-
Enter the following items and click the [Add].
-
Association code
-
Device name: Identification name of printer
-
Location: Where printer is installed at
*Other item is optional.
-
-
Login to SATO Online Services.
Enter email address and password.
-
Click [+ Add device] on the upper right of the Dashboard screen as shown on the left, and select [On-demand/Light].
-
Enter the serial number.
Serial Number input screen is shown. Then input the printer serial number and press [Code] button.
PIN code is shown. Recommend to note it.
-
Return to "Printer screen" and enter the PIN code.
Press the right softkey [✓] of the printer to confirm the entered PIN code.
-
Printer serial number and association code are shown in the printer screen. It is recommended to make a note of the association code.
-
Click [Next] in the Add QR connection printer screen.
-
Enter the following items and click the [Add].
-
Association code
-
Device name: Identification name of printer
-
Location: Where printer is installed at
*Other item is optional.
-
Register your printer via SOS Smart App
-
Startup SOS Smart App and log-in. Select [Add printer].
-
Tap [On-demand] in the printer registration screen.
-
Tap the [QR] button on the On-Demand screen to load the [QR Code] displayed on the printer screen.
When the printer serial number is entered, tap the [Get a PIN] button to display the 4-digit PIN code.
-
Go to printer LCD and Input PIN to printer.
Input PIN code to printer. Press Right key to go to next screen.
-
Association Code is displayed.
Serial Number and Association Code are displayed. Press [Next] button at [Add on-demand printer] screen.
-
Tap the [QR] button on the On-Demand screen to load the [QR Code] displayed on the printer screen.
When the printer serial number is entered, tap the [Get a PIN] button to display the 4-digit PIN code.
Daily Checkup must be performed after the printer registration is completed.
Confirmation on SOS Web App
Check the [Device list] of SATO Online Services show operated serial number.
On-demand connection (NFC connection)
The on-demand connection using NFC requires scanning NFC of the printers with a mobile device (smartphone, tablet, etc.) where the SOS mobile application is installed beforehand. The printers are monitored for safety use by sharing the operating statuses, setting information, error information, etc. of the printers between the mobile device and the SOS cloud.
Please check the table below to see which model you are using. Click the text link in the right column for the model you are using.
|
|
If you cannot find the model you are looking for, please check our website.
https://www.sato.co.jp/products/printer/
On-demand connection (NFC connection): PW208NX
Push the power button on the control panel until the LED lights up in blue and turn on the printer. An initial icon ![]() is displayed at the top of the printer screen, but it is not yet connected with SATO.
Please make the following settings to link the printer and use account.
is displayed at the top of the printer screen, but it is not yet connected with SATO.
Please make the following settings to link the printer and use account.
|
Printer settings for SOS
-
Turn on the printer and go to “Online Service” to change SOS mode to Light.
-
When you press and hold the
button and button simultaneously for 2 seconds or more in the offline (stop) screen.
Select [Interface] > [Online Services] > [SOS mode] from the printer menu and set the SOS mode to [Light].
-
Log in to SOS Smart app select [Add printer] > [On-demand].
Only for NFC-enabled devices/smartphones running the Android OS or NFC must be enabled on the device/smartphone.
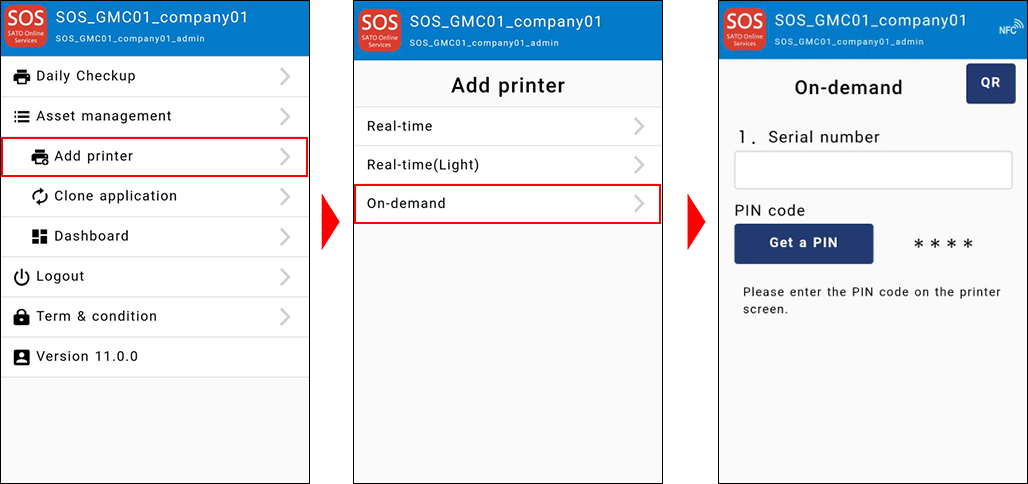
-
Touch the NFC of the printer with the Real-time Light displayed. NFC is installed in the red circle part of the figure below.
-
When NFC reading is completed, the screen is changed so enter the device name and installation location with SOS Smart App and tap the [Add] button. (The association code is not required to enter and leave it blank. This association code is required for on-demand (QR) connection).
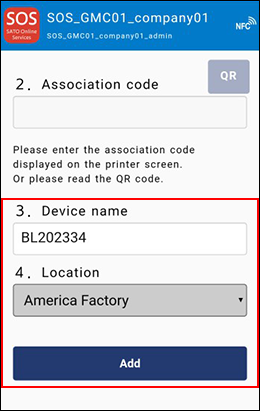
Confirmation on SOS Web App
Check the [Device list] of SATO Online Services show operated serial number.
SOS Web App
You can manage your registered printers using SATO Online Services.
-
Printer status
-
Usages of parts
-
Maintenance
-
Installation location and user registration/change
Common operations
When logging in, the following Dashboard is displayed.
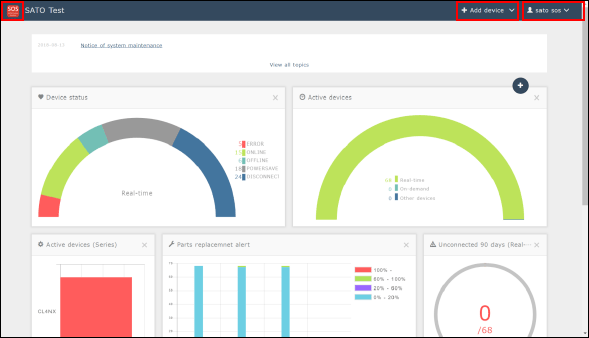
-
 Home button
Clicking the SOS mark on the upper left of the screen will display the Dashboard. -
 Adding a device
Clicking the Add device button on the upper right of the screen will display the device connection menu.-
[Real-time]: Displays a screen to add a network connection device.
-
[On-demand]: Displays a screen to add a QR connection device
-
[Other device]: Displays a screen to add an SOS-incompatible device or other devices. Other device batch registration.
-
[Other device batch registration]: Displays a bulk registration screen to add an SOS-incompatible device or other devices.
-
-
 Main menu
Clicking the login name on the upper right of the screen will display the main menu.-
[Login name]: Displays the User information screen.
-
[Dashboard]: Displays the Dashboard.
-
[Device list]: Displays the Device list screen.
-
[Company information]: Displays the Company information screen.
-
[Manage locations]: Displays the Manage locations screen.
-
[Terms of Use]: Displays the Terms of Use.
You can access the terms of use on the following page.
https://www.sato-sos.com/sos/sos_agreement.pdf -
[Contact us]: Displays the Contact us screen.
-
[Logout]: Select this to log out.
-
User Information
Re-set password
Change password from ID AUTH.
-
Select user to change password form [User], choose [Edit] to reset password.
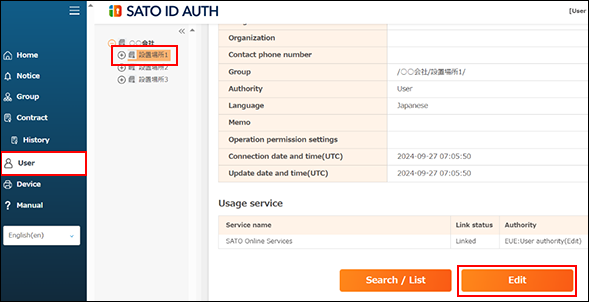
-
Re-set password.
User upper and lower half-byte alphanumeric up to eight characters. Note that symbol cannot be used at the top of the password.
-
Click [Update].
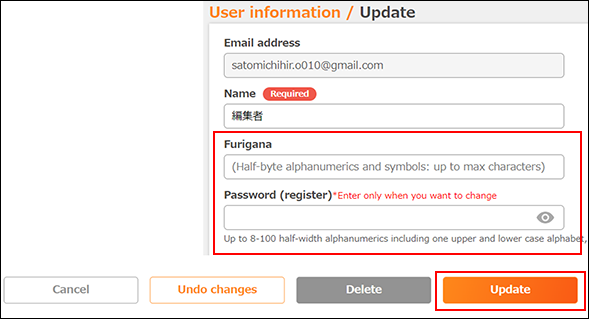
Password will be reset.
Updating user information
Click the account name on the common menu on the upper right.
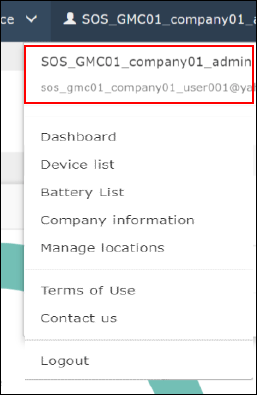
Updating user information
The following items can be edited on the User information screen.
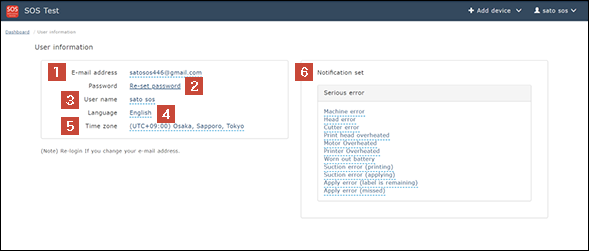
-
[E-mail address]
-
[Password]
-
[Username]
-
[Language]
-
[Time zone]
-
[Notification set]
Re-set password
Re-set password.
-
Clicking [Re-set password] on the User information screen will display the screen shown on the left.

-
Enter the new password twice, and click the [Set] button.
Re-set password must be a combination of alphanumeric with upper and lower case within 8 characters to register a password. However, a symbol cannot be used in the first character of the password. -
New password entry.
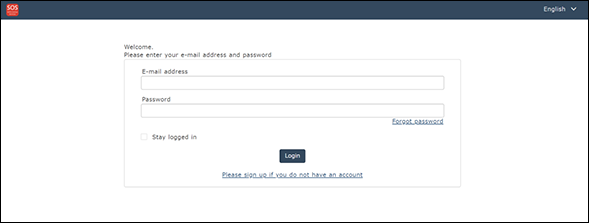
Enter the email address and the new password on the login screen, and click the [Login] icon
Dashboard
You can check the statuses of your devices clearly on this home screen.
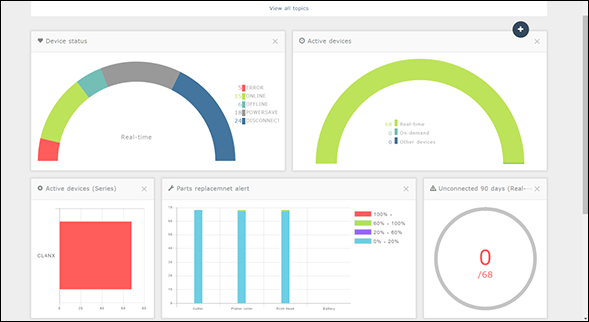
Topics
Displays topics related to SOS.
Notifies the maintenance, added new functions, etc. of the SOS system.
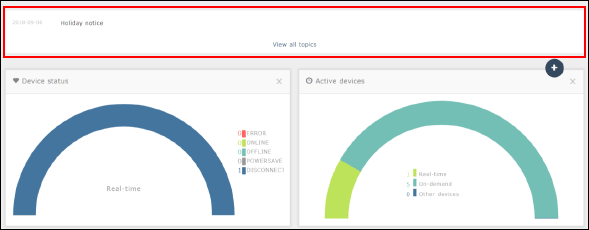
Click [View topics list] to check the past topics.

Dashboard parts
Individual parts that constitute the Dashboard are called the Dashboard parts.
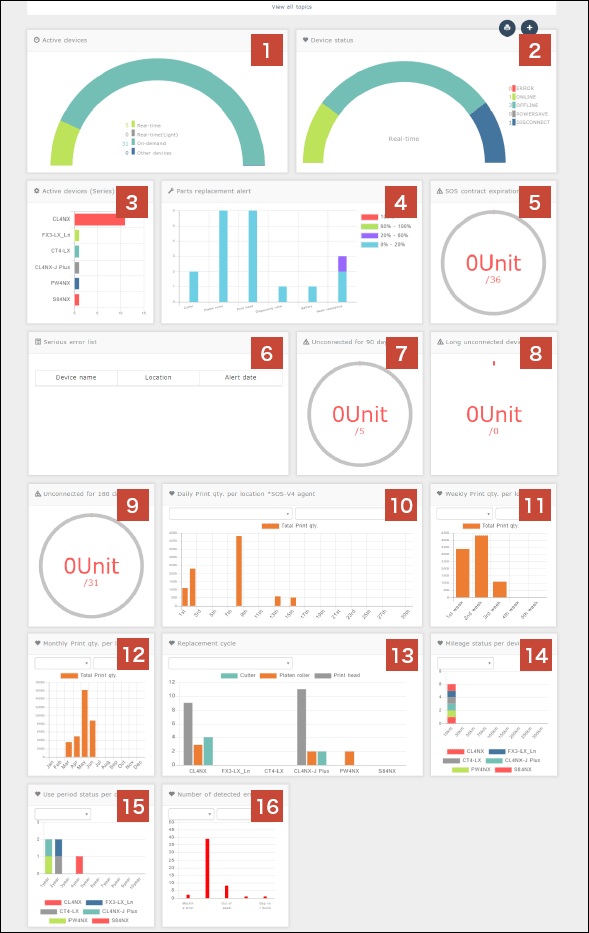
-
Number of registered devices
Show number of registered devices per network connection method in graph. -
Network connection status
For registered devices, show number of devices connected to network per connection status in graph. -
Number of registered devices per series
Show number of registered devices per series in graph. -
Consumables replacement alert
Show use status of consumables and the qty. per part in graph. -
Maintenance contract alert
Show number of devices with maintenance alert appeared. -
Serious error list
For registered devices, show a list of serious-error-detected devices with model name, installed location and the trouble date. -
Long unconnected (network)
For devices with long unconnected alert appeared, show number of devices which are "connected to network." -
Long unconnected (QR/NFC)
For devices with long unconnected alert appeared, show number of devices which are "connected via QR/NFC." -
Long unconnected (Lite mode)
For devices with long unconnected alert appeared, show number of devices which are "connected via Lite mode." -
Daily print qty. per device installed location
Show daily total label print qty. of registered devices in graph. Print history can be output via CSV file.* Feature supported in SOS agent V4 and later (for real time communication devices only)
-
Weekly print qty. per device installed location
Show weekly total label print qty. of registered devices in graph. Print history can be output via CSV file.* Feature supported in SOS agent V4 and later (for real time communication devices only)
-
Monthly print qty. per device installed location
Show monthly total label print qty. of registered devices in graph. Print history can be output via CSV file.* Feature supported in SOS agent V4 and later (for real time communication devices only)
-
Parts replacement log
Show replaced parts and the replacement cycle of the parts of the registered devices per series in graph. Parts replacement log can be output via CSV file.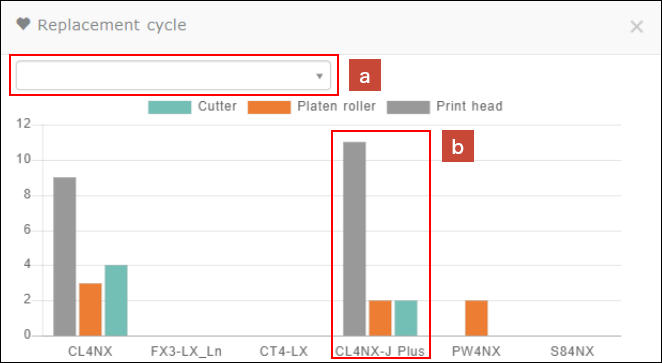
X axis
Device series
Y axis
Replacement cycle
Parts
Replacement cycle per part
-
Select device installed location
Device installed location of the devices displayed in the graph can be selected. If the search window is left blank, devices of all installed locations will be shown. -
Graph
By clicking the graph, device installed location can be selected and parts replacement log data file can be downloaded. The log can be used for understanding and analyzing parts replacement trend per serial number, installed location, etc.
-
-
Mileage
Show mileage of registered devices and number of devices per mileage in graph. Can also check how many devices have reached certain mileages. Mileage log can be output via CSV file.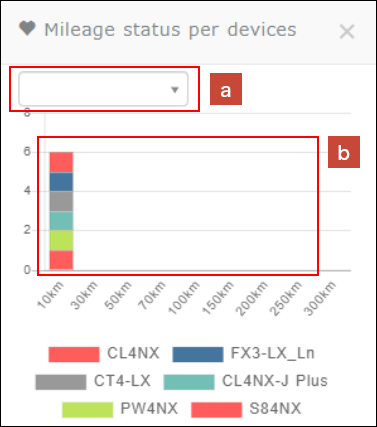
X axis
Mileage
Y axis
Number of devices
Device series
Number of devices per series
-
Select device installed location
Device installed location of the devices displayed in the graph can be selected. If the search window is left blank, devices of all installed locations will be shown. -
Graph
By clicking the graph, device installed location can be selected and mileage log data file can be downloaded. The log can be used for understanding and analyzing mileage trend per serial number, installed location, etc.
-
-
Use period
Show use period of registered devices and number of devices per use period in graph. Can check how many devices have reached certain use periods. Use period log can be output via CSV file.
X axis
Use period
Y axis
Number of devices
Device series
Number of devices per series
-
Select device installed location
Device installed location of the devices displayed in the graph can be selected. If the search window is left blank, devices of all installed locations will be shown. -
Graph
By clicking the graph, device installed location can be selected and use period log data file can be downloaded. The log can be used for understanding and analyzing use period trend per serial number, installed location, etc.
-
-
Number of errors detected per error type
Show errors detected in registered devices and number of errors detected in graph. Error log can be output via CSV file.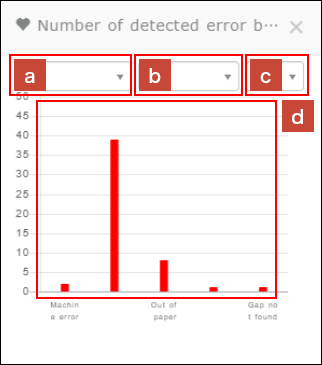
X axis
Error type
Y axis
Number of errors detected
-
Select error type
Error type displayed in the graph can be selected. If the search window is left open, all error types will be shown. -
Select month
Month displayed in the graph can be selected. If the search window is left open, current month will be shown. -
Select page
Maximum 8 error types can be shown in one page. More than 9 error types will be shown in multiple pages; select the page to be shown in the search window. -
Graph
By clicking the graph, error type and period can be selected and use error log data file can be downloaded. The log can be used for understanding and analyzing error trend per serial number, installed location, etc.
-
Dashboard parts settings
The Display locations of Dashboard parts can be changed.
-
Changing the display locations of Dashboard parts
Drag the Dashboard part you wish to move to the desired location in order to change the display location. -
Show/Hide setting for Dashboard parts
Clicking the plus button will display the Select display panel screen.
Add the checkmark to the Dashboard parts to display, and remove the checkmark from the Dashboard parts to hide.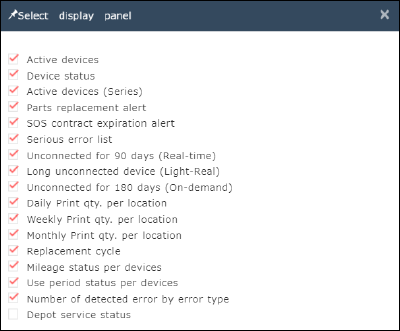
Device list
Using the Device list, you can search and manage the devices you have registered with SOS. To display the Device list, select [Device list] from the common menu.
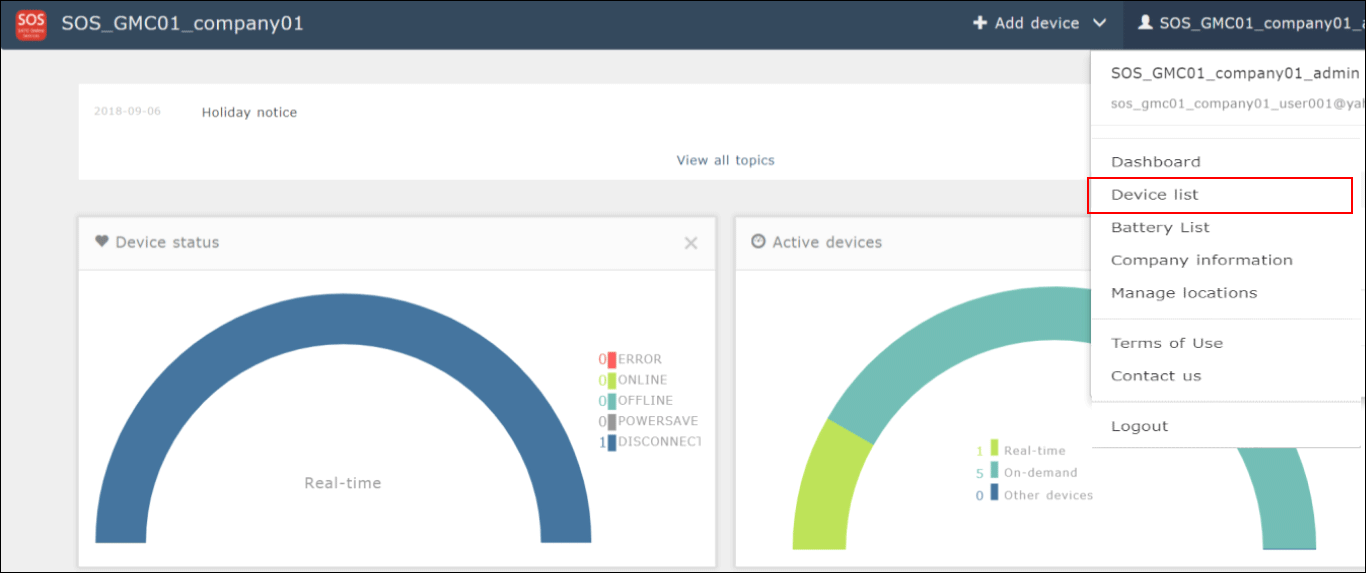
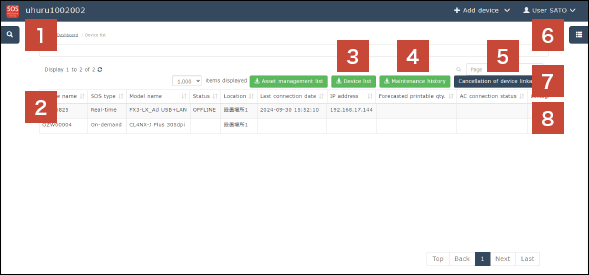
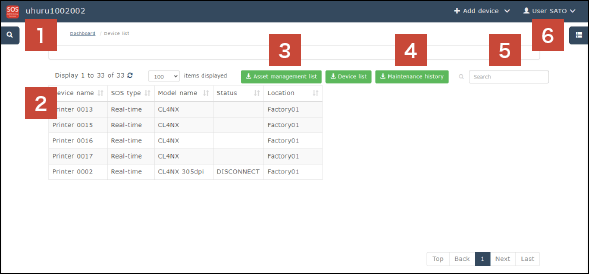
Device list control
-
Search window
Open the Search window, and narrow down devices to be displayed in the search result by using multiple items as search keys, such as device name and installation location. -
Details
Device details are shown. Clicking the Details will display the Device details screen that allows you to check more detailed information such as device setting information. -
Download button
Search results can be downloaded in a batch. More items are output with the Asset management button than with the Device list button. Note that the Asset management button can be used only by customers who have signed up for our maintenance support. -
Maintenance log button
Maintenance log of all devices can be downloaded via CSV file. The log can also be downloaded via CSV file from [Maintenance history] of [Device detail]. -
Free word search
Further narrow down the contents of the Device list currently displayed with free words. The search targets of the contents entered here are all columns. -
Display column selection
You can select columns to display in the list. Select necessary items such as consumption rate of printer consumables so that the selected items can be displayed at the next and succeeding searches. -
Cancel Device association/Associate Device
Cancels device association with SATO ID AUTH.* Do NOT cancel this association.
When device is not associated with SATO ID AUTH, Associate button (
 ) will show.
 -
Associated state
When device is associated with SATO ID AUTH, this symbol ( ) will be added.
Device details
Device details
On the Device details screen, you can display various information such as device setting information and usages of parts, and edit registration information of devices.
-
Device Panel
Displays the basic information of a device. Clicking the ( ) icon in the Display status field will enable you to capture the current printer screen.
(The capture function may not be used depending on the firmware version of the printer.) -
Edit device information button
Edit the displayed device name, and register or delete the device. -
Device details tab
Refer to the usage and setting contents of the device. Available information of the items are shown in the table below. (Contents of the table may vary according to future release of new models.)Summary
Replace spare parts
Responsible organization, Country, Status, Last error, Depot service, Last update, Serial number, Company ID, SOS type, Firmware, Contract number, Contract name, Contract start date, Contract expired, SOS agent version, Print method, Speed, Darkness range, Sensor type, Darkness, Print mode, Backfeed
Spare parts status (Platen roller, Print head, Cutter, Maximum head resistance), Platen roller replacement (Current parts, Parts replacement), Thermal head replacement (Current parts, Parts replacement), Cutter replacement (Current parts, Parts replacement)
Location
Usage
Company, Location, Postal code, Address, Contact number, Memo1, Memo2, Memo3
Parts replacement alert, Long unconnected, Total cuts, Life counter, Total print quantity, Print head usage ratio, Next service timing (Print head), Number used (Print head), Cutter usage ratio, Next service timing (Cutter), Number used (Cutter), Platen roller usage ratio, Next service timing (Platen roller), Number used (Platen roller), Battery charge count, Battery status, Number of labels used in total, Number of ribbons used in total, Total application times, Number of passes, Total power-on time, Total suction time, Uptime, Life counter prediction, Total print quantity, Daily average print quantity, Weely average print quantity, Monthly average print quantity
Asset information
Real-time
Device name, Series, Model name, SOS registration date, Asset number, Asset acquisition date, Installation date
Clone, MAC address, IP address, DNS: IP address, Proxy On/Off, Proxy: IP address, NTP: IP address, Bluetooth enabled, Wi-Fi status, RFID enabled, W-LAN module type, MQTT protocol
-
Device details tab(CL-SXR)
Summary
Replace spare parts
Responsible Party, Country, Status, Last Error, Depot Repair Status, Last Connection Date/Time, Serial Number, Company ID, Connection Type, Firmware, Contract Number, Contract Name, Contract Start Date, Contract End Date, SOS Agent Version, Printing Method, Print Speed, Print Density Range, Sensor Type, Print Density, Operation Mode, Backfeed Operation
Parts Status (Platen Roller, Thermal Head, Cutter, Thermal Head Resistance MAX), Platen Roller Replacement (Current Parts, Parts Replacement), Thermal Head Replacement (Current Parts, Parts Replacement), Cutter Replacement (Current Parts, Parts Replacement)
Location
Usage
Company Name, Installation Location, Postal Code, Address, Contact Phone Number, Note 1, Note 2, Note3
Replacement alerts, long-term disconnection, total mileage, paper replacement count, ribbon replacement count, Continuous operating time, total mileage prediction, total issuance count, daily average issuance count, weekly average issuance count, monthly average issuance count, temperature, humidity, power supply voltage, RFID module temperature (UHF), RFID module temperature (HF), cut time (UP/DOWN)
Asset information
Platen Roller Information
Equipment Name, Series, Model Name, SOS Registration Date, Asset Management Number, Asset Acquisition Date, Installation Date
Platen usage rate, Platen replacement prediction, Number of platen replacements
SIM Information
Smart Head Information
Phone number, carrier, SIM serial number, communication protocol, reception level, communication mode, IPv4 settings, IPv6 settings, communication data volume
Head usage rate, Head replacement prediction, Number of head replacements, Product name, Product code, Lot number, Actual resistance value, Dot density, Start date/time, Head travel distance, Total pulses applied, Thermistor MIN, Thermistor MAX, Head breakage presence, Head breakage detection date/time, Head breakage location, Travel distance at head breakage, Total pulses applied at head breakage, Thermistor at head breakage, Printing density at head breakage, Speed at head breakage, Error threshold
Cutter Information (Displayed only during use)
Real-time
Total cutter usage count, cutter utilization rate, cutter replacement prediction, cutter replacement count
Clone, MAC Address, IP Address, DNS: IP Address, Proxy On/Off, Proxy: IP Address, NTP: IP Address, Bluetooth Enabled, Wi-Fi Status, RFID Enabled, W-LAN Module Type, MQTT Protocol
-
Printer log tab
Check the history of operations performed by the SOS system to the device, history of errors and warnings that have occurred on the printer, etc. The details are described in the next and subsequent pages. -
Control panel tab
Printer control can be performed such as test print to the printer from the SOS system. The details are described in the next and subsequent pages. -
Maintenance history tab
Maintenance log of devices can be viewed and downloaded. -
Settings tab
Refer to the setting parameters of the printer and change the settings. The details are described in the next and subsequent pages. -
Association icon
When the device is associated with SATO ID AUTH, this symbol ( ) will be added.
Printer log tab
-
Search conditions
A log extraction period and log type can be specified as search conditions. -
Download button
The search result of the displayed log can be downloaded in text file format.
Control panel

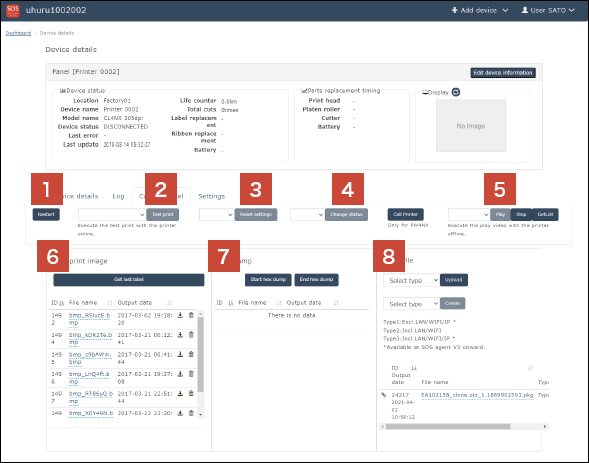
-
Restart button
The printer can be restarted on the SOS system. Note that when labels are being issued, it is stopped before restart. -
Test print button
Select an item to test-print from the combo box, and click the [Test print] button to direct the printer to test print. -
Reset settings button
Select [UserReset(-I/F)] from the combo box, and click the [reset settings] button. Then the setting parameters of the printer can be restored to the default values. -
Change status button
Select ONLINE or OFFLINE from the combo box to change the printer status. -
Play video
Help videos built into the printer can be played on the printer. Click the [GetList] button to display the list of playable videos in the combo box. Select a video, and click the [Play] button to play it. -
Last print image acquisition
Acquire the image data of the last-printed label with the printer. The acquired data can be downloaded from the list beneath the button. -
Hex dump acquisition
Clicking the [Start hex dump] button will start to acquire the Hex dump (file containing the issue direction data from PC, etc. to printer expressed hexadecimally). Clicking the [End hex dump] button will upload the Hex dump of the data printed during the period from Hex dump start to end, to the SOS system. The data uploaded to the system can be downloaded from the list. -
Clone file operation
Upload the Clone file (file with the printer settings copied) from the PC or printer. By changing the clone type in the combo box, you can change the contents included in the Clone file to be uploaded.-
Type 1 – Excl.LAN/WIFI/IP: Setting parameters except for network settings including IP address(*)
-
Type 2 – Incl.LAN/WIFI: Setting parameters except for IP address
-
Type 3 – Incl.LAN/WIFI/IP: All setting parameters(*)
* Supported in SOS agent V3 and later.
-
Type 4 – Incl.LAN/WIFI/IP: All setting parameters(*)
* Supported in SOS agent V3 and later.
Automatic Clone Acquisition
* This feature is available only to customers with an active maintenance contract, and only when CL4-SXR/CL6-SXR printers are connected via a network connection.
When the printer settings are changed, an automatic clone backup is executed, and the latest three generations are stored in SOS Cloud.
In cases such as printer board replacement, the original settings can be restored.
When an initial transmission message is received from the printer, an instruction to upload the configuration file to the target printer can be automatically issued.Printer Settings
Set the printer’s Auto Clone setting to ON.
[Settings] > [Tools] > [Clone] > [Auto Clone]* When the printer board is replaced, the default value of Auto Clone is "OFF", so be sure to set it to "ON".
SOS Web App
[Device Details] > [Control Panel] > [Clone Files]
Automatically backed-up clones are displayed as "Type4".
"Apply", "Download", and "Delete" are available. icon
iconClick this icon to switch enable/disable of Clone file sharing within the same installation location.
 icon
iconClick this icon to apply the Clone file to this printer.
 icon
iconDownload the Clone file.
-
Settings tab
The setting information list of the SOS network connection device is acquired when the Settings tab is displayed.
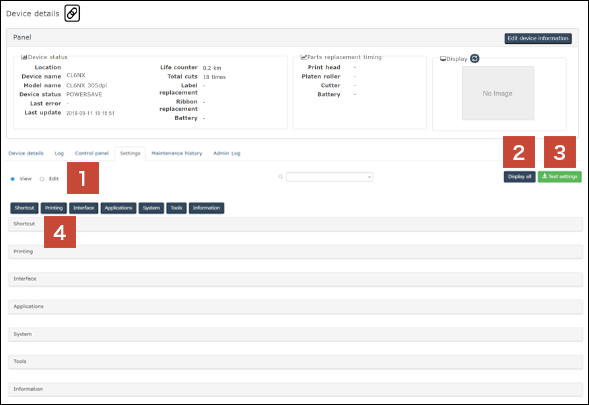
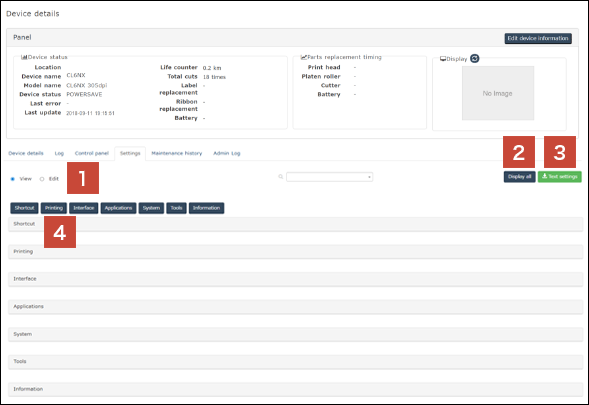
-
Edit/View switching button
Switch between the View mode and Edit mode. When changing the setting parameters of the printer on the SOS system, select the Edit mode. -
Display all button
This button expands all the folded items. Pressing the button again will return to the previous state. -
Text file output of setting value button
The setting parameters are downloaded as a text file in a batch. -
Setting fields
View the setting parameters of the printer and edit them on the SOS system. For details of each setting parameter, see the manual corresponding to your printer.
Maintenance history tab
Maintenance log of registered devices can be viewed.
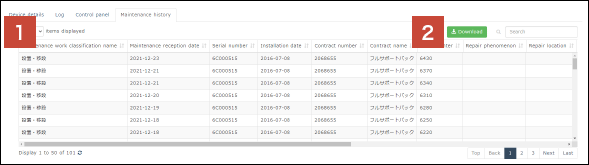
-
Maintenance history list
Maintenance history for the number of items displayed will be shown.
Viewable items in Maintenance history list are as follows: Maintenance work classification name, Maintenance reception date, Serial number, Installation date, Contract number, Contract name, Total counter, Repair phenomenon, Repair location, Installation location name, Installation location address, Spare parts name, Spare parts quantity -
Download button
Maintenance history can be downloaded via CSV file. Maintenance log of all devices can be downloaded via CSV file in a batch from [Maintenance history] of [Device list].
Downloading asset information
You can download the device information displayed on the Dashboard in the CSV file format.
Click the Device list on the main menu to display the [Device list] screen.
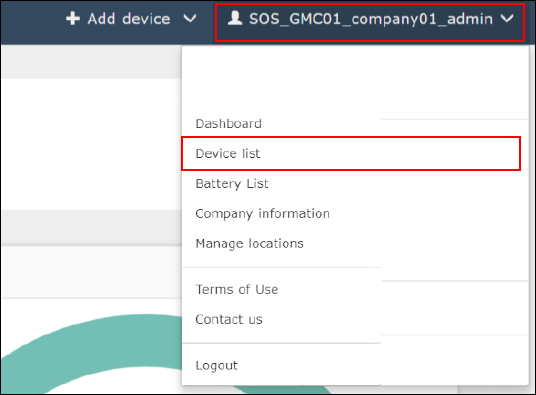
Click the [Asset management list] button on the Device list screen to download the CSV file.
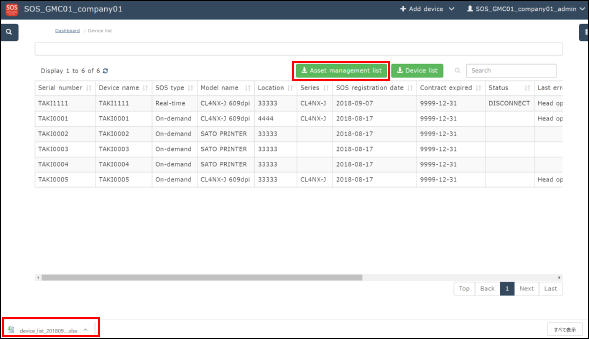

After the CSV file is successfully downloaded, click the bottom right of the screen to display the file in Excel format.
Battery list
In Battery list, batteries used in the devices registered to SATO Online Services by customers can be searched and managed. Battery list can be shown by selecting “Battery list” from the common menu. This feature is supported in devices that use batteries.
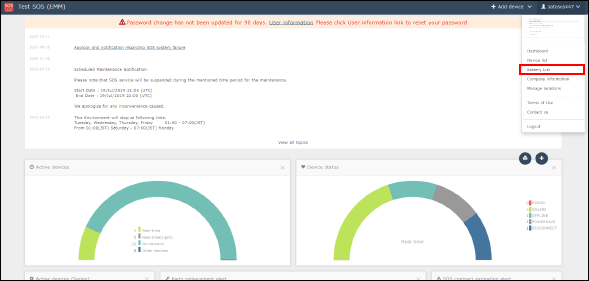
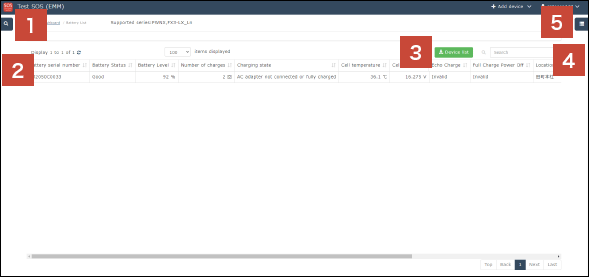
-
Search window
Open Search window to filter multiple items to be displayed in the keys including battery status, remaining battery capacity. -
Battery information
Show Battery information. Display items can be customized.* [Battery serial number] will be supported from the newly releasing devices.
-
[Device list] button
Battery list information can be downloaded via CSV file. -
Free word search
Devices shown in Battery list can be further filtered by free word search. Entered free word applies to all lines shown in the Battery list. -
Select display items
Display items in Battery list can be selected. Choose necessary items such as battery status and remaining battery capacity to show the selected items from the next time onwards.* The “Battery serial number” feature will be available on newly launched devices.
* Supported models may change in accordance with future product releases.
Company info
Updating company information
Clicking the Company information on the main menu will display the Company information screen.
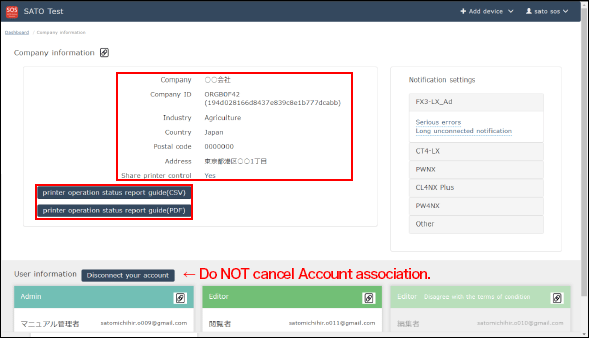
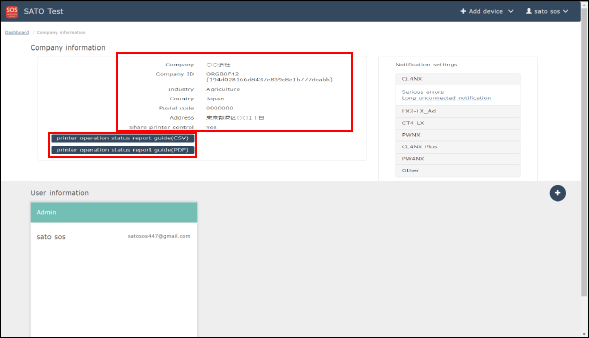
When logging in with the administrator authority or editor authority, Company, Industry, Country, Postal code, Address and Share printer control can be edited. When logging in with the viewer authority, viewing is only possible.
-
About Share printer control
If Share printer control is set to "Yes," the settings of your label printers can be changed by our customer help desk.
Support is provided when you have any problems.
If Share printer control is set to "No," the settings of your label printers cannot be changed by our customer help desk.
Viewing is only possible. -
Printer operation status report notification (CSV) (PDF) (Appears when applicable data is created.)
Operation status report of contracted printers will be distributed quarterly. After the notification email is distributed, the data can be downloaded.
By pressing buttons, the data will be output via file and the data can be checked.
Company - Notification settings
Clicking the Company information on the main menu will display the Company information screen.
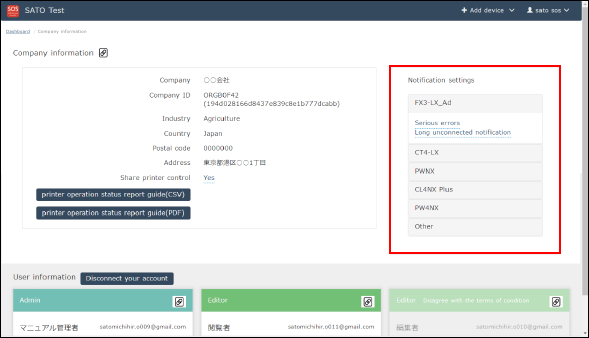
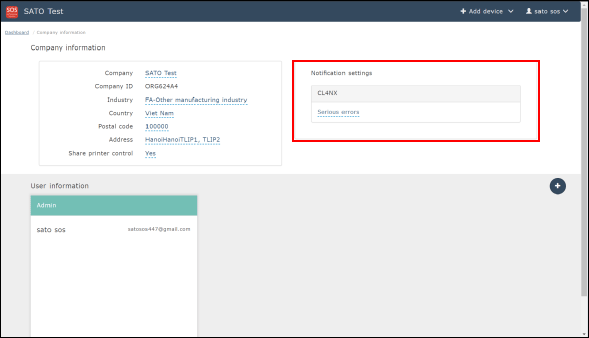
When logging in with the administrator authority or editor authority, Notification settings can be edited. When logging in with the viewer authority, viewing is only possible.
-
About Notification settings as default
As default settings, an email notification is sent if serious errors designated by our company occur. -
Editing Notification settings
Clicking Serious errors, etc. of the series to edit notification settings will open the screen of the notification settings details. Then the detailed settings can be made. The notification settings can be made for each series.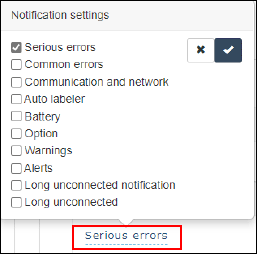
-
Notification type
Notification settings and errors are shown in the below table. Those may not be supported by some series.Critical error
Machine error, thermal head error, cutter error, battery degradation
Common errors to devices
Head open, paper end, ribbon end, printing skip error, sensor error, cutter is open, overheat error, head density change, gap not found, cover open, I mark not found, paper jam error, power ON/OFF switch error while printing, abnormal supply voltage error, printing skip error, over range printing error, paper auto-feed error, tag not found, write failure, tag read failure, tag locked for writing or tag cannot be written, write value and read value unmatched, lock failure, wrong tag UID is read, multiple tags captured at once, inconsistent EPC, writing is locked or no power to write, wrong tag type selected, internal error occurred, out of power, auto clone error, Bluetooth MFi chip error
Communication, network
Program error, communication condition check (parity/overrun/framing), buffer overflow, USB memory read/write error, USB memory storage is full, command error, calendar error, BCC unmatched, NTP error, EAP authentication error, EAP authentication error (timeout), Bluetooth error, CRC check error, WLAN error
Auto-labeling
Adherence error (while printing/label pasting), label paste error (takeaway, no pasting), over capacity (data not available/offline/start point warning/label paste ongoing), cylinder error (forward/backward), emergency stop error, nip is open, backing winding non-lock error, assisting nozzle error, dumper error, pasting area save error, internal signal trouble, dedicated error1, dedicated error 2, dedicated error 3, external alarm, internal signal trouble2
Battery
Low battery, low battery error (charging), battery not inserted, cannot use battery, battery temperature error, battery error, charging, battery consumption warning, power off error, re-setting, charging error,battery consumption warning
Options
RFID tag error, RFID system error, option error, non-RFID warning, NFC error, NFC command error, barcode reader connection error, barcode read error1, barcode read error2, barcode matching error, RTC module error, RFID SRA Error, RFID overheat error, option not supported
Warning
Ribbon near end, label near end, head error
Alert
Excess address, printer cleaning needed, thermal head replacement needed, cutter replacement needed, platen roller replacement needed
Long time disconnection notification
Network long-term unconnected
Information
Maintenance, Email notifications of failures, etc.
Printer operation status report notification
Notification email of printer operation status report
Company - User information management
Clicking the [Company information] on the main menu will display the Company information screen.
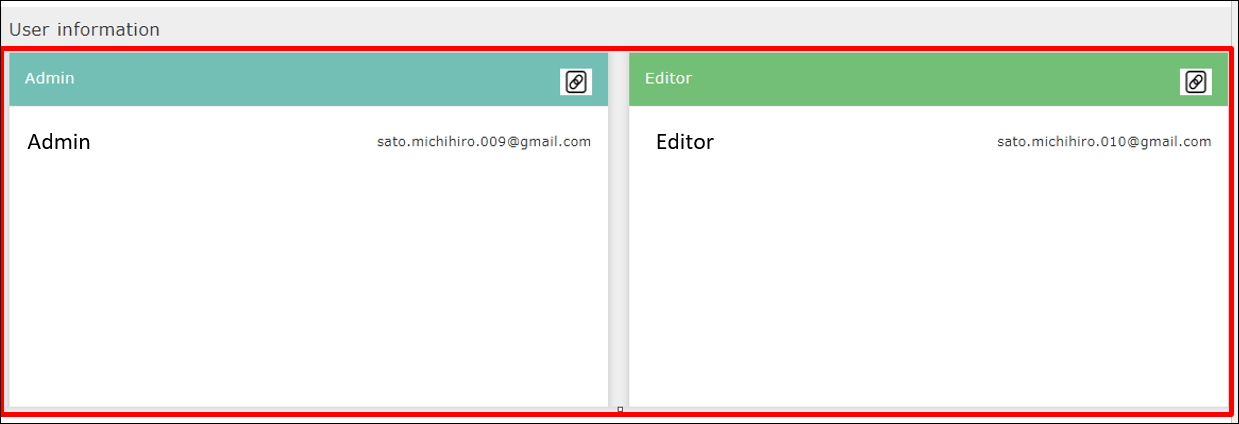
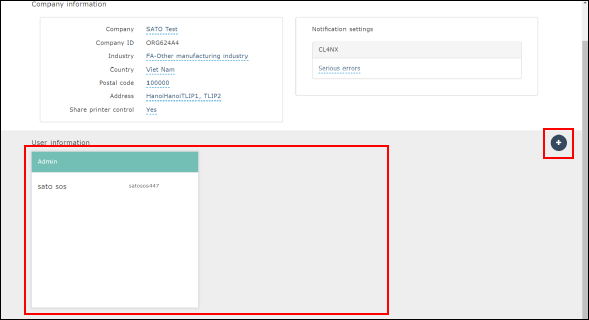
User information screen will show when login is made by Administrator's authority and add/edit/delete of User can be performed.
Only when logging in with the administrator authority, the User information is displayed, and users can be added, edited and deleted.
Adding a user
-
Select [User] form Manu and choose Company to register from the tree. Click [New entry].
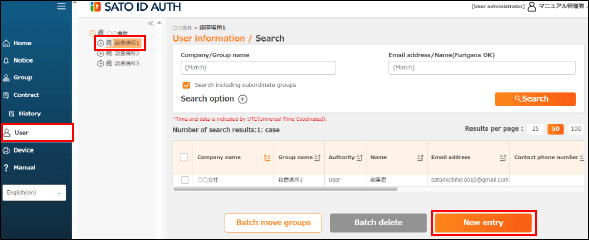
-
Enter [Required] fields in User information and press [Register] button
* Please see SATO ID AUTH authority for the authority.
2 Edit User information
-
Select [User] form Menu, choose Group, and select User to edit.
-
-Click [Edit] to edit the items.
Delete User
-
Select [User] from Menu, choose Group, choose User to delete. Click [Batch delete].
-
Adding a user
Clicking the plus button on the right side of the screen will display the New user screen.
Enter E-mail, Username, Access level and Responsible location of the person to invite, and click Add. Then an invitation mail is sent to the entered email address.
The invited person clicks the URL written in the received email, open the login screen, and log in with the email address and temporary password.
-
Editing a user
The authority indication and responsible location of the user displayed with a dotted underline can be edited.
-
Deleting a user
Click the trash can mark to delete the user.
To invite a user once deleted, add the user.
Access level setting
SATO ID AUTH authority
SOS authority after associated with ID AUTH
| ID AUTH | SOS |
|---|---|
|
User administrator authority checked with operation authority setting |
Management authority: entire authority including adding user is available |
|
User authority (Edit) authority checked with operation authority |
Edit authority: add User/Device cannot be performed |
|
User authority (View) not checked with operation authority |
View authority: limited information can be viewed |
Access level setting
SOS classifies the access level of users logging in into 3 types: Administrator, Editor and Viewer to enable appropriate management.
- Admin: Adding a user and all the other operations are allowed.
- Editor:. Adding a user, device, etc. is not allowed.
- Viewer: Viewing only restricted information is allowed.
Manage installation location
Installation location (Create new group)
SOS manages Installation locations, and ID AUTH manages Groups. Group can be registered from ID AUTH. Registered Groups can also be checked from SOS.
Select [Company/Group] from Menu, and choose the company to register from the tree.
-
Check Company name, and if correct, switch to [Group] tab and press [New entry] button.
-
Enter [Required] fields in Group information, and press [Register] button.
* Check [Parent Group” is the applicable Company. [Group name] for ID AUTH, [Installation location] for SOS is shown.
Installation location reference (SOS)
Click [installation location management] from Menu, item window will open as shown in the left image. Please edit from ID AUTH.
* Please change email receive setting from SOS.
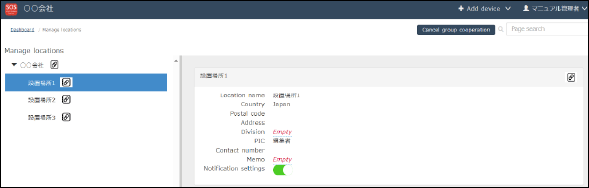
Installation location (Group edit)
Click [Company/Group] from Menu, click Group to edit, click Edit to edit the items.

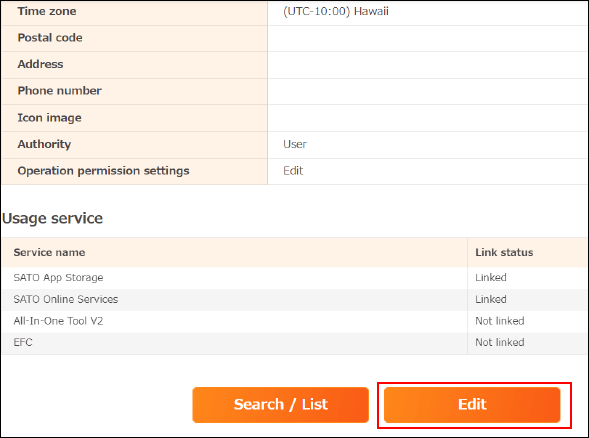
Manage Locations
The installation locations of printers can be added, edited, copied and deleted.
Select Manage locations from the common menu on the upper right of the Dashboard screen.
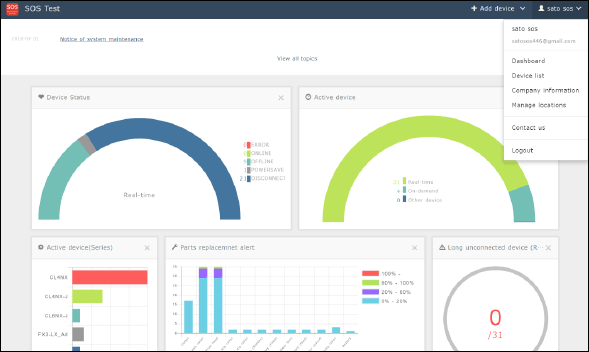
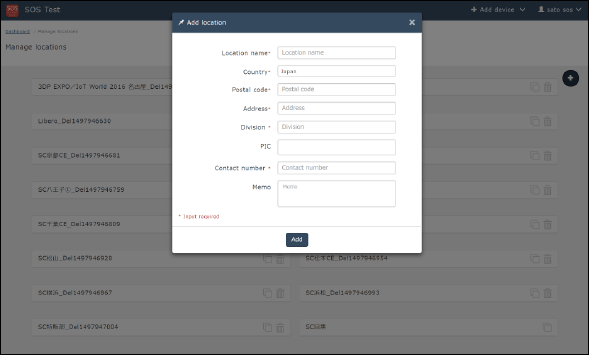
-
Adding installation locations Click the [+] icon on the Manage locations screen, open the Add location screen, and enter the following items.
-
Location name *
-
Country *
-
Postal code *
-
Address *
-
Division *
-
PIC (Person In Charge)
-
Contact number *
-
Memo
* All fields followed by an asterisk must be filled in.
-
After the field entries are complete, click the [Add] icon to complete the setting.
Editing, copying and deleting installation locations
Clicking the location name to edit will open the editing items as shown on the left. Select the item, and edit it. After entry, click the checkmark to complete the setting.
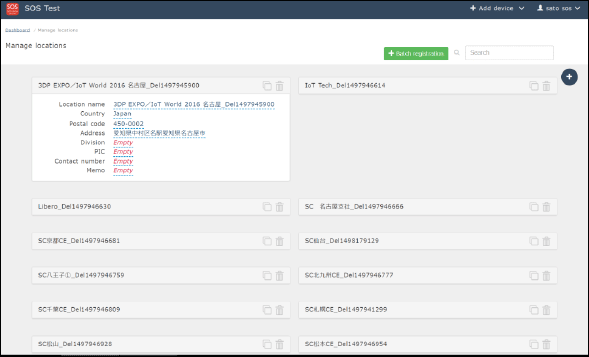
To copy the installation location, click the [ ] icon on the right side of the location name.
To delete the installation location, click the [ ] icon on the right side of the location name.
Batch-register printer installed locations
Click [ ] button to show pop-up and select special format to batch-register the printer installed locations
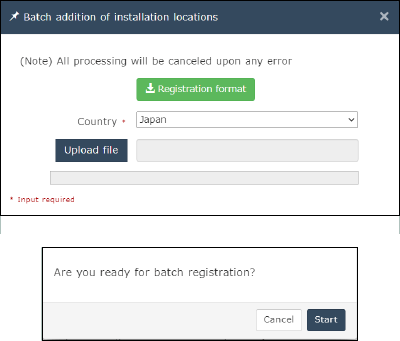
Maximum 2000 cases can be registered at a time to realize time-savings and work efficiency.
Click [ ] button to download the special registration format. When a generated file is selected, batch registration dialog will be shown. Click [Start].
* For registration error, error information file will be output.
Terms of Use
Terms of Use: Displays the Terms of Use.
You can access the terms of use on the following page.
https://www.sato-sos.com/sos/sos_agreement.pdf
Contact Us
If there is any inquire, Press the contact us from the SOS main menu and fill in all fields.
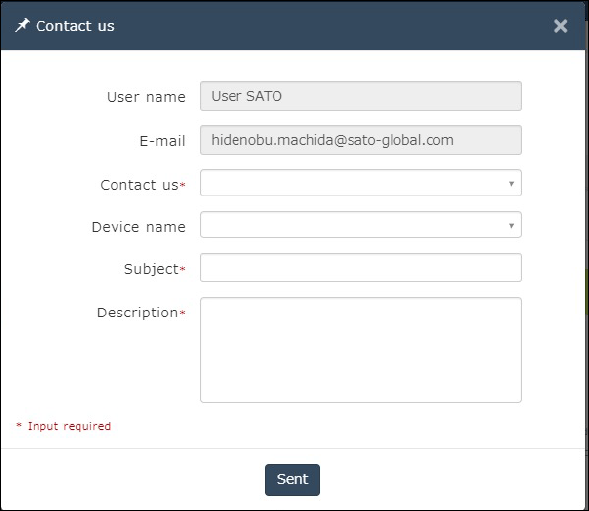
SOS Smart App
Introductions
About SATO Online Services (terms & condition)
Thank you for using the SATO Online Services.
SATO Online Services (hereafter referred to as SOS) monitors all printers using the IoT technology, and performs preventive maintenance, “Proactive action” for consumable parts by tracking the operating statuses. Furthermore, in case of a malfunction, SOS identifies the cause immediately to contribute to quick troubleshooting, and drastically reduces the downtime due to printer errors.
This manual will explain another means to support customers' stable operation, how to use SOS Smart App. Be sure to check terms and conditions posted in the Smart App when using it. We will provide SATO Online Services as agreed upon at account registration.
To monitor printer operation
SOS Smart App sends operation status to cloud by using mobile communication network. For collecting operation information, use QR / NFC which is standard installed in the printer. The following functions are realized based on the collected information.
About preventive maintenance
Consumable parts we designed have threshold value for replacement. You can grasp the state of equipment such as when consumable replace to, display of target equipment on the web.
On-demand (QR/NFC) Conditions for replacement timing calculation: We will inform you about equipment that was predicted to exceed the threshold value scanned by the QR / NFC 3 times or more and within 3 months, within approximately one week.
Manage printer per installation location. (Hierarchy of equipment management)
A first user who invited by SOS is administrator of your organization. Administrator can create editable user, readable user and can sends invitation to both. And it can also create device locations. To use SOS Smart App, please login with these account.
How to get SOS Smart App
To use SOS on your mobile device, please install the SOS Smart App using the following steps:
Android
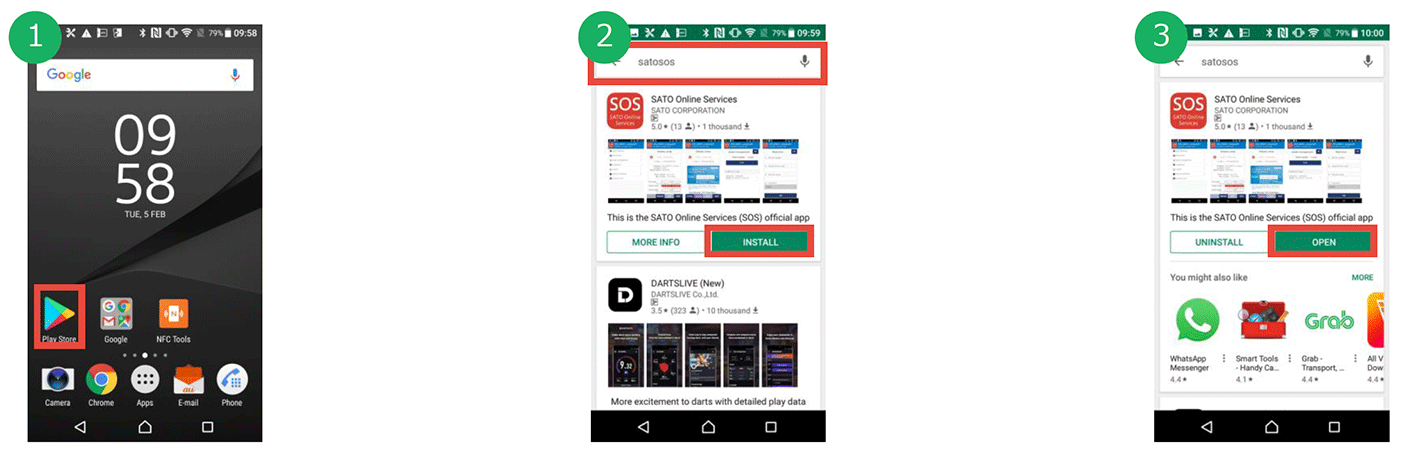
Android 9 or later.
-
Tap [Play Store].
-
Search with "SATO Online services"
Tap [sato online services].
-
Tap [INSTALL] button to install.
-
Tap [OPEN] button to start SOS.
iOS
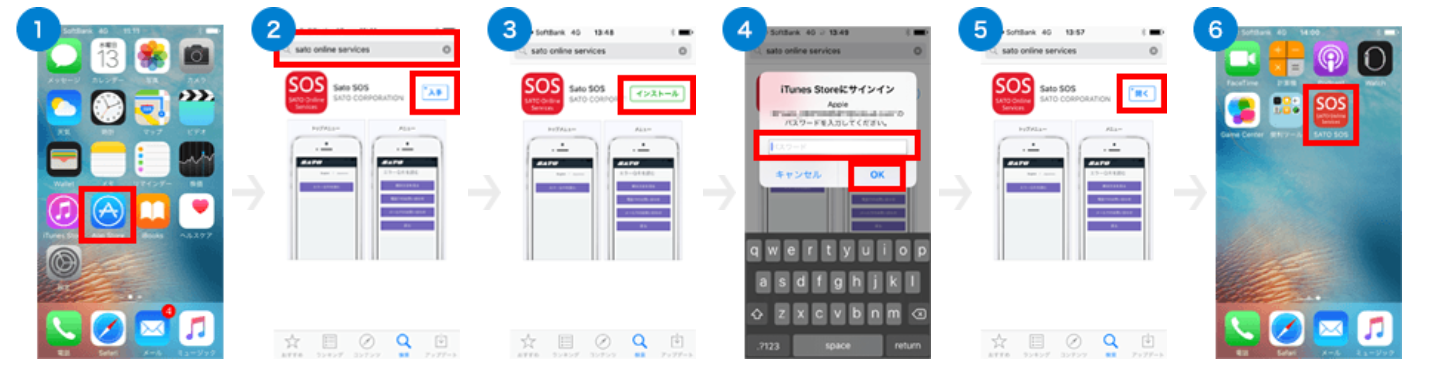
iOS 18 version.
-
Open App store.
-
Search with "sato online services".
Select Sato SOS from search result.
-
Press [install] button.
-
Enter your iTunes Store password and press [OK].
-
Press open after installation completed.
-
Launch the application from shortcut of Smart App.
About Update
SOS Smart App get new version automatically if your Smart phone sets to auto update. If it sets to manual update, SOS Smart App will display a dialog to get a new version of SOS.
How to get a login account
Before using SOS, create a representative account to log in to SOS by SATO local office or our contracted business partners. After an administrative account that represents an individual company or organization is created, the representative account can invite multiple accounts for each printer location or each division.
First, SATO local office or our contracted business partners create the representative account.
For SATO ID AUTH users a new account needs to be created from SATO ID AUTH (hereafter called ID AUTH).
Please see SOS Manual for SOS Association for how to create an account.
Notes when login is made via SATO ID AUTH
Before login
|
Login |
Enter ID and password of ID AUTH account and press login button. |
|
Forget password |
Do NOT reset password from [Forget password] button. Please reset password from ID AUTH |
After login
|
Update installation location |
ID AUTH user cannot update installation location. |
|
Register network-connected device |
In cased of ID AUTH account, device will be registered at the same time when the device in SOS side is registered. |
|
Register light mode-connected device |
In case of ID AUTH account, device will be registered at the same time when the device in SOS side is registered. |
|
Register QR/NFC-connected device |
In case of ID AUTH account, device will be registered at the same time when the device in SOS side is registered. |
|
Dashboard |
In case of ID AUTH account, screen will shift to Maintenance screen. |
Function of SOS Smart App
Important point of reading NFC
Instead of reading QR, you can grasp printer information by touching the red circle in the figure with a smartphone.

|

|
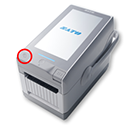
|
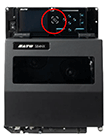
|
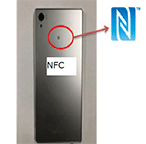
|
|
Important point of reading NFC
Reading of NFC is supported only for NFC implementation model with Android smartphone. There are notes on reading NFC tags. "Overlap the NFC mark of the smartphone and the printer when execute the reading."
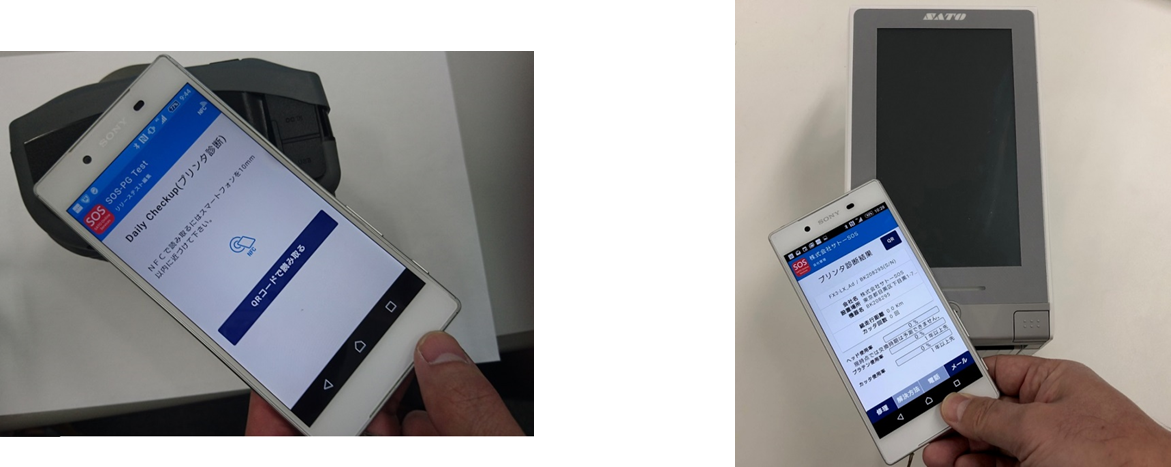
* When reading fails continuously, NFC may not be able to be read depending on the model. In this case, restart of your smart phone is required. Please pay attention to the reading position of NFC.
About printer's power on/off when reading NFC
When printer power is ON, NFC prioritize Bluetooth connection due to specification of android OS and NFC may not be able to read. For this reason, we recommend turning off printer power when reading NFC.
|
Function name |
Operate with Power ON |
Operate with Power OFF |
|---|---|---|
|
Daily Checkup |
- |
✓ |
|
Asset management |
- |
✓ |
|
Add printer |
- |
✓ |
|
Make clone |
✓ |
- |
Basic Functions
Functions (login)
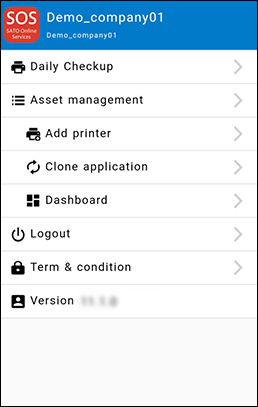
-
Daily Checkup
Function to check printer status with reading QR or NFC. To check the operation status of the printer and the usage rate of consumable parts. -
Asset management
Read the QR / NFC displayed on the printer and supports management of printer assets and inventory work. To check the above data and export data with SATO Online Services. -
Add printer
Sign up your printer to SOS. -
Clone application
Read printer NFC and let printer to create or apply clone files.* Clone file has each settings of printer.
-
Dashboard
ID AUTH user cannot view the dashboard. Please use SOS Web site.Go to SATO Online Services (Web) and "device list" screen is appeared. -
Logout
Select this to log out -
Terms of Use
Displays the Terms of Use.
Basic function when not logged in
When you not logged in to SOS Smart App, the menu like left picture is shown.
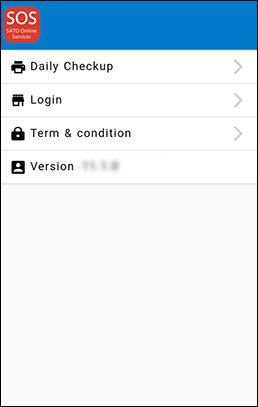
-
Daily Checkup
Function to check printer status with reading QR or NFC. You can check the operation status of the printer and the usage rate of consumable parts. -
Login
You can login to SATO Online Services.Please use email address and password used when SATO ID AUTH account was created. -
Terms of Use
Displays the Terms of Use.
Account functions
There are function restrictions as shown in the table below depending on the SOS login account authority.
| Admin | Editor | Viewer | |
|---|---|---|---|
|
Daily Checkup |
✓ |
✓ |
✓ |
|
Add printer |
✓ |
✓ |
- |
|
Asset management |
✓ |
✓ |
✓ |
|
Dashboard |
✓ |
✓ |
✓ |
|
Login / Logout |
✓ |
✓ |
✓ |
|
Term and condition |
✓ |
✓ |
✓ |
* The editor cannot delete data. And you can operate only the printer of the limited installation place.
Daily Checkup
Timing to use
The Daily Checkup performs preventive diagnosis of the printer by reading the QR code or NFC tag which is explained below.
* When an error occurs (read NFC tag or read QR code displayed on screen)
* Periodic notification.
Please perform this operation at least every 3 months to implement preventive maintenance of consumable parts.
Operation when printer error occurred.
When printer error occurred, printer can display QR code to the screen. To read this QR code with SOS Smart App helps early solution of an error. In case of PW208NX series, read NFC tag when an error is displayed on the screen.
-
When an error is occurred at a printer, the error message is shown on the printer screen. And selecting the [SOS] item, the QR code for scanning will be displayed. The following pictures are example of CL4NX screen.
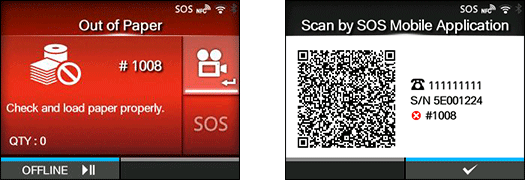
-
Next step, start SOS Smart App and choose [Daily Checkup] then [Read QR code].
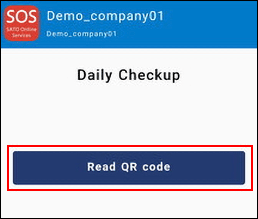
-
QR code reading function is booted and read QR code displayed on the screen of printer.
When finished the reading, it send the information of error to SOS cloud and the diagnostics screen is shown.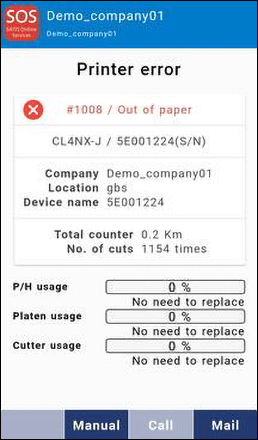
Also Daily Checkup can read NFC tag in case of FX3 and PW2NX series.
Instead of reading the QR code, you can check the same diagnostic result by touching the red circle in the figure with the smartphone.
How to set periodic notification
By setting the mileage, the number of cuts, or the date of the paper, you can display the QR code on the printer screen when the set threshold is reached.
Regularly, by reading the displayed QR code, you can accumulate printer information in the SOS cloud. By doing so, you can check the setting status of the printer, the amount of paper used, and the estimated time to replace expendable parts.
For information on how to change periodic notification, check the web manual below
<CL4NX/CL6NX Operator Manual>
(Input a search keyword [Periodic Notification] (SOS users only))
http://www.manual.sato-global.com/printer/cl4nx_cl6nx/main/index.html
<CL4NX Plus/CL6NX Plus Operator Manual>
(Input a search keyword [Periodic Notification] (SOS users only))
http://www.manual.sato-global.com/printer/clnxplus/main/index.html
<CL4-SXR/CL6-SXR Operator Manual>
(Input a search keyword [Periodic Notification] (SOS users only))
https://www.manual.sato-global.com/printer/cl-sxr/en/main/index.html
<FX3 Operator Manual>
(Input a search keyword [Periodic Notification] (SOS users only))
http://www.manual.sato-global.com/printer/fx3/main/index.html
<LR4NX-FA Operator Manual>
(Input a search keyword [Periodic Notification] (SOS users only))
http://www.manual.sato-global.com/labelmachine/lr4nx-fa/main/index.html
<CT4-LX Operator Manual>
(Input a search keyword [Periodic Notification] (SOS users only))
http://www.manual.sato-global.com/printer/ct4-lx/main/index.html
<S84/86NX Operator Manual>
(Input a search keyword [Periodic Notification] (SOS users only))
https://www.manual.sato-global.com/printer/s8nx/en/main/index.html
<PW4NX Operator Manual>
(Input a search keyword [Periodic Notification] (SOS users only))
https://www.manual.sato-global.com/printer/pw4nx/en/main/index.html
<PW2NX>
* PW2NX series has no periodic notification. Instead of that, you can read information anytime via NFC tag.
When the counter or date reaches the notification setting threshold, an  icon is displayed on the device screen. Please make the printer offline at this time. The following QR code is displayed.
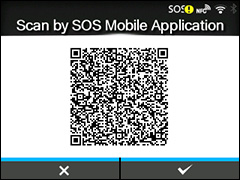
Next step, Start SOS Smart App and choose [Daily Checkup] then [Read QR code]. QR code reading function is booted and read QR code displayed on the screen of printer. When finished the reading, it send the information of error to SOS cloud and the diagnostics screen is shown.
Diagnostics result and how to solve an error
Diagnostics result screen has following items.
-
Error name(Only when an error has occurred.)
-
Model name / Serial number
-
Company, Location, Device name
-
Total counter
-
Number of cuts
-
Printer head usage / replace timing
-
Platen usage / replace timing
-
Cutter usage / replace timing
There are two kinds of solution support functions in the menu at the bottom of the diagnostic screen.
[Manual]: Refer to web manual and solution support.
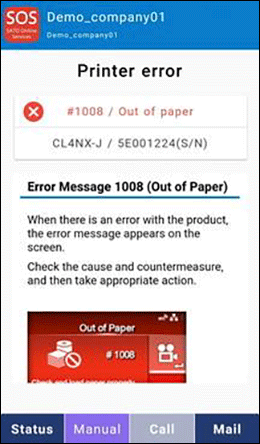
[Mail]: Sending inquiry via E-Mail.
Asset management
About asset management and printer diagnostic
Asset management makes it easy to check the presence of a device by reading the QR code or NFC displayed on the device.
The results are listed on the smartphone screen and reflected on the SOS web system.
-
Reflected results can be exported in tabular format with updated time stamps.
-
Checking the usage status of the device on the terminal.
<NFC readable device: PW208NX>
Tap the [Asset management] button on the home screen.
-
Reading with QR code
Tap QR and read the QR code displayed on the device. -
Reading with NFC
With this screen displayed, touch the NFC part of the printer with your smartphone.
Read information will displayed. Tap line to check how the device is being used.
Show device usage.
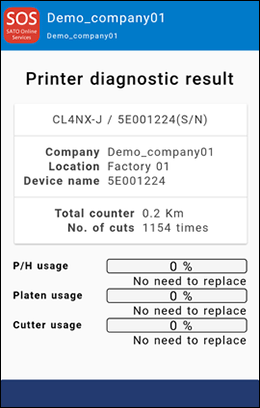
If you need to replace consumable parts, or if you encounter a problem with the device, use the following solutions.
1. Manual: Show printer web manual.
2. Mail: Sends E-Mail from SOS Smart App.
Usage alarm function
If you have not started the application for a long time, the following notification appears. Why don't you take this opportunity to perform your printer diagnosis?
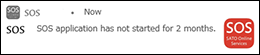
List of Error Message
Learn about errors on your system that are not caused by printer errors.
| # | Message | Description |
|---|---|---|
|
1 |
Due to poor signal quality, it cannot be connected. |
Failed to connect to server. Check your carrier's signal strength and Wi-Fi connection. |
|
2 |
Under maintenance |
The server is performing maintenance. Try running the application again later. |
|
3 |
Please allow camera access. If not, you cannot read the QR code. |
Grant the SOS application access right to the camera on your terminal. Refer to the manual of your terminal for how to set access rights. |
|
4 |
Unexpected error |
An unexpected error has occurred. Please wait for a while and try again. If this message appears repeatedly, please contact our office. |
|
5 |
Printer does not exist in your organization. |
If this message appears, please check the following:. * Has the scanned printer already performed "Add printer"? *Is this printer registered at your location? |
|
6 |
The device has already been registered. |
Appears when a printer is added to a printer that has already been added. Please check the registration status. |
|
7 |
A timeout occurred. |
This message appears when you are logged in from two or more terminals simultaneously under the same account. It also appears if you are logged in to the web system and mobile app at the same time. |
|
8 |
Device is not registered. |
Add printer
Real-time (Real-time and Real time WebSocket)
* Network settings for printer is required.
-
Login to SOS Smart App. For SATO ID AUTH users Please use email address and password used when SATO ID AUTH account was created.
-
Select [Add printer].
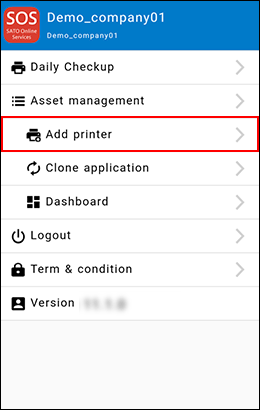
-
At Add printer screen, select [Real-time].
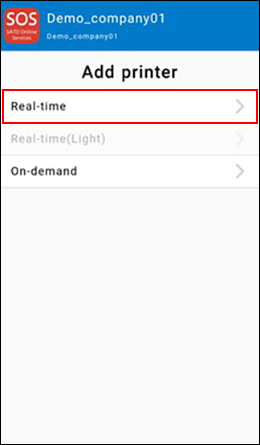
-
At Real-time screen select [QR], and read the QR code displayed on the printer screen.
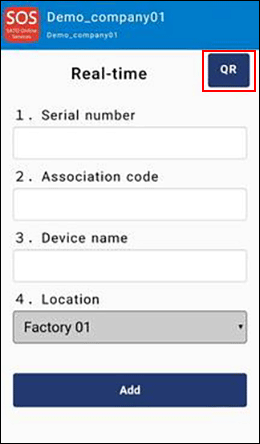
-
Serial number and association code will displayed automatically, then input device name and select Location. After that, tap [Add].
Real-time connection setting is finished.
* Please refer to SOS user manual to know how to display the QR code for "Add printer" on the screen of printer.
Real-time Light (Android only)
* ※Network settings for printer is required for "Real-time Light".
-
Login to SOS Smart App. For SATO ID AUTH users Please use email address and password used when SATO ID AUTH account was created.
-
Select [Add printer].
-
On Add printer screen, select [Real-time(Light)].
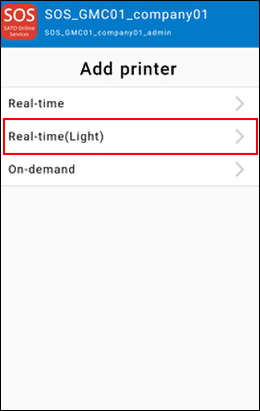
-
On Real-time (Light) screen, touch the NFC tag of printer with smartphone
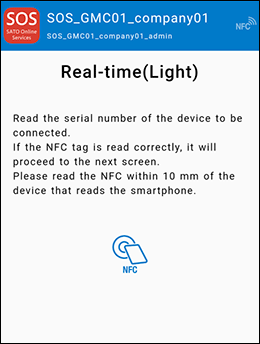
-
Serial number will displayed automatically, then input device name and select Location. After that, tap [Add].
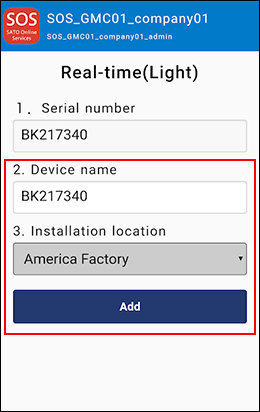
Real-time-Light connection setting is finished.
* Please refer to SOS user manual to know how to operate the printer.
Real-time Light connection (Network connection): CL4NX/CL6NX/LR4NX-FA/PW4NX
Real-time Light connection (Network connection): CL4NX-SXR/CL6-SXR
Real-time Light connection (Network connection): FX3-LX
Real-time Light connection (Network connection): CT4-LX
Real-time Light connection (Network connection): S84NX/S86NX
After connecting with Real-time Light, press and hold the power button to turn off the printer. And turning on the power again, check connection status at device list of SOS.
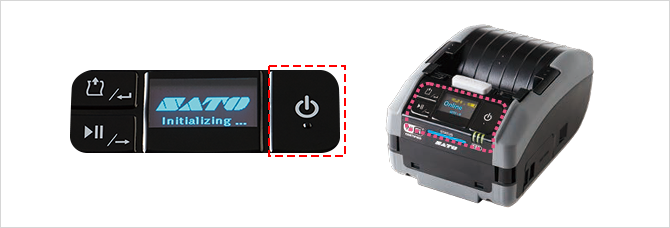
On-demand (Connecting by NFC)
-
Login to SOS Smart App. For SATO ID AUTH users Please use email address and password used when SATO ID AUTH account was created.
-
Select [Add printer].
-
On Add printer screen, select [On-demand].
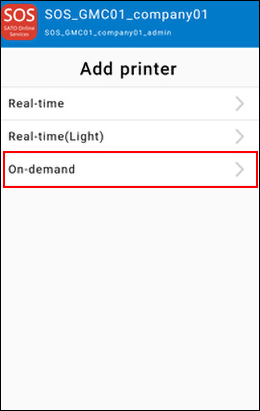
-
When the following screen is displayed, touch the NFC mounting part of the printer with a smartphone to read the printer information.
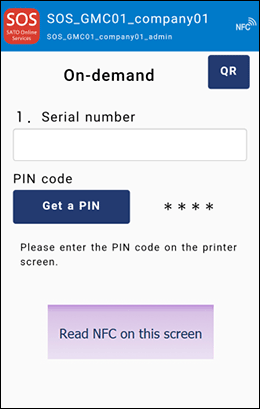
-
Enter the device name and location, and then tap the [Add] button to complete adding the printer by NFC connection.
Perform Daily Checkup after the printer registration is completed.
* Please refer to SOS user manual to know how to operate the printer.
On-demand (Connection by QR code)
-
Operate the printer and display the PIN registration screen on demand. (*)
-
Login to SOS Smart App. For SATO ID AUTH users Please use email address and password used when SATO ID AUTH account was created.
-
Select [Add printer].
-
On Add printer screen, select [On-demand].
-
Tap the [QR] button on the On-Demand screen to load the [QR Code] displayed on the printer screen.
-
When the printer serial number is entered, tap the [Get a PIN] button to display the 4-digit PIN code.
-
When the PIN code is set to the printer, the QR code is displayed on the printer screen.
-
Tap the [QR] button on the On-Demand screen to load the [QR Code] displayed on the printer screen.
-
The association code will be entered. After entering the device name and selecting the location, tap the [Add] button.
Registration of printer authentication using QR connection is completed.
Perform Daily Checkup after the printer registration is completed.

* Please refer to SOS user manual to know how to operate the printer.
Dashboard
Device list (Check an added printer)
launch the SATO Online Services app from the SOS Smart App and display the device list. This is useful to verify that the printer has been added correctly. Tap [Dashboard] button on the screen.ID AUTH user cannot view the dashboard. Please use Web site.
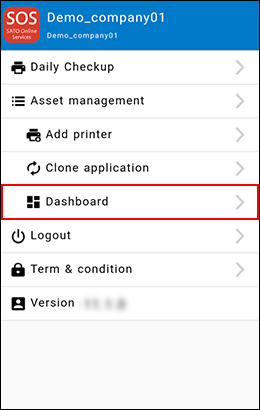
The device list of the SATO Online Services application is displayed, taking over the login information of the SOS Smart App.
Tap details to display the device detail screen.
You can check the detailed information of the device.
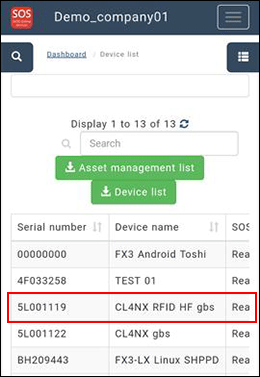
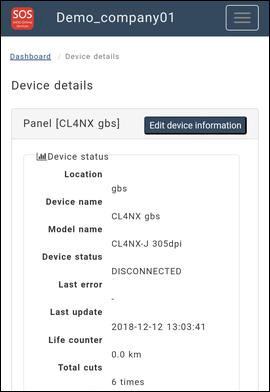
To close the dashboard screen, use the  button in the upper right corner of the screen or the Back key on your mobile device.
Displaying and printing the QR Code for Daily Checkup
Printers connected via QR code can display a QR code that represents status information.
Display the QR Code: CL4NX/CL6NX/LR4NX-FA
-
Push the power button on the control panel until the LED lights up in blue and turn on the printer. Then press
left key or key and set a printer to "OFFLINE". -
Press
Enter Key. -
Select [Settings] > [Interface] > [Network] > [Services] > [Online Services].
-
Ensure that [SOS Mode] is set to [On-Demand].
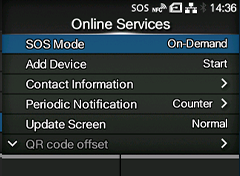
- Select [Update Screen] > [Print]
-
Select [Daily Checkup (or, SOS update)].
-
The QR code is displayed on the printer screen.
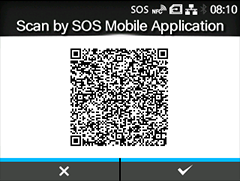
Scan this QR code using the Daily Checkup (Printer Diagnosis) feature in the SOS Smart App (mobile app).
To print it, press the right soft key on this screen to print a label containing the QR code.
Adjust the QR code printing position on the printer label
If you need to adjust the printing position of the QR code on the label, you can do so from the [QR code offset] option in the [Online Services] menu.

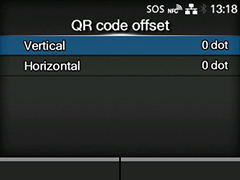
To print a QR code, you need paper that is at least 33 mm in length and 33 mm in width, excluding the backing paper.
Display the QR code: CL4-SXR/CL6-SXR
-
Press and hold the power button on the control panel to turn on the printer. Press the Home button and open the settings screen from the menu.
-
Select [Settings] > [Cloud Services] > [SATO Online Services].
-
Check that [Mode] is set to [On-demand].

-
Select [Daily Checkup]
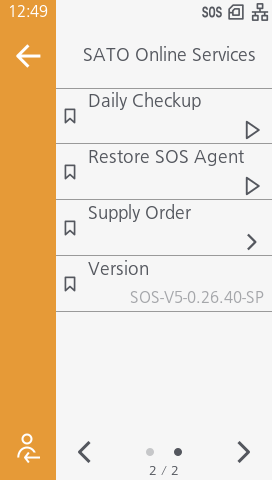
-
The QR code is displayed on the printer screen.
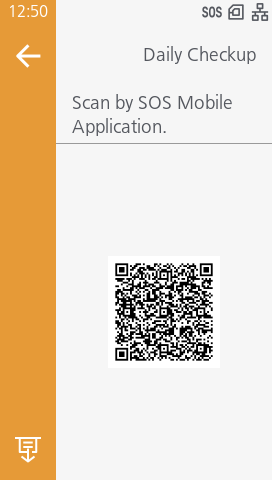
Scan this QR code using the Daily Checkup (Printer Diagnosis) feature in the SOS Smart App (mobile app).
To print it, tap the "Print" icon at the bottom left of the screen.
Adjust the QR code printing position on the printer label
If you need to adjust the printing position of the QR code on the label, you can do so from the [QR code offset] option in the [Online Services] menu.
To print a QR code, you need paper that is at least 33 mm in length and 33 mm in width, excluding the backing paper.
Display the QR code: CT4-LX
-
Press and hold the power button on the control panel to turn on the printer. Press the Home button and open the settings screen from the menu.
-
Select [SETTINGS] > [Interface] > [Network] > [Services] > [Online Services].
-
Ensure that [SOS Mode] is set to [On-Demand].
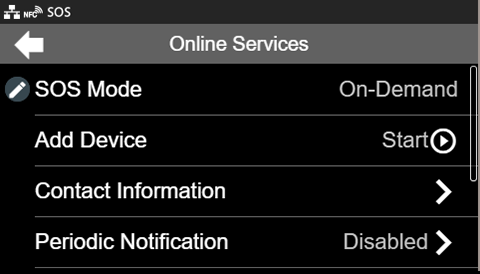
- Select [PRINT] in the [Update Screen].
-
Select [Daily Checkup (or, SOS update)].
-
The QR code is displayed on the printer screen.
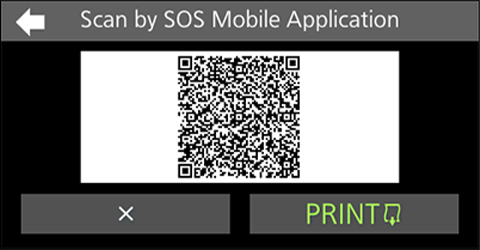
Scan this QR code using the Daily Checkup (Printer Diagnosis) feature in the SOS Smart App (mobile app).
To print it, tap the [PRINT] at this screen.
Adjust the QR code printing position on the printer label
If you need to adjust the printing position of the QR code on the label, you can do so from the [QR code offset] option in the [Online Services] menu.
To print a QR code, you need paper that is at least 33 mm in length and 33 mm in width, excluding the backing paper.
Display the QR code: FX3-LX
-
Press and hold the the power button and turn on the printer. Then tap SOS Agent on the home screen and ensure that [SOS Mode] is set to [On-Demand].
-
Select [Daily Checkup (or, SOS update)].
-
The QR code is displayed on the printer screen.
Scan this QR code using the Daily Checkup (Printer Diagnosis) feature in the SOS Smart App (mobile app).
To print it, tap the "PRINT" at this screen.
When adjusting the position of a QR code on a printed label
If you need to adjust the printing position of the QR code on the label, you can do so from the Pitch menu on the QR code display screen.
To print a QR code, you need paper that is at least 33 mm in length and 33 mm in width, excluding the backing paper.
FAQ
SOS Web App
If you forget your login password
Please reset your password by following the instructions in the Login Information section of this manual. Kindly note that, for security reasons, our company is unable to view or confirm your current password.
Some menus or buttons described in this manual are not displayed
Some of the functions are provided only to the customers who have made a maintenance support agreement on the printer with our company.
For details of the maintenance support, please feel free to contact our support desk described at the end of this manual.
Some functions do not work even if operated exactly as the manual says
Some functions may not operate correctly even when used exactly as described in the manual. Temporary errors can occur due to network conditions or other factors, so please try the operation again.
Additionally, certain functions—such as the screenshot capture feature on the Device Details screen—may not be supported depending on the printer model or firmware version.
If you need further clarification or assistance, please feel free to contact our support desk.
Cannot register or edit the device
Depending on the SOS user permissions assigned to you, you may only have access to view the screen without the ability to register or edit devices.
Please contact the person responsible for SOS user management within your company to review or update your access permissions.
SOS Smart App
Is the SOS Smart app free?
Yes, anyone can use it for free, but if you are not logged in with an SOS account, the function is limited. Please contact your local SATO office regarding your SOS account.
Others
What is the difference between Real-time Light connection and Real-time connection?
Real-time Light connection and Real-time connection differ in their specifications.
With Real-time Light connection, the status is basically updated every 60 minutes. Therefore, if accurate and timely status information is important, Real-time connection should be recommended.
The specifications of Real-time Light connection are as follows.
<Printer Behavior>
- When the printer starts up, it sends an initial message to SOS Cloud (the status at that time)
- After startup, the printer sends a periodic message to SOS Cloud every 60 minutes (the status at that time).
- When an error occurs on the printer, it sends an error message to SOS Cloud (ERROR)
- When an error is cleared on the printer, it sends an error recovery message to SOS Cloud (the status at that time).
<SOS Cloud Behavior>
- If no message is received from the printer for 60 minutes, the status is updated to DISCONNECTED.
The specifications of Network Connection are as follows.
<Printer Behavior>
- When the printer starts up, it sends an initial message to SOS Cloud (the status at that time)
- After startup, the printer sends a periodic message to SOS Cloud every 60 minutes (the status at that time).
- When an error occurs on the printer, it sends an error message to SOS Cloud (ERROR)
- When an error is cleared on the printer, it sends an error recovery message to SOS Cloud (the status at that time).
- When the Online button is pressed on the printer, it sends a message to SOS Cloud (ONLINE)
- When the Offline button is pressed on the printer, it sends a message to SOS Cloud (OFFLINE)
- When the printer enters sleep mode, it sends a message to SOS Cloud (POWERSAVE).
<SOS Cloud Behavior>
- If no message is received from the printer for 60 minutes, the status is updated to DISCONNECTED.
- When communication with the printer is disconnected, the status is updated to DISCONNECTED.