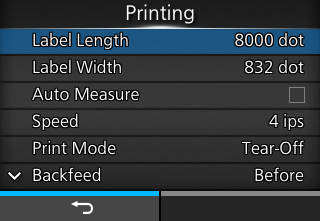
2.
3. Press thebutton to display the Offline screen.
4. Press thebutton again to show the Online screen.
•
◦
• If [Protocol] in the [Applications] menu is changed to [SZPL], then [Auto Measure] is enabled and executes automatically.
• If you have selected [Dispenser] or [Linerless tearoff] in the [Print Mode] menu, then print speed has a maximum of 4 ips (inches/second) (101.6 mm/sec).
• When [Quality Priority] or [Balance] has been selected in the [Print Control] menu, printing may not be done at the speed set in these settings, depending on the conditions while printing.Tear-Off (Function for feeds the printed media for removal)
•After printing and dispensing, backfeed the front part of the next media to the print head position.
• If you have selected [Dispenser] in the [Print Mode] menu, only [Gap] and [I-Mark] will be available.
• If you have selected [Linerless tearoff] in the [Print Mode] menu, only [I-Mark] and [None] will be available.
• To further fine tune the print darkness, set [Printing] > [Advanced] > [Adjustments] > [Darkness Adjust].
•
4. Select the type of sensor to adjust, and then press thebutton (START).
5.
6.Display the Offline screen, press thebutton (FEED), and then confirm that the media is fed correctly.
• If the media is not fed correctly after executing [Auto-calibration], contact your SATO reseller or technical support.
4.
5. Press the/
buttons to change the [Emit] value until the [Sensor] value is below 0.5 (V). Set the [Emit] value as low as possible.
6. If the [Sensor] value does not decrease below 0.5 after you changed the [Emit] value, press the/
buttons to change the [Receive] value.
7. Take a note of the [Sensor] value from the above procedure. This is the "Low" level value for the Gap sensor.
3.If the difference between the "High" and the "Low" levels is less than 1.0, adjust the [Emit] and [Receive] values so that the difference is more than 1.0, or adjust the "Low" level (voltage) of the Gap sensor again.
4. If both "High" and "Low" levels comply with the standard value, press thebutton (
) to confirm the value.
2.
3. Press the/
buttons to change the [Slice level] value. Set the [Slice level] to the level calculated in step 1.
4.
•
3.
4. Press the/
buttons to change the [Emit] value until the [Sensor] value is below 0.5 (V). Set the [Emit] value as low as possible.
5. If the [Sensor] value does not decrease below 0.5 after you changed the [Emit] value, press the/
buttons to change the [Receive] value.
6. Take a note of the [Sensor] value from the above procedure. This is the "Low" level value for the I-mark sensor.
1.
3.If the difference between the "High" and the "Low" levels is less than 1.0, adjust the [Emit] and [Receive] values so that the difference is more than 1.0, or adjust the "Low" level (voltage) of the I-mark sensor again.
4. If both "High" and "Low" levels comply with the standard value, press thebutton (
) to confirm the value.
2.
3. Press the/
buttons to change the [Slice level] value. Set the [Slice level] to the slice level calculated in step 1.
4.
•
The setting range is from 1 to 999999.
•
• The changes to this setting are linked and are changed with each of the test print settings in the [Tools] > [Test Print] menu.
•
•
• The changes to this setting are linked and are changed with each of the test print settings in the [Tools] > [Test Print] menu.
• The changes to this setting are linked and are changed with each of the test print settings in the [Tools] > [Test Print] menu.However, if [Feed At Power On] is enabled, the product feeds the media when it is powered on and changes to Online mode.Also, if [Auto Measure] is enabled, the product feeds the media when it changes to Online mode for the first time after being powered on.However, if [Auto Measure] is enabled, the product feeds the media when it changes to Online mode for the first time after being powered on.
•If you have selected [Enabled] in [Reprint], you can press thebutton (REPRINT) on the Online screen to print the previous data again.
Adjust the media stop position when [Sensor Type] is set to [None]. This adjustment also sets the blank amount from the media stop position.
•