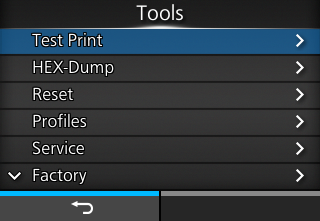
[Tools] Menu
[Test Print]
[Factory]
2.
Press the button () to start a test print. Press the button () again to pause printing.
The options are [Large] (101.6 mm (4”) ) and [Small] (55 mm (2.17”)).
The settings in [Pitch], [Offset], and [Darkness Adjust] are linked and are changed with the settings in the [Printing] > [Advanced] > [Adjustments] menu.
[Configure List]
2.
Press the button () to start a test print. Press the button () again to pause printing.
The settings in [Pitch], [Offset], and [Darkness Adjust] are linked and are changed with the settings in the [Printing] > [Advanced] > [Adjustments] menu.
[Configure QR]
2.
Press the button () to start a test print. Press the button () again to pause printing.
The settings in [Pitch], [Offset], and [Darkness Adjust] are linked and are changed with the settings in the [Printing] > [Advanced] > [Adjustments] menu.
[Paper Sensor]
When you do a test print for the media sensor, the print mode automatically changes to the [Continuous] mode. Close the dispenser unit before doing a test print.
2.
Press the button () to start the test print. Press the button () again to pause the print.
The necessary media width is 55 mm (2.17") for [Small].
The settings in [Pitch], [Offset], and [Darkness Adjust] are linked and are changed with the settings in the [Printing] > [Advanced] > [Adjustments] menu.
[BD Address]
2.
Press the button () to start a test print. Press the button () again to pause printing.
The settings in [Pitch], [Offset], and [Darkness Adjust] are linked and are changed with the settings in the [Printing] > [Advanced] > [Adjustments] menu.
[Head Check]
2.
Press the button () to start the head check print. Press the button () again to pause the print.
The settings in [Pitch], [Offset], and [Darkness Adjust] are linked and are changed with the settings in the [Printing] > [Advanced] > [Adjustments] menu.
[HEX-Dump]
[Hex Dump Mode]
[Buffer Dump]
[Log Files]
[Copy]
[Remove]
2.
Select the file to delete and press the button. A check mark appears on the right side of the file name.
3.
After you select the file, press the button () to delete the selected file.
When [Hex Dump Mode] is set to [Enabled], it may take some time before the files appear.
[Print]
2.
Select the file to print and press the button to perform the dump print.
When [Hex Dump Mode] is set to [Enabled], it may take some time before the files appear.
[Reset]
[Select]
[Data]
[Data & Settings]
[Settings]
[Profiles]
[Delete]
[Load]
[Save]
[Start with]
[Service]
[Factory]
[Wi-Fi Site Survey]
[Install Certificates]
3.
Go to the [Settings] > [Tools] > [Install Certificates] menu.
[Delete Certificates]
[Clone]
[Logging Function]
[Enabled]
[Save]
[Remove]
Press the button () to delete the log data.
[Startup Guide]

Back to top