S84NX/86NX Operator Manual
SATO

MENU

MENU

  • TOP (Table of Contents)
  • Getting Started
  • Searching from Category
  • Searching by Function Names
  • Searching According to What You Want to Do
  • Troubleshooting
  • Support and Warranty
Close
TOP > Adjusting the Product > Adjusting the Ribbon Tension Balance
Adjusting the Ribbon Tension Balance
If the ribbon is not spread smoothly over the print head, print voids will occur at the point of the ribbon fold. Typically, this is the result of the axis of the ribbon spindle, print head and the ribbon adjustment plate not being perfectly parallel.
 
Required tool
•
Phillips screwdriver
The adjustment procedure for the ribbon tension is as follows:
1.
Open the top cover of the product.
2.
Turn the head lock lever (1) clockwise to unlock the print head.
3.
Find the two screws on the front of the print head assembly.
4.
Loosen the two screws attached to the ribbon adjustment plate.
Do not remove the screws.
5.
Adjust the ribbon adjustment plate (2) as shown below.
Adjust the left side of the plate upward 
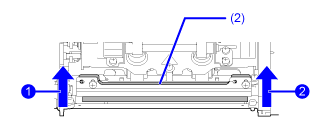
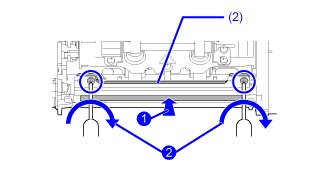
when a wrinkle occurs on the right.
Adjust the right side of the plate upward when a wrinkle occurs on the left.
6.
Hold the ribbon adjustment plate (2) in the set position and tighten the two screws .
7.
Perform a test print to check the printing quality.
The ribbon must not be wrinkled or meander.
8.
Repeat the procedure from steps 1 through 6 until the ribbon tension is even on both sides.

Related Topics
[Test Print]

Back to top

© 2022 SATO Corporation