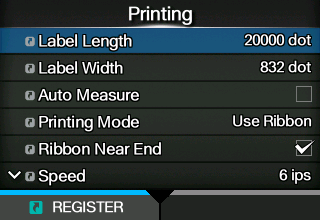
[Printing] Menu
[Label Length]
[Label Width]
[Auto Measure]
The Auto Measure function can be performed when [Sensor Type] is set to [Gap] or [I-Mark].
2.
Set [Auto Measure] to [Enabled].
3.
Press the button or button to show the Online or Offline screen.
6.
When you press the 
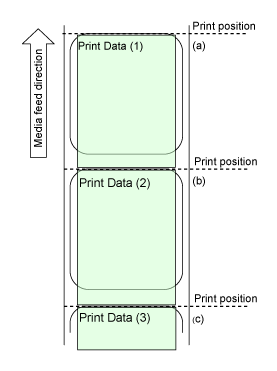
button, the product feeds two pieces of label and measures the label length.
When you enable [Auto Measure], this function executes in the following conditions:
If [Protocol] in the [Applications] menu is changed to [SZPL], then [Auto Measure] is enabled and executes automatically.
[Printing Mode]
[Ribbon Near End]
[Speed]
[Sensor Type]
If you have selected [Dispenser] or [Dispense & Print] in the [Print Mode] menu, only [Gap] and [I-Mark] will be available.
If you have selected [Linerless] in the [Print Mode] menu, only [None] will be available.
[Micro Label Print Mode]
[Micro Label Print Mode]
[Auto Label Length Detection]
[Label Length Averaging Count]
Set the number of labels measured to be used for averaging the automatically set label length when the [Micro Label Print Mode] is set to [Enabled] and the [Auto Label Length Detection] is set to [Enabled].
[Label Length]
[Print Mode]
[Backfeed]
[Backfeed]
[Backfeed Start]
[Backfeed Timing]
Available only if you have selected [Controled] in the [Backfeed] menu and [TIME] in the [Backfeed Start] menu.
[Darkness]
To further fine tune the print darkness, set [Printing] > [Advanced] > [Adjustments] > [Darkness Adjust].
[Imaging]
[Advanced]
[Calibrate]
[Auto-calibration]
[Auto-calibration] is not available if you have selected [Linerless] in the [Print Mode].
6.
Press the / buttons to select the type of sensor to be adjusted.
7.
Press the button or button.
8.
When the confirmation screen appears, press the 
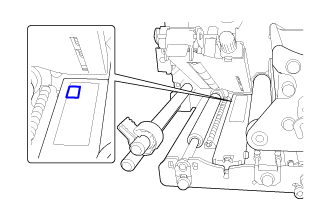
button to start the sensor adjustment.
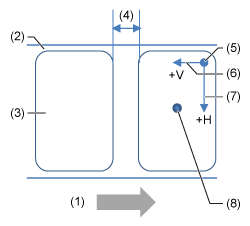
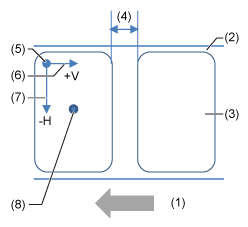
10.
Set to Offline mode. Press the button to confirm that the media is fed correctly.
If the media is not fed correctly after doing [Auto-calibration], contact your SATO reseller or technical support.
[GAP Levels]
4.
Select the [GAP Levels] in the [Calibrate] menu and press the button.
5.
Press the / buttons to change the [Emit] value until the [Sensor] value is below 0.5 (V). Set the [Emit] value as low as possible.
6.
If the [Sensor] value does not decrease below 0.5 after you changed the [Emit] value, press the / buttons to change the [Receive] value.
7.
Take a note of the [Sensor] value from the above procedure. This is the "Low" level value for the Gap sensor.
3.
Check the [Sensor] value.
If the difference between the "High" and the "Low" levels is less than 1.0, adjust the [Emit] and [Receive] values so that the difference is more than 1.0, or adjust the "Low" level (voltage) of the Gap sensor again.
[GAP Slice Level]
2.
Select the [GAP Slice Level] in the [Calibrate] menu and press the button.
3.
Press the / buttons to change the [Slice level] value. Set the [Slice level] to the level calculated in step 1.
4.
Press the button to confirm the value.
If you set the [Slice level] to 0.0 (V), the product sets the slice level automatically.
[I-Mark Levels]
3.
Select the [I-Mark Levels] in the [Calibrate] menu and press the button.
4.
Press the / buttons to change the [Emit] value until the [Sensor] value is below 0.5 (V). Set the [Emit] value as low as possible.
5.
If the [Sensor] value does not decrease below 0.5 after you changed the [Emit] value, press the / buttons to change the [Receive] value.
6.
Take a note of the [Sensor] value from the above procedure. This is the "Low" level value for the I-mark sensor.
3.
Check the [Sensor] value.
If the difference between the "High" and the "Low" levels is less than 1.0, adjust the [Emit] and [Receive] values so that the difference is more than 1.0, or adjust the "Low" level (voltage) of the I-mark sensor again.
[I-Mark Slice Level]
2.
Select the [I-Mark Slice Level] in the [Calibrate] menu and press the button.
3.
Press the / buttons to change the [Slice level] value. Set the [Slice level] to the slice level calculated in step 1.
4.
Press the button to confirm the value.
If you set the [Slice level] to 0.0 (V), the product sets the slice level automatically.
[Head Check]
[Head Check Mode]
[Every Page]
Appears if you have selected [Every Page] in the [Head Check Mode] menu.
[Check Media Size]
[Adjustments]
[Offset]
[Pitch]
[Pitch Offset]
[Darkness Adjust]
[Start Online]
[Feed After Error]
However, if [Feed At Power On] is set to [Enabled], the product feeds the media when it is powered on and changes to Online mode.
Also, if [Auto Measure] is enabled, the product feeds the media when it changes to Online mode for the first time after being powered on.
[Feed At Power On]
However, if [Auto Measure] is enabled, the product feeds the media when it changes to Online mode for the first time after being powered on.
[Finisher Feed]
[Feed Speed]
[Sync with Print Speed]
[Feed Speed]
[Backfeed Speed]
[Paper End]
[Sensor Type]
[Paper End Distance]
[Head Base Position] (S84NX Only)
[Prioritize]
[Reprint]
If you have selected [Enabled] in [Reprint], you can press the button ([REPRINT]) on the Online screen to print the previous data again.
[Print End Position]
[Calendar Setting Mode]
[Calendar Reprint]
[Day of Week Code]
[Sunday] to [Saturday]
[Month Code]
[January] to [December]
[Case Format]
[Calendar Check]
By selecting [Enabled], a calendar error occurs when time is judged to be incorrect, such as due to a dead battery, etc.
[Work Shift Setting Mode]
[1] to [3]
[Shift Code]
[Shift Time]
Available only if you have selected [Enabled] in the [Shift Code] menu.
[Shift Name]
Available only if you have selected [Enabled] in the [Shift Code] menu.
[Ribbon Tension Adjustment]
[Printing Operations]
[Throughput Mode]
[Extended Backfeed Operation]
[Page Clipping Mode]
The print position moves according to the values set in the [Pitch] or [Pitch Offset] in the [Printing] > [Advanced] > [Adjustments] menu.
[Feed Offset]
[Backfeed Offset]
Appears only if you have selected [Linerless] in the [Print Mode] menu.
When [Printing Mode] is set to [Use Ribbon], the length of label backfeed needs to be under 30 mm (1.18"). If it is over 30 mm (1.18"), the end of the ribbon may be falsely detected.

Back to top