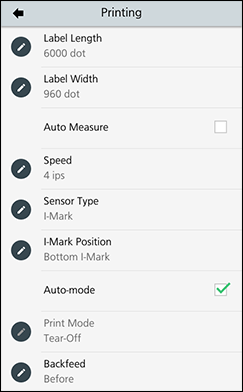
[Printing] Menu
[Label Length]
[Label Width]
[Auto Measure]
The Auto Measure function can be performed when [Sensor Type] is set to [Gap] or [I-Mark].
2.
Enable [Auto Measure].
3.
Press the / (Standby/Home) button to show the Home screen.
6.
When you press the / 
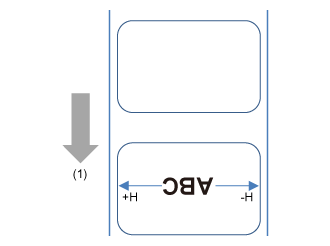
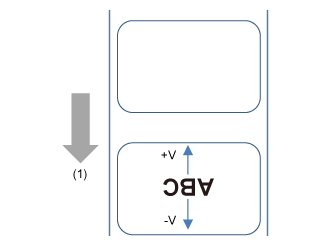
(Standby/Home) button again, the product feeds two pieces of label and measures the label length.
When you enable [Auto Measure], this function executes in the following conditions:
When [Protocol] in the [Applications] menu is changed to [SZPL], [Auto Measure] is enabled and executed automatically.
[Speed]
When [Speed] is set to more than 5 ips (127 mm/sec) while the product is connected to an AC power supply, it changes to 4 ips (101.6 mm/sec) if the battery starts to be used.
If [Linerless tearoff] is selected in the [Print Mode] menu and you use media that is 20 to 23 mm (0.79 to 0.91") long, set the print speed to 5 ips (127 mm/sec) or less.
[Sensor Type]
If [Dispenser] is selected in the [Print Mode] menu, only [Gap] and [I-Mark] will be available.
If you have selected [Linerless tearoff] or [Linerless cutter] in the [Print Mode] menu, only [None] and [I-Mark] will be available.
[I-Mark Position]
Appears only if you have selected [I-Mark] in the [Sensor Type] menu.
Custom I-mark allows using labels where the I-mark position does not correspond with [Center I-Mark], [Bottom I-Mark] and [Top I-Mark]. With the [I-Mark Offset] setting, you can set the position of the I-mark. The stop position and the printed image will be adjusted accordingly but the backfeed distance will not change.
If you have selected [Cutter], [Partial cutter], [Linerless cutter] or [Linerless tearoff] in the [Print Mode] menu, [Center I-Mark] is not available.
[Label Size]
[I-Mark Offset]
[Auto-mode]
[Print Mode]
You cannot set the [Print Mode] if [Auto-mode] is enabled.
[Backfeed]
[Backfeed] is applicable only when the print mode is set to something other than continuous mode.
If you have selected [Tear-Off], [Partial cutter], [Linerless tearoff] or [Linerless cutter] in the [Print Mode], only [Before] is available.
If you have selected [Continuous] in the [Print Mode], only [None] is available.
[Cutter Type]
[Eject Cut]
[Darkness]
To further fine tune the print darkness, set [Printing] > [Advanced] > [Adjustments] > [Darkness Adjust].
[Imaging]
[Advanced]
[Calibrate]
[Auto-calibration]
For [Gap + I-Mark]/[Gap]/[I-Mark]
For [Dispenser]
For [Linerless]
5.
When the confirmation screen appears, tap 
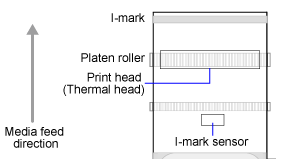
to start the sensor adjustment.
7.
Set to Offline mode. Tap [FEED] to confirm that the media is fed correctly.
If the media is not fed correctly after [Auto-calibration], contact your SATO reseller or technical support.
[GAP Levels]
4.
Tap [GAP Levels] in the [Calibrate] menu.
5.
Change the [Emit] value until the [Sensor] value is below 0.5 (V). Set the [Emit] value as low as possible.
6.
If the [Sensor] value does not decrease below 0.5 after you changed the [Emit] value, change the [Receive] value.
7.
Take a note of the [Sensor] value from the above procedure. This is the "Low" level value for the Gap sensor.
3.
Check the [Sensor] value.
If the difference between the "High" and the "Low" levels is less than 1.0, adjust the [Emit] and [Receive] values so that the difference is more than 1.0, or adjust the "Low" level (voltage) of the Gap sensor again.
[GAP Slice Level]
2.
Tap [GAP Slice Level] in the [Calibrate] menu.
3.
Change the [Gap Slice Level] value. Set the [Gap Slice Level] to the level calculated in step 1.
4.
Tap to confirm the value.
If you set the [Gap Slice Level] to 0.0 (V), the product sets the slice level automatically.
[I-Mark Levels]
3.
Tap [I-Mark Levels] in the [Calibrate] menu.
4.
Change the [Emit] value until the [Sensor] value is below 0.5 (V). Set the [Emit] value as low as possible.
5.
If the [Sensor] value does not decrease below 0.5 after you changed the [Emit] value, change the [Receive] value.
6.
Take a note of the [Sensor] value from the above procedure. This is the "Low" level value for the I-mark sensor.
3.
Check the [Sensor] value.
If the difference between the "High" and the "Low" levels is less than 1.0, adjust the [Emit] and [Receive] values so that the difference is more than 1.0, or adjust the "Low" level (voltage) of the I-mark sensor again.
[I-Mark Slice Level]
2.
Tap [I-Mark Slice Level] in the [Calibrate] menu.
3.
Change the [I-Mark Slice Level] value. Set the [I-Mark Slice Level] to the slice level calculated in step 1.
4.
Tap to confirm the value.
If you set the [I-Mark Slice Level] to 0.0 (V), the product sets the slice level automatically.
[Dispenser Levels]
2.
Tap [Dispenser Levels] in the [Calibrate] menu.
3.
Change the [Emit] value until the [Sensor] value is below 0.5 (V).
Set the [Emit] value as low as possible.
4.
If the [Sensor] value does not decrease below 0.5 after you changed the [Emit] value, change the [Receive] value.
5.
Take a note of the [Sensor] value from the above procedure. This is the "Low" level value for the dispenser sensor.
3.
Check the [Sensor] value.
If the difference between the "High" and the "Low" levels is less than 1.0, adjust the [Emit] and [Receive] values so that the difference is more than 1.0, or adjust the "Low" level (voltage) of the dispenser sensor again.
[Linerless Levels]
2.
Tap [Linerless Levels] in the [Calibrate] menu.
3.
Change the [Emit] value until the [Sensor] value is below 0.5 (V).
Set the [Emit] value as low as possible.
4.
If the [Sensor] value does not decrease below 0.5 after you changed the [Emit] value, change the [Receive] value.
5.
Take a note of the [Sensor] value from the above procedure. This is the "Low" level value for the linerless sensor.
3.
Check the [Sensor] value.
If the difference between the "High" and the "Low" levels is less than 1.0, adjust the [Emit] and [Receive] values so that the difference is more than 1.0, or adjust the "Low" level (voltage) of the linerless sensor again.
[Head Check]
[Head Check Mode]
[Every Page]
Appears only if you have selected [Every Page] in the [Head Check Mode] menu.
[Check Media Size]
[Adjustments]
[Offset]
[Pitch]
[Darkness Adjust]
[Start Online]
This setting is linked to the [Standalone] > [Initial Display at Start-Up] menu. When [Start Online] is enabled, [Application] is enabled for [Initial Display at Start-Up]. When [Start Online] is disabled, [Home Screen] is enabled for [Initial Display at Start-Up].
[Feed After Error]
However, if [Feed At Power On] is enabled, the product feeds the media when it is powered on and changes to Online mode.
Also, if [Auto Measure] is enabled, the product feeds the media when it changes to Online mode for the first time after being powered on.
[Feed At Power On]
Also, if [Auto Measure] is enabled, the product feeds the media when it changes to Online mode for the first time after being powered on.
[Finisher Feed]
[Paper End]
[Prioritize]
[Reprint]
If you enabled [Reprint], you can tap [REPRINT] on the Online screen to print the previous data again.
[Print End Position]
Adjust the media stop position or cut position when the [Sensor Type] is set to [None]. This adjustment also sets the blank amount from the media stop position.

Back to top